All My Love Chocolate Wraps

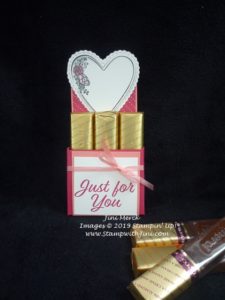
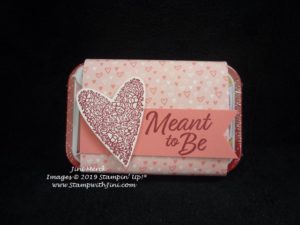
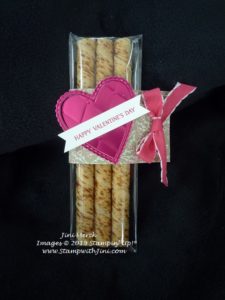
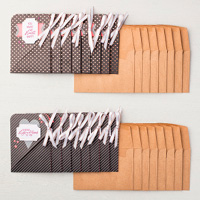
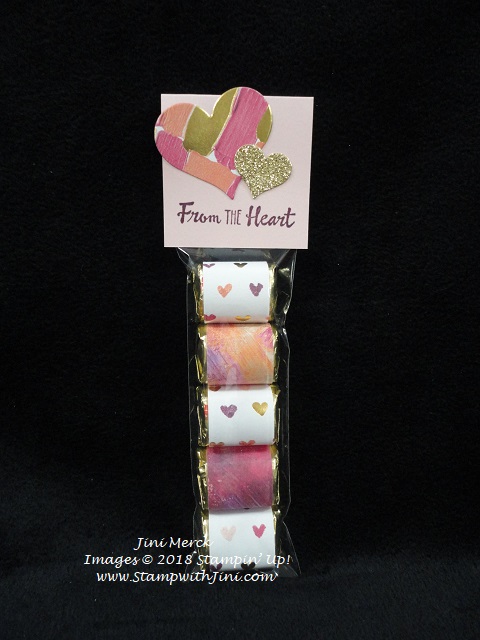
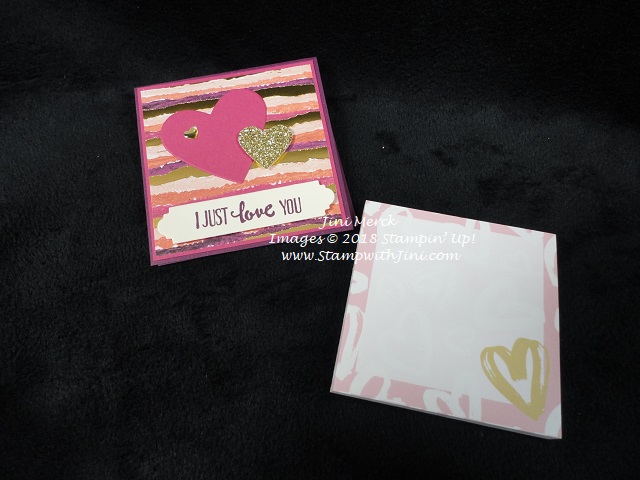
Today’s project is a quick and easy treat that you can make last minute for Valentine’s Day. I whipped up a batch for my team meeting today.

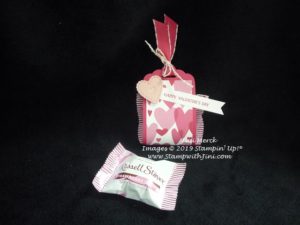
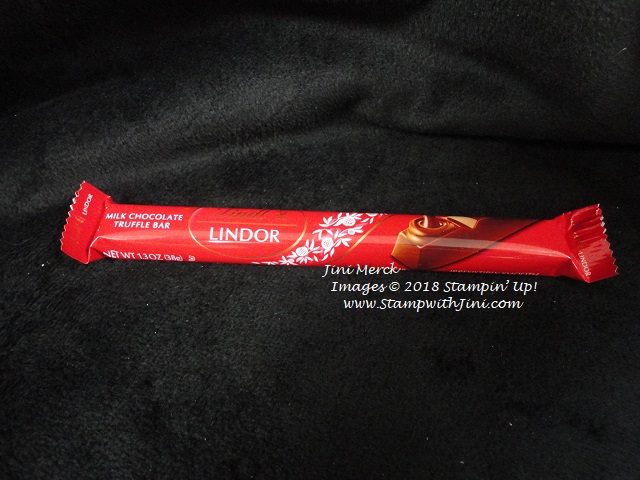
They were a lot of fun to make – and I hear the little chocolates are yummy too.

I’ve got a video tutorial for you.

All My Love Chocolate Wrap Video Tutorial

Along with this PDF with step by step directions.

All My Love Chocolate Wrap Tutorial PDF

Enjoy!

Supplies:

Stamp Set: Forever Lovely (148624)

Inks: Lovely Lipstick (147140/147179)

Paper: All My Love Designer Series Paper (148576), Blushing Bride (131198), Lovely Lipstick (146970), and Whisper White Card stock (100730)

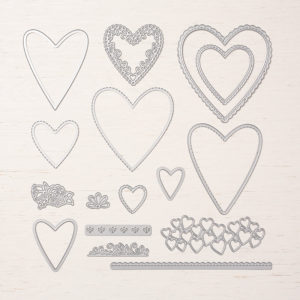
Accessories: Be Mine Stitched Framelits Dies (148527),h All My Love Ribbon Combo Pack (148584), Heart Epoxy Droplets (148583), Scallop Tag Topper Punch (133324), Triple Banner Punch (138292) and Silver & Petal Pink Baker’s Twine (146288)

Click here to order your Stampin’ Up! Products online 24/7! (US only)

Shop at my Online Store and use Host Code H3Z3YTVZ

Click Here to learn more about using the Hostess Code If you order Online make sure your profile information is up to date and you’ve allowed me to contact you (If you chose no contact in the past you’ll need to call 1-800-Stamp Up to have them change your profile for you.)

Meant to Be Merci Treat Holder Tutorial

Merci chocolates are so yummy that I thought I’d create some treat holders to share them – plus it stops me from eating them since they seem to call my name! So I reached for the Meant to Be Bundle and got to work.

Here is what I came up with

This little treat holder holds 3 Merci Chocolates – a perfect size for just a little taste of chocolate when you want it.

I love the way the heart shape is at the top without any card stock behind it. Want to know how I made them? Here’s my video tutorial.

Meant to Be Merci Treat Holder Video Tutorial

And how about a PDF you can print? Do you find these helpful to go along with the video? Why not leave me a comment and let me know?

Meant to be Merci Treat Holder Tutorial PDF

Enjoy!

Supplies:

Stamp Set: Meant to Be (*148626)

Inks: Lovely Lipstick Classic Ink (147140), Memento Tuxedo Black Ink Pad (132708), Lovely Lipstick (147281) and Soft Sea Foam Stampin’ Blends Combo Packs (148069)

Paper: All My Love Designer Series paper (148576), Flirty Flamingo (141416),  Lovely Lipstick,and Whisper White Card stock (100730)

Accessories: Be Mine Stitched Framelits Dies (*148527), All My Love Ribbon Combo Pack (148584), and Simply Scored Scoring Tool (122334)

*Meant to Be Bundle (150587)

Click here to order your Stampin’ Up! Products online 24/7! (US only)

Shop at my Online Store and use Host Code H3Z3YTVZ

Click Here to learn more about using the Hostess Code

Meant to Be Tin Wrap

Valentine’s Day is right around the corner and I’ve been having fun creating little treats for my fellow stampers, family and friends. Today’s Tin Wrap is quick and easy to do – so you can make lots of them quickly! A plus for Valentine’s Day treats.

I thought this sentiment was a fun twist on the mints – get it? Meant….Mint…. lol

The tins I’ve used came from my local discount store and are cinnamon, but they are a standard size tin so you can use your favorite mints or tin.

Here is a quick Video Tutorial for you

Meant to Be Tin Wrap Video Tutorial

And of course a PDF so you can print it with a complete supply list and step by step directions.

Meant to Be Tin Wrap Tutorial PDF

Enjoy!

Supplies:

Stamp Set: Meant to Be (*148626)

Inks: Cherry Cobbler Classic Ink (147083)

Paper: All My Love Designer Series paper (148576), Flirty Flamingo (141416), and Whisper White Card stock (100730)

Accessories: Be Mine Stitched Framelits Dies (*148527) and Banner Triple Punch (138292)

*Meant to Be Bundle (150587)

Click here to order your Stampin’ Up! Products online 24/7! (US only)

Shop at my Online Store and use Host Code H3Z3YTVZ

Click Here to learn more about using the Hostess Code

Meant to Be

It’s a week of swaps and I’ve received some fabulous ones that I want to share with you this week. So come back often!

Today I’m highlighting Our Meant to Be stamp set and coordinating Be Mine Stitched Framelits Dies. Perfect for Valentine’s Day next month. Check out these wonderful cards using products from the All My Love Suite found on pages 4 – 6 of the 2019 Occasions Catalog.

I really like the sentiments in this set since it includes a great variety like this one we can use to send our friends.

And of course there is the traditional valentine option.

And how about this lovely one that uses the Lace Dynamic Embossing Folder (148530). It is simply beautiful in person with it’s rich deep embossed image.

And how about this non traditional option – done in blues?

And this fun fold

with a pocket inside for a little gift card if desired.

While the Meant to Be Bundle is wonderful for Valentine’s Day, know that you’ll want to include this set of dies in your collection – the heart shapes are wonderful for all kinds of projects. And who doesn’t love a stitched edge?

Supplies:

Stamp Set: Meant to Be (*148626)

Paper: All My Love Designer Series Paper (148576) and All My Love Card stock Pack (148578)

Accessories: Be Mine Stitched Framelits Dies (*148527) and Heart Epoxy Droplets (148583)

*Meant to Be Bundle (150587)

Click here to order your Stampin’ Up! Products online 24/7! (US only)

Shop at my Online Store and use Host Code H3Z3YTVZ

Click Here to learn more about using the Hostess Code If you order Online make sure your profile information is up to date and you’ve allowed me to contact you (If you chose no contact in the past you’ll need to call 1-800-Stamp Up to have them change your profile for you.)

Forever Lovely Valentine Treat

I made today’s project as a little goodie for my team members and put one at everyone’s tables for the Winter Retreat this past weekend. I couldn’t resist these yummy little Creme Filled Wafer Rolls when I saw them and was hoping they were individual wrapped. However, that turned out not to be the case so our 2×8″ Cello Bags to the rescue!

I simply slipped 3 of the little sticks inside and sealed then decorated. I really like how they came together and think they turned out quite elegant with the Lovely Lipstick Foil Sheets. The little heart looks just like a chocolate box since I used the Tufted Embossing Folder. What do you think?

I’ve put a video together for you in case you’d like to make some of these treats too

Forever Lovely Valentine Treat Video Tutorial

And of course, I’ve got a complete supply list below for you along with a PDF tutorial too.

Forever Lovely Valentine Treat PDF

Enjoy!

Supplies:

Stamp Set: Forever Lovely (*148624)

Inks: Lovely Lipstick Classic Ink (147140)

Paper: Grapefruit Grove and Lovely Lipstick Foil Sheets (Sale-a-bration 149712), All My Love Designer Series Paper (148576), and Whisper White Card stock (100730)

Accessories: 2×8″ Cello Bags (141703), Be Mime Stitched Framelits Dies (148527), All My Love Ribbon Combo Pack (148584), Triple Banner Punch (138292) and Tufted Dynamic Embossing Folder (146335)

*Forever Lovely Bundle (150580)

Click here to order your Stampin’ Up! Products online 24/7! (US only)

Shop at my Online Store and use Host Code FFCVWYHC

Click Here to learn more about using the Hostess Code If you order Online make sure your profile information is up to date and you’ve allowed me to contact you (If you chose no contact in the past you’ll need to call 1-800-Stamp Up to have them change your profile for you.)

Sign up HERE for my FREE Newsletter or Get my Blog Posts delivered right to your inbox HERE

How Do You Get a 2019 Occasions Catalog?

Don’t have a Demonstrator? Email me at [email protected] include your name, address, and phone number and I’ll be happy to mail you one.

Sign up HERE for my FREE Newsletter or Get my Blog Posts delivered right to your inbox HERE

Paper Pumpkin Valentine Fun

One of the great things about Paper Pumpkin is the ability to put together great projects quickly and this years Valentine themed kit is no exception.

Not only does it include a wonderful stamp set and ink spot,

but also 16 great cards you can make and give. And who doesn’t love everything that you need coming in one box? Everything except scissors! And good news when you are a Paper Pumpkin subscriber you’ll have access to refills when available too!

Check out this fun video that shows the January kit –

In March Paper Pumpkin will be celebrating it’s 5th Anniversary! Wow, can you believe it? I still remember the excitement of holding that first kit in my hands during the launch at Leadership! And they’ve only gotten better since!!!

If you haven’t tried Paper Pumpkin before it is a great time to do so – The March Kit will include a special treat inside it’s unique anniversary box! And did you know during Sale-a-bration you can earn FREE Sale-a-bration products with a prepaid subscription? Gotta love that, right?

Promotion Details

  • The free gift complements the kit but is not needed to complete the kit.
  • The free gift is exclusive to the March Paper Pumpkin kit and cannot be found anywhere else.
  • The free gift is a crafting product with a wide range of use that can be used on a variety of paper crafting projects.
  • The free gift holds an approximate retail value of $6-$8 when compared to similar products offered by Stampin’ Up!.
  • Subscribe between February 11–March 10 at 11:50 PM (MT).

Whether you choose to begin a month to month subscription by clicking HERE or purchase a prepaid subscription by clicking HERE you are sure to fall in love with Paper Pumpkin.

Not sure yet? Why not check out my Paper Pumpkin Craft Time? For just $5 you can come and play with a Paper Pumpkin project, and it’s FREE when you join during the event! Got questions? Ask me – I’m happy to answer any questions simply email me at [email protected] or call 706 754-7124.


Click here to order your Stampin’ Up! Products online 24/7! (US only)

Shop at my Online Store and use Host Code UCBWYB2B place a $75 order and receive a FREE gift!


Click Here to learn more about using the Hostess Code If you order Online make sure your profile information is up to date and you’ve allowed me to contact you so I can mail you your FREE gift!

Painted with Love Nugget Treats

Today’s post is going to be short and sweet – Here is a quick and easy treat idea using the Sweet & Sassy Framelits Dies and the Painted with Love Specialty Designer Series Paper.

The sentiment is from the Petal Palette stamp set. If you’d like to see here are the steps to make your own.

Here are the instructions – the supply list is below for you.

  1. Cut 5 strips of Designer Series Paper 1″ x 3″ (make sure the pattern is going the direction you want. For mine I lined the hearts up along the top edge and cut 1″ strips that then I cut into 4 3 inch sections.)
  2. Using your Glue Dots add one to each end of the Designer Series Paper and place one against the Nugget and wrap the Designer Series Paper all the way around. The second Glue Dot will seal the other end down.
  3. Slide the nuggets into cello bag.
  4. Cut a piece of Blushing Bride Card stock 2 1/4″ x 4 1/2″; score at 2 1/4″
  5. Stamp your sentiment in Rich Razzleberry along the bottom of card stock.
  6. Fold the sentiment piece in half and slip over the top of the cello bag and staple. (Your hearts will hide the staple on the front.)
  7. Run a piece of Designer Series paper through the Big Shot using the small heart Framelits die.
  8. Attach the heart to the nugget topper, leaving it hang a bit above the top and side.
  9. Run a piece of Gold Glimmer Paper through the Big Shot using the smallest heart Framelits die.
  10. Adhere the small heart to the nugget topper.

That’s it! Quick and easy – now you just need to share your treat!


Fast Fuse Sale Update –

Unfortunately the Fast Fuse Sale has ended. I’m very sorry, but The Fast Fuse Promotion was so popular that it sold out in a very short amount of time.  Hopefully you were able to get some while it was available.

Supplies: 

Stamp Set: Petal Palette (145785/145788)

Inks: Rich Razzleberry Classic Ink (126950)

Paper: Painted with Love Specialty Designer Series Paper (145580), Gold glimmer Paper (133719), and Blushing Bride (131198)

Accessories: Sweet & Sassy Framelits Dies (141707), 2″ x 8″ Cellophane Bags (141703) and Glue Dots (103683)

Non Stampin’ Up!: Hershey’s Nuggets

Click here to order your Stampin’ Up! Products online 24/7! (US only)

Shop at my Online Store and use Host Code UCBWYB2B place a $75 order and receive a FREE gift!


Click Here to learn more about using the Hostess Code If you order Online make sure your profile information is up to date and you’ve allowed me to contact you so I can mail you your FREE gift!


Painted with Love Treat Tent Tutorial

Check out this quick and easy last minute Valentine’s Day Treat Tent that I made for my hubby

– it holds what else, chocolate!

This project uses an old favorite, Teeny Tiny Wishes stamp set since it is filled with tons of all occasions sentiments perfect for this punch and a little something for any project!

I’ve made a video tutorial for you in case you want to make some too.

Painted with Love Treat Tent Video Tutorial

And here is a complete supply list for you.

Enjoy!


Supplies:

Stamp Set: Teeny Tiny Wishes (128748/127802)

Inks: Rich Razzleberry Classic Ink (126950)

Paper: Painted with Love Specialty Designer Series Paper (145580),  Gold Glimmer Paper (133719), Melon Mambo (115320), Rich Razzleberry (115316), and Powder Pink Card stock (144244)

Accessories: Simply Scored Scoring Tool (122334),  Classic Label Punch (141491), and Sweet & Sassy Heart Framelits Dies (141707)

Click here to order your Stampin’ Up! Products online 24/7! (US only)

Shop at my Online Store and use Host Code UCBWYB2B place a $75 order and receive a FREE gift!

Painted with Love Post it Note Holder

I love creating little gifts for family and friends and this one if a practical post it note holder for my husband – a little love, a little help to keep track of things. LOL

This colorful little Post it Note Holder hold a simple little pad of sticky notes I found at my local Walmart recently – cute right?

And the gold little heart just beckoned me since it reminded me of the beautiful Painted with Love Specialty Designer Series Paper and it’s gold foil accents!

I’ve made a quick little tutorial for you too! So why not check it out?

Painted with Love Post it Note Holder Tutorial (printable) PDF

Supplies:

Stamp Set: Petal Palette (*145785/145788)

Inks: Rich Razzleberry Classic Ink (126950)

Paper: Painted with Love Specialty Designer Series Paper (145580), Rich Razzleberry Card stock (115316), Melon Mambo Card stock, Gold Glimmer Paper (133719), and Very Vanilla card stock (101650)

Accessories: Simply Scored Scoring Tool (122334), Petal & More Thinlits Dies (145655), Sweet & Sassy Framelits Dies (141707), and Bone Bolder (102300)

Adhesives: Snail Adhesive (104332/104331) and Stampin’ Dimensionals (104430)

Non Stampin’ Up!: 3″ x 3″ Sticky Note Pad

*Petal Palette Bundle (145973/145974)

Click here to order your Stampin’ Up! Products online 24/7! (US only)

Shop at my Online Store in January and use Host Code RQGVFRW6 place a $75 order and receive a FREE gift!

Click Here to learn more about using the Hostess Code If you order Online make sure your profile information is up to date and you’ve allowed me to contact you so I can mail you your FREE gift!

Sign up for my FREE Newsletter My Newsletters include stamping tips, ideas and updates on what is happening with me! You’ll also receive a FREE Class Tutorial using the 2017-2018 In Colors when you sign up!


Party Pandas Valentine Nugget Treats

Want a quick and easy treat for Valentine’s Day? How about this chocolate filled treat made with the two of our Sale-a-bration items? Just one pack of the Bubbles & Fizz Designer Series Paper will make quite a few of these goodies. So why not grab a bag of Nuggets and get started?

Here are the instructions – the supply list is below for you.

  1. Cut 5 strips of Designer Series Paper 1″ x 3″ (make sure the pattern is going the direction you want. For mine I lined the hearts up along the top edge and cut 1″ strips that then I cut into 4 3 inch sections.)
  2. Using your Glue Dots add one to each end of the Designer Series Paper and place one against the Nugget and wrap the Designer Series Paper all the way around. The second Glue Dot will seal the other end down.
  3. Slide the nuggets into cello bag.
  4. Cut a piece of Blushing Bride Card stock 2 1/4″ x 4 1/2″; score at 2 1/4″
  5. Stamp your sentiment in Basic Black Archival Ink along the bottom of card stock.
  6. Fold the sentiment piece in half and slip over the top of the cello bag and staple. (Your scallop circle will hide the staple on the front.)
  7. Run a piece of Calypso Coral card stock through the Big Shot using the scallop circle Framelits die.
  8. Attach the scallop circle to the nugget topper, leaving it hang a bit above the top.
  9. Stamp your panda image onto Whisper White card stock using Basic Black Archival Ink.
  10. Color in heart using your Powder Pink Stampin’ Write Marker.
  11. Cut panda out using the circle Framelits die.
  12. Adhere the panda image to the scallop circle card stock using Stampin’ Dimensionals.

That’s it! Quick and easy – now you just need to share your treat!

Supplies: 

Stamp Set: Party Pandas (Sale-a-bration 147218/147221) and Teeny Tiny Wishes (128748/127802)

Inks: Basic Black Archival Ink (140931) and Powder Pink Stampin’ Write Marker (144033)

Paper: Bubbles & Fizz Designer Series Paper (Sale-a-bration 147244),   Blushing Bride (131198), Calypso Coral (122925) and Whisper White card stock (100730)

Accessories: 2″ x 8″ Cellophane Bags (141703), Layering Circles Framelits Dies (141705), and Stampin’ Dimensionals (104430)

Click here to order your Stampin’ Up! Products online 24/7! (US only)

Shop at my Online Store in January and use Host Code RQGVFRW6 place a $75 order and receive a FREE gift!

Wondering How to Get YOUR Copy of the Occasions & Sale-a-bration Catalogs?

  • If you haven’t ordered in a while
  • Don’t have a demonstrator

Contact me at [email protected] or give me a call. I’ll be happy to mail you one or if your local set one aside for pick up