

Were celebrating the 4th with a good old fashioned family cookout here in Clarkesville and it looks like the weather will be perfect for it. I’m really looking forward to seeing everyone again and getting to meet new family members too. Some we haven’t seen in years, along with marriages and babies. What fun.
And since it is the fourth of July I thought it would be fun to do a little something for the kids. So I’ve put together this fun bucket of items for each family.
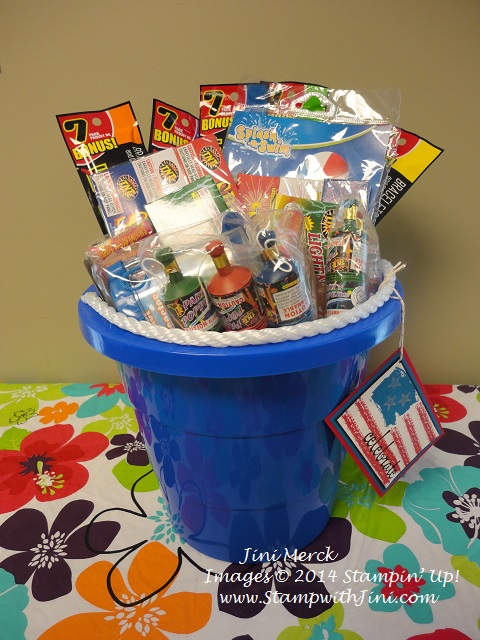
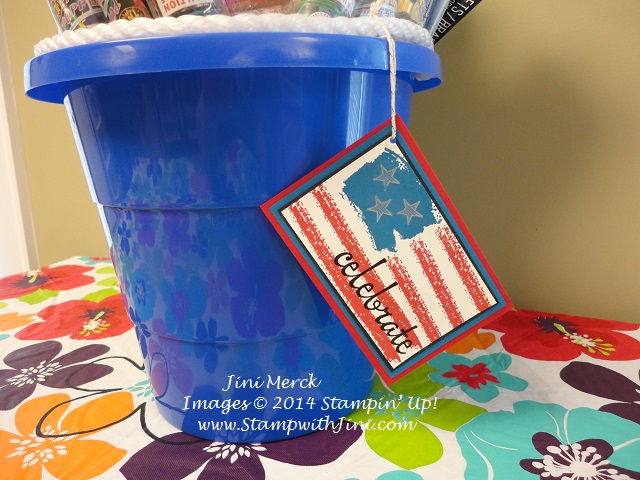
And created this cute little tag that I attached to it with our Metallic Silver Baker’s Twine (132142) that is part of our Weekly Deals this week.
What do you think? Cute? I’m hoping these will be a hit with everyone since it contains a little something fun for all ages that can be used all day and even until the fireworks!
What’s inside? Well I’ve got some bubbles, a beach ball for the pool, bug boxes for catching the fire flies, glow sticks, sparklers, poppers, and other goodies for the evening.
I’ve got the one done – now just to put the others together. LOL Larry’s got a big family!
Home improvements – oh my!
Today I thought I would also share with you what I’ve been doing lately with my free time. I think I’ve shared with you I’ve had the home improvement bug this spring, my love of painting trim….. and so the projects continued.
Larry and I have “discussed” painting the stairs for years, or should I say I have. He just didn’t think it was necessary and I thought it would be a big help to protect the pressboard and make cleaning easier too.
Well on June 3rd I decided I’d jump in. I’ve never painted stairs so I was a bit intimidated, but after reading up on it I figured what the heck – it couldn’t be that hard, right?
I tried stain first at the suggestion of my sister, unfortunately it didn’t cover up all the spots that had been created from spills over the years. And apparently my brain wasn’t functioning well either, because I didn’t think of solid color stain that the gal at Home Depot had recommended before I started to kilz. Oh, well. I guess paint was meant to be.
So here is the first picture I took – Seems I always forget to take the before photo – caulked, Kilzed, and first coat of trim.

I know it looks a little strange with only part of the stairs done to this point, but I figured I wanted to see how it went. And I wanted to get the color on the tread to see how I liked the color we chose to go with the wood landing. LOL – Like I’d have a choice once I started.
The biggest challenge was making the stairs usable since my guys are always up and down them and of course my classroom is downstairs too. I sure didn’t want to go long without getting to stamp!

So I learned if I started first thing in the morning they’d be dry enough for everyone to go up and down when they got home and the trash and dirt from their shoes would not stick. (It seemed to rain a lot so going around wasn’t really an option Johnathan wanted to deal with.) I also did every other step and added the green paper to keep things clean.
Here is the finished project now after I finished all the touch ups and door trim this week. Yea!
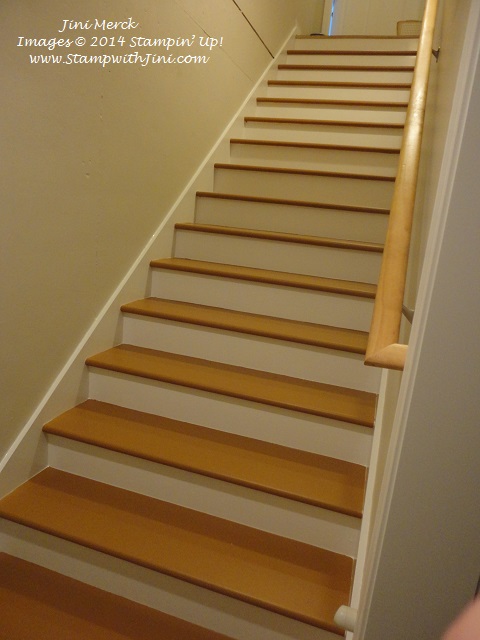
Painting the stairs really brightened up the space and I really love the look. They are so easy to clean now!
However, I am still thinking about stamping on the risers. I’ve had this great two step stamp set I’ve always wanted to use for that, but for now I’ve got other things on my list I want to do first.

Everyone who has been to my classroom before noticed the new look immediately and made my day by commenting about how great they looked. Thanks guys!
Funny thing is my husband, Larry asked me what took me so long to paint the stairs! (He’s a hoot.) They don’t squeak any more which is the part he loves. Of course that means my “alarm system” for the kids is gone since I always knew when someone was coming up the stairs. I’m not sure what made them stop creaking and squeaking, but I’m glad my husband likes the end result too. Now I’ve just got to get him to put trim up where the concrete and sheet rock meets. That little space drives me nuts. After all who knows what can live in that space – eek!
Supplies:
Stamp Set: Work of Art (134111/134114), Fabulous Four (134171/134174), and Something to Say (134177/134180)
Inks: Pacific Point (126951), Real Red (126949), Melallic Silver Encore Ink (132142), and VersaMark (102283)
Paper: Pacific Point (111350), Real Red (102482), Basic Black (121045), and Whisper White (100730)
Accessories: Silver Baker’s Twine (132976), 1/8″ Handheld Circle Punch (134365), Black Embossing Powder (109133), and Heat Tool (129053)
Click here to order your Stampin’ Up! Products online 24/7! (US only)
Hostess code KGM3XHTJ
Weekly Deals (Special ends Monday, July 7th 2014 at 11:50 p.m. (MT)

Get your favorites Designer Series Paper in July – Sale ends July 31, 2014 at 11:50 p.m. (MT)
Blendabilities are here – Click HERE to get yours today!
The stairs look great! I’m sure you are glad they are done. And the buckets of 4th of July goodies are super cute too! I think I want to become a Merck… oh, but you already knew that. 🙂