It’s a rainy day here in Northeast Georgia so I’m going to take advantage of that and stamp. This kind of weather is perfect for that kind of thing I think. So today’s post will be a quick one sharing a card with you that I thought I had shared earlier in the month. So here we go. Seems I need to spend a bit of time cleaning up piles on my desk too. lol
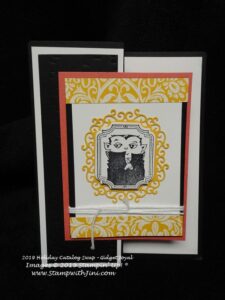
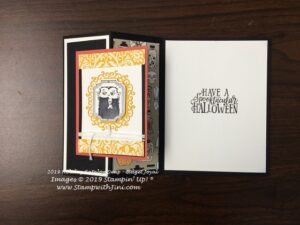
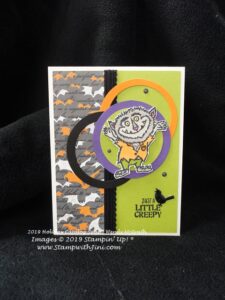
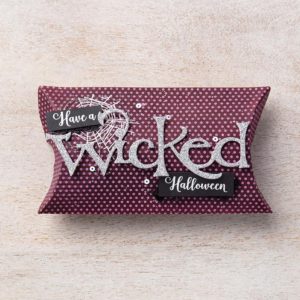
Today’s card is a fancy fold card that uses just a few score lines to create a wow factor – This card will be simple to make for your Halloween fun
Using our Spectacular Bash Suite of Products it’s sure to make that special trick or treater smile when they open it.
How do you create this fold? Simply take a 5 1/2″ x 8 1/2″ card stock base and score it 2 1/8″ and then at 4 1/4″. Yep, it’s that simple!
Shop at my Online Store and use Host Code YS9WN2UA
Click Here to learn more about using the Hostess Code If you order Online make sure your profile
information is up to date and you’ve allowed me to contact you (If you chose no
contact in the past you’ll need to call 1-800-Stamp Up to have them change your
profile for you.)
There is a nip in the air now, and we’ve had some beautiful fall days so I thought I’d share with you some Halloween cards as the little trick or treaters will be knocking on our doors soon. My kids used to love playing dress up and I would sew their costumes so that they could play in them all year long. Anyhow, great memories but that was many moons ago… So here are some great cards that are a lot of fun for us grown ups who enjoy a bit of Halloween fun too.
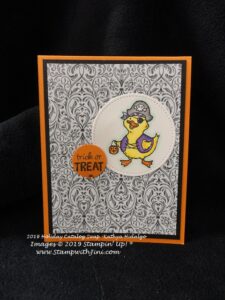
This stamp set includes 4 little chicks are dressed up for 4 different winter holidays which makes it a great set for those cards and treats we will be making!
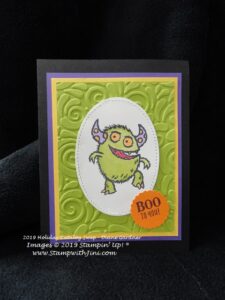
And of course I’ve shared these adorable little monsters with you before from the Boo To You stamp set (150550) in an earlier post for a fun treat item.
And finally if you like a more realistic look for Halloween you’ll want to check out The Raven (150593) great for simple stamping since the art work is great all by itself.
The moon on this card was created by using a simple masking technique. Cut out a circle from a sticky note place it where you’d like and then use a Stampin’ Sponge to add ink. Remove the sticky note when you’re done and you have this great moon. So simple, but it creates a great effect!
So what do you think? Like these cards? Why not leave me a comment and let me know which you like the best? Then stop by my Online Store and get yours.
Shop at my Online Store and use Host
Code YS9WN2UA
Click Here to learn more about using the Hostess Code If you order Online make sure your profile information is up to date and you’ve allowed me to contact you (If you chose no contact in the past you’ll need to call 1-800-Stamp Up to have them change your profile for you.)
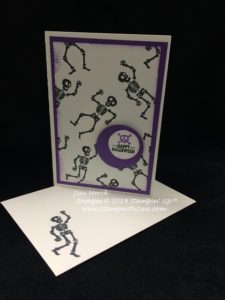
If you sometimes find the options over whelming when you sit down to create a card, simple stamping just might the thing to recharge your creativity. Today’s project was created using card stock, ink, and a couple of punches. It also uses the stamp set from our September Paper Pumpkin Kit. Which is perfect for simple stamping. Check out this cute little note card for Halloween. Perfect for mailing or tucking in with a little treat.
These little skeletons are simply stamped in Memento Tuxedo Black and I used the Gorgeous Grape spot that came in the kit for the sentiment and sponging. Want to see how I made it? I’ve got a video today for you. (I know it’s a day later than planned, but I wanted to share my big news with you yesterday – a perfect way to start the new year!)
Paper Pumpkin September 2019 Bon Appetit Halloween Note Card Tutorial
And here is a printable PDF tutorial for you with a complete supply list and step by step directions too.
Paper Pumpkin September 2019 Bon Appetit Halloween Note Card Tutorial PDF
Enjoy!
And did you know that the Stampin’ Up! is giving us kits that will coordinate in October & November. While they are stand alone kits they can also be used together to make our holiday crafting even easier! So it’s a super time to join in the Paper Pumpkin fun.
These two kits will contain the following:
October Kit
Kit details: Makes 10 cards and envelopes
Card size: 4 1/4″ x 5-1/2″ (10.8 x 14 cm)
Envelope size: 4-1/2″ x 5-3/4″ (11.4 x 14.6 cm)
Coordinating colors: Early Espresso, Pool Party, Poppy Parade, and Shaded Spruce
November Kit
Kit details: Makes 24 holiday-themed gift tags of 4 various sizes and designs.
Coordinating colors: Early Espresso, Pool Party, Poppy Parade, and Shaded Spruce
The October and November kits coordinate; however, each kit is all-inclusive and can stand alone.
Subscription Information
Subscribe for the October kit at paperpumpkin from September 11–October 10.
Subscribe for the November kit at paperpumpkin from October 11–November 10.
Supplies may be limited toward the end of each subscription period.
Paper Pumpkin kits are great for all ages and contain everything you need to assemble the kit, just add a scissors and you are ready to go!
Got questions? Want to see what Paper Pumpkin is all about? I hold a Paper Pumpkin Craft Time each month where you can try it out. Click HERE to see my Calendar of Events to learn more.
Shop at my Online Store and use Host
Code H62N9P3Z
Click Here to learn more about using the Hostess Code If you order Online make sure your profile information is up to date and you’ve allowed me to contact you (If you chose no contact in the past you’ll need to call 1-800-Stamp Up to have them change your profile for you.)
Sign up HERE
for my FREE Newsletter or Get my Blog Posts delivered right to your inbox HERE
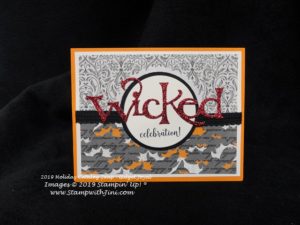
It’s Friday the 13th and so I couldn’t resist sharing some more Halloween cards with you today using the Wonderfully Wicked Bundle from the Holiday Catalog. This bundle includes some simple images that will assure you can create some great projects so that you can have a wonderfully wicked time this year with your family and friends. LOL!
Here are some projects using this set for you today – This first card uses a simple technique of turning down the corner of the card front allowing you a peek of what is inside.
And how about a little sparkle? This die was cut out using our Red Glimmer Paper (150427).
And of course here are some treat items, since what’s Halloween without some treats?
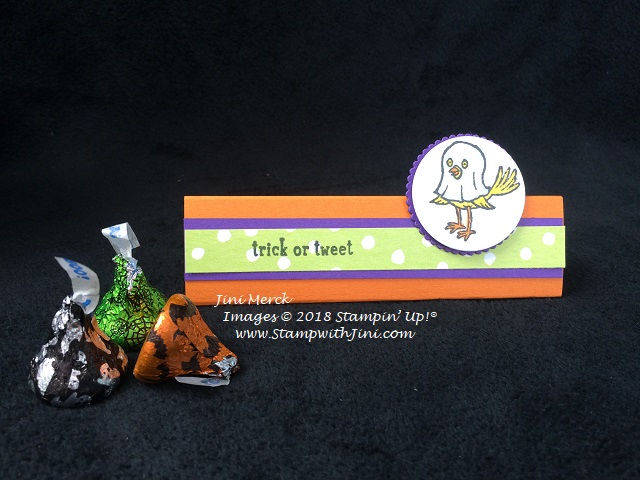
Today’s treat holder is a quick and easy one that you can make last minute for your holiday treat giving and it holds what else, chocolate! So it will be a hit with your chocolate lovers.
This treat was made using the fun little animal image from the Trick or Tweet stamp set – my favorite for making all those fun Halloween treats! And perfect for these Halloween wrapped chocolate Kisses I found this fall.
Check out this video tutorial so you can make some too.
Trick or Tweet Treat Tent Video Tutorial
And of course I’ve whipped up a PDF with a complete supply list for you too!
Trick or Tweet Treat Tent Tutorial PDF
Enjoy! And then stop back by tomorrow when I’ll be sharing some birthday inspired cards with you.
Shop at my Online Store and use Host Code W2NX46E9
Click Here to learn more about using the Hostess Code If you order Online make sure your profile information is up to date and you’ve allowed me to contact you
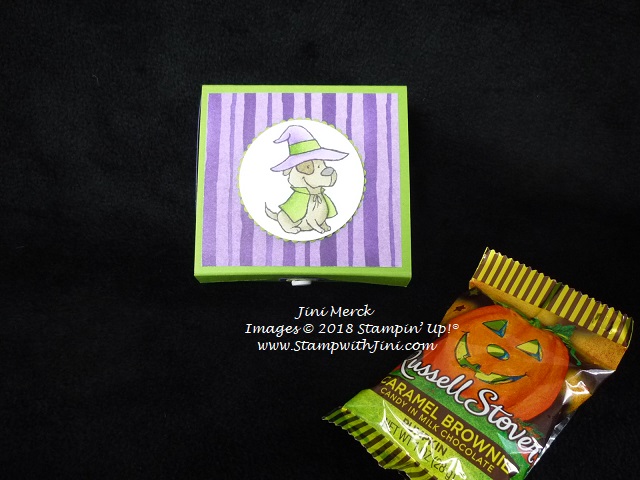
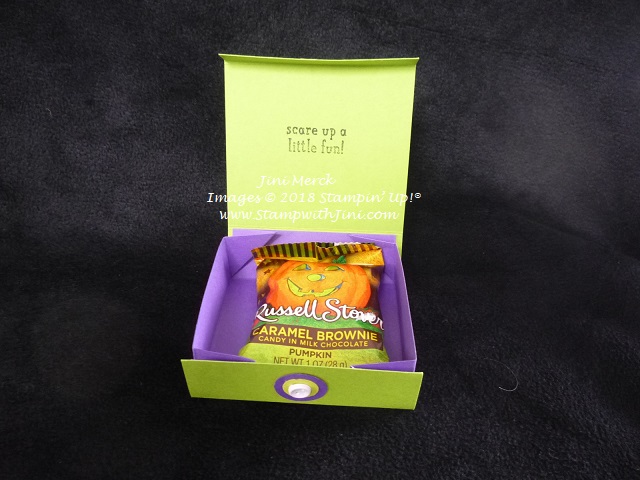
I love these little folding boxes that I shared with you the other day – so this time I’ve created one using the Trick or Tweet stamp set. After all we need to scare up some chocolate, right? And I couldn’t resist this little guy – he just makes me smile.
When you open up the lid and you’ll get a Halloween greeting and
Chocolate of course, (although you could put all kinds of things inside since it’s a pretty roomy box if your guys don’t love chocolate.) I found these Russel Stover Carmel Brownie pumpkins at my local Ingles and couldn’t resist pickup up a few as gifts family.
(Sorry I think my photos are a bit off, it’s another rainy day here in Georgia which doesn’t my photo I hoping it’s just my screen.)
I’ve created a PDF tutorial with a complete supply list for you and of course, you can see the video on how to create this Folding Box HERE.
Trick or Tweet Folding Box Tutorial PDF
With all this rain it’s a great time to get some crafting in! Or at least that is what I’m telling my husband today. LOL!
Shop at my Online Store and use Host Code FZ3P6HGN
Click Here to learn more about using the Hostess Code If you order Online make sure your profile information is up to date and you’ve allowed me to contact you
Sign up HERE for my FREE Newsletter or Get my Blog Posts delivered right to your inbox HERE
How Do You Get a 2018 Holiday Catalog?
Don’t have a Demonstrator? Email me at StampwithJini@gmail.com include your name, address, and phone number and I’ll be happy to mail you one.
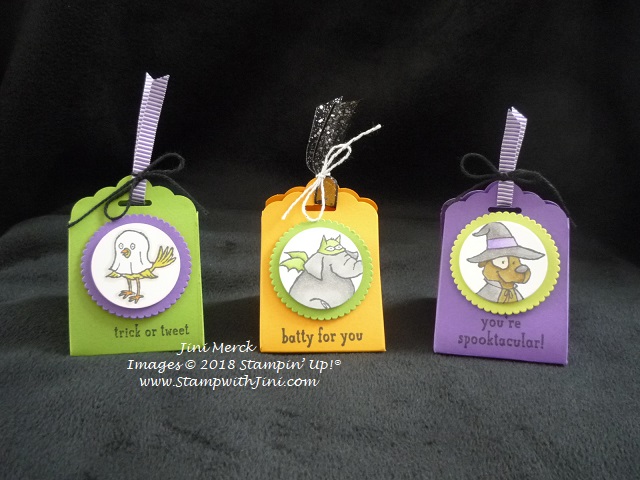
I love to make little treat items for family and friends and so when I saw the Trick or Tweets stamp set in the Holiday Catalog I knew it would be perfect for this year’s Halloween treats.
Check out this cute little box I made using the set
My fellow stamper, Pam gave this cute little box idea last spring and so I wanted to give it a try myself. Turns out these little boxes are sooooo easy to make, that they are kind of addictive once you get going.
Or at least I couldn’t stop – LOL! The images and color combinations were just a lot of fun to play with once I got coloring with my Stampin’ Blends.
I thought you might like to try some too for your treats so I’ve whipped up a quick video tutorial.
Trick or Tweets Treat Boxes Video Tutorial –
And of course I’ve included a complete supply list on my PDF tutorial for you.
Why not leave me a comment and let me know which combination is your favorite?
Shop at my Online Store and use Host Code FZ3P6HGN
Click Here to learn more about using the Hostess Code If you order Online make sure your profile information is up to date and you’ve allowed me to contact you
Live local and want to stamp with me? Why not check out my upcoming Calendar of Events?
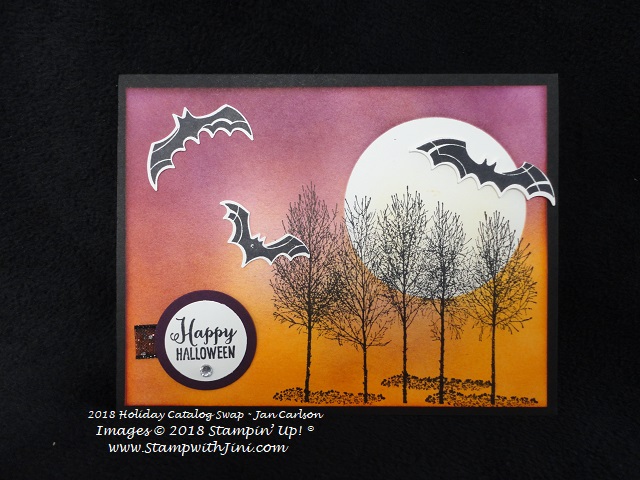
It’s almost fall and that means Halloween is right around the corner – If you love Halloween you’ll want to check out this fun card using the Spooky Treats & Winter Woods stamp sets from the Holiday Catalog.
This card uses simple sponging and masking to create a wonderfully spooky fall night!
How is it done? First you’ll create a mask using one of the Layering Circle Framelits Dies and a sticky note. Place the sticky note where you’d like it on your Whisper White card stock. Then sponge starting with the lightest color Crushed Curry in a circular motion to begin building the layers of color. Add some Pumpkin Pie and then finish with Blackberry Bliss. Remove the mask and you’re ready to finish stamping.
Yep, it’s that easy. Each time you’ll get a little different look based on your sponging which makes it a lot of fun.
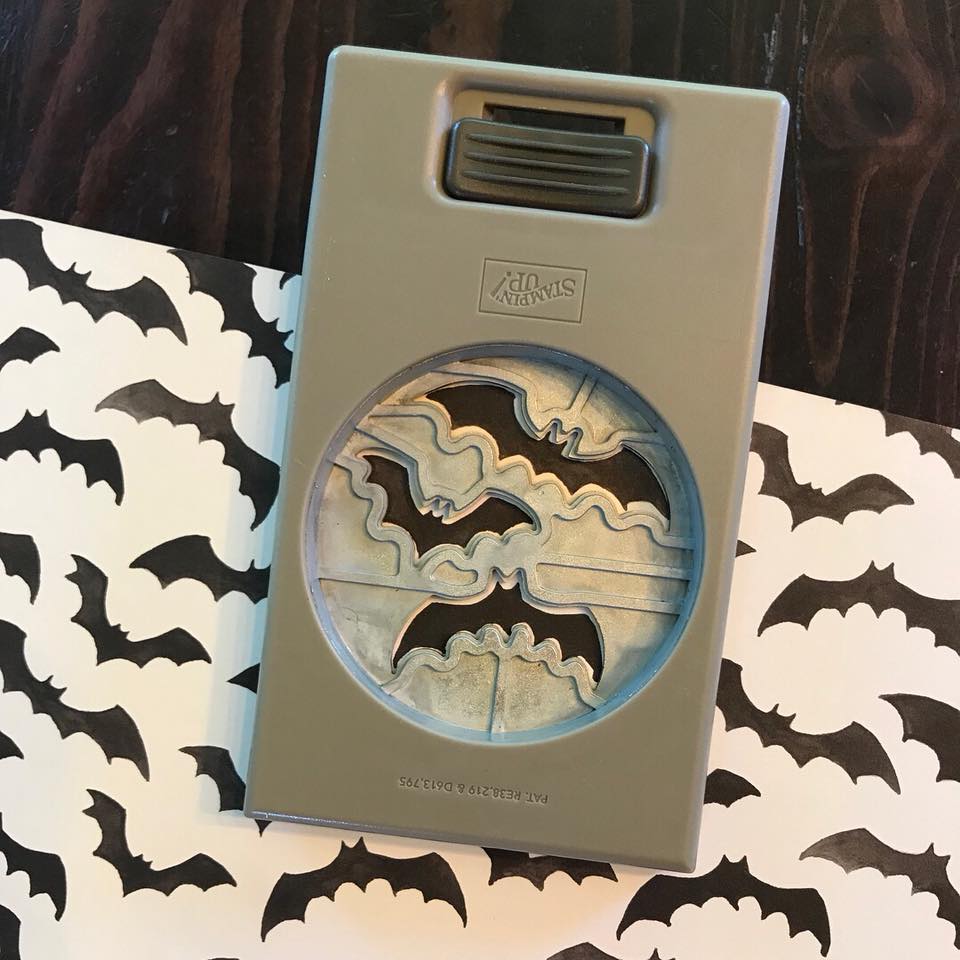
And if you love this punch you’ll love this tip that Sara shared with us yesterday.
The Spooky Bat Punch (148014) cuts out the bats from the Toil & Trouble Designer Series Paper (147531) bat images! How cool is that?
You’re going to LOVE all the fantastic products in the Holiday Catalog! Why not come to my Holiday Catalog Kick Off and check them out? But hurry and RSVP by the end of the day September 12th so I’ll have enough goodies for everyone!
Can’t come? or don’t live local and want a catalog? If you don’t have a demonstrator why not email me at StampwithJini@gmail.com your name, address and phone number and I’ll be happy to mail one to you!
Love this card? Then you’ll want to stop back by tomorrow when I’ll be sharing some more wonderful cards from a swap I recently hosted.
Shop at my Online Store and use Host Code 7GTJDB3N
Click Here to learn more about using the Hostess Code If you order Online make sure your profile information is up to date and you’ve allowed me to contact you
Sign up HERE for my FREE Newsletter or Get my Blog Posts delivered right to your inbox HERE
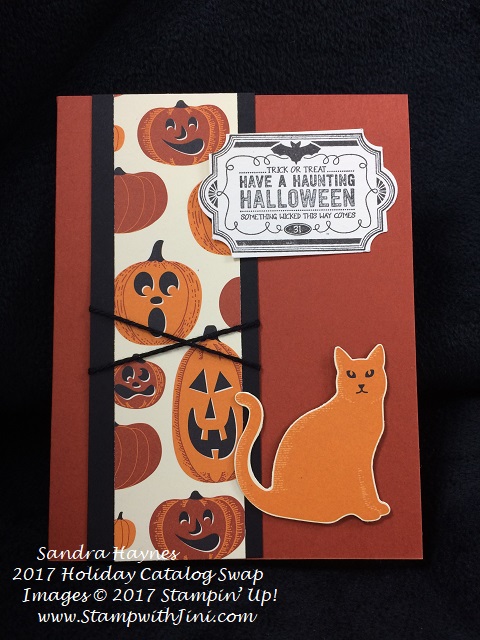
And I love this next card, while it is for Halloween, change the sentiment and it could be used for any cat lover! Clever, right?
I’ve included the supply list below for you.
Want to see some more wonderful swaps? Stop back by tomorrow when I’ll be sharing some of the swaps I received using the Carols of Christmas Stamp set from the Holiday Catalog.
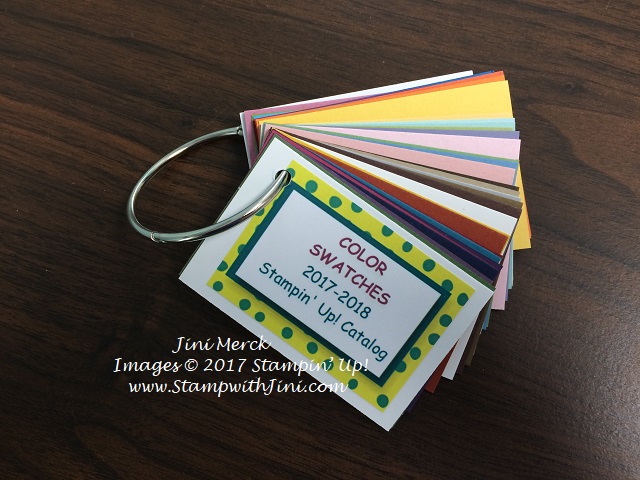
Shop at my Online Store and use Hostess Code RDZGJVPC during September and receive a free gift from me with a qualifying order of $50 or more in product! You’ll receive my 2017 Color Ring with a swatch of all 50 current colors all on a convenient ring!
Click Here to learn more about using the Hostess Code If you order Online make sure your profile information is up to date and you’ve allowed me to contact you so I can mail you your FREE gift!
#HurricaneRelief & #Making a Difference
I’m donating the sales from my hand stamped cards that you can purchase. To learn more Click HERE.
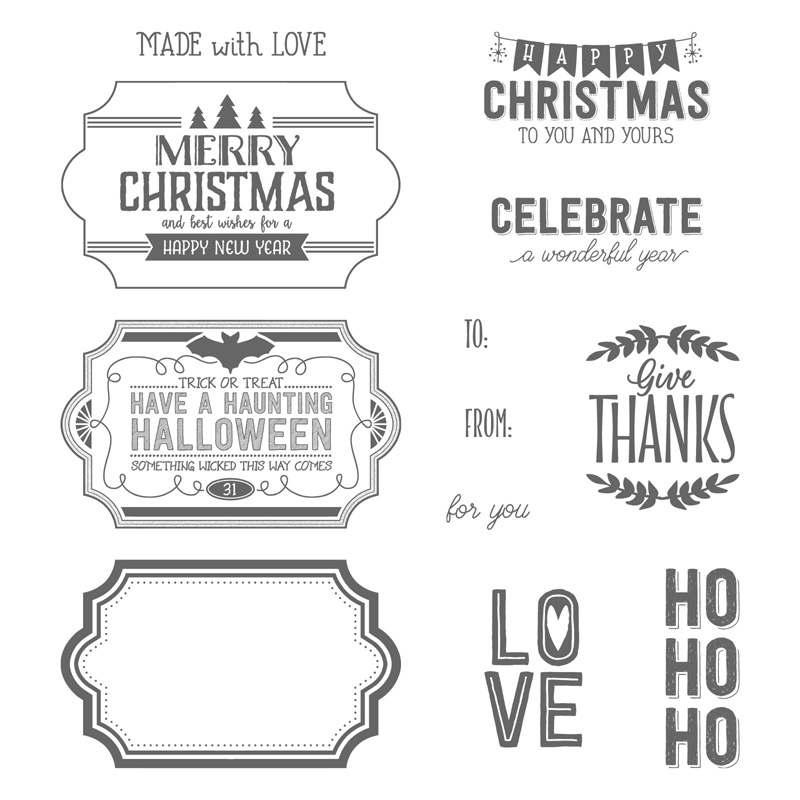
Have you seen the Labels of Love stamp set in the Holiday Catalog? It covers all kinds of occasions AND It coordinates with a NEW punch – and you know how I LOVE punches for quick and easy projects.
Here is a fun Halloween card using the Label of Love stamp set along with the Cat Punch and some Spooky Night Designer Series paper for a quick card.
There’s a lot of punching going on here. LOL The cat is part of the Designer Series Paper, Spooky night – just punch it out. That’s right no stamping – so you have a perfect cat every time!
And check out these projects made with the Labels of Love stamp set.