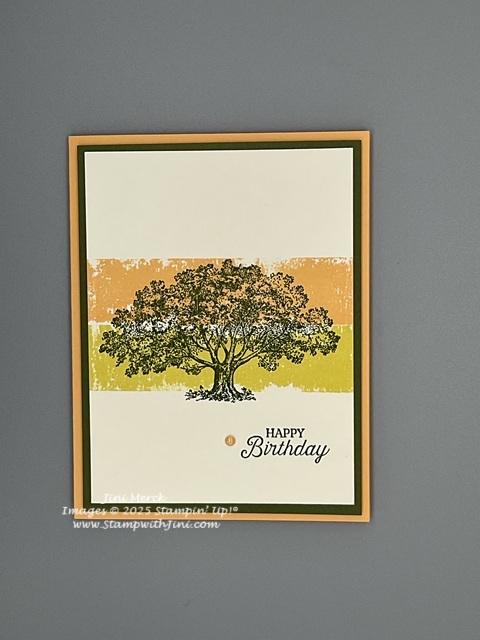
Today’s card uses a quick and simple technique that is so easy to do. It’s one of the first techniques I used when I learned how to stamp as it is an easy way to add color to your projects.
This card creates the feel of the setting sun with just two colors and a simple image. These type of cards I find are great for the guys in my life.
Want to see how I created this card? Check out my video tutorial.
And of course here is a PDF tutorial for you too.
Loveliest Tree Painters Tape Technique Birthday Card Tutorial PDF
Enjoy! And then stop back by next week as we get ready to launch the NEW 2026 May-August Mini Catalog!
Yesterday I shared a quick and easy monochromatic card with you using the Lifetime of Love stamp set (Last Chance 162574) so today I thought I’d share another card that was created with this stamp set.
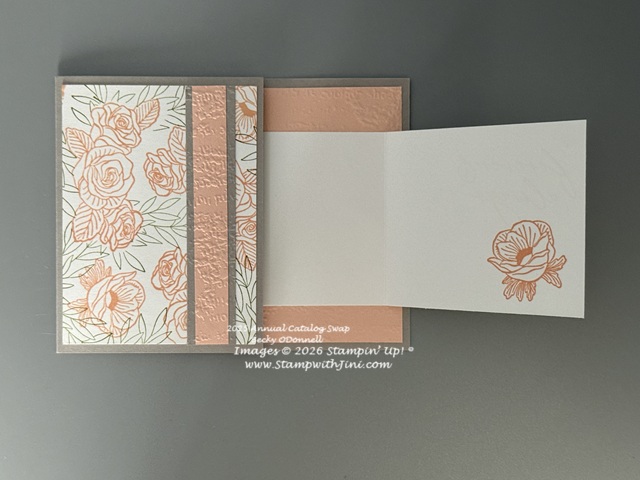
Today’s card has a totally different feel to it since it uses our Petal Pink and Gray Granite to create this lovely wedding card along with a simple masking technique.
The flowers were first stamped onto the Basic White Card stock panel and then a simple mask was used to cover the flowers. After the leaves were stamped using Old Olive to create this layered color look. Fun right? Simply stamp the flower image onto masking paper or a sticky note and cut out and you’re ready to go.
This card is also a fun fold called a joy fold card that is so simple to do! This card uses a 8 inch Basic White panel that has been scored at 4 3/4″. It creates a panel large enough to hide the inside sentiment when the outside sentiment is opened.
Here are a couple of photos showing you the flap portion of the card.
Lovely right? Who wouldn’t enjoy receiving this card on their special day?
Love fun little techniques that step up your projects? How about an Embossing Folder technique that is quick and simple to do that has been used on this card?
Today’s card uses the Easter Basket Bundle (166947) to create this card. It also uses a technique of adding ink to the debossed side of the folder to add color.
How do you do that? It’s simple – you’ll want to use your Classic Ink pad or a brayer to add color to the inside of your embossing folder and then run it through your Stampin’ Cut & Emboss as normal. Clean up is easy simply run water over the inside and allow it to dry.
This creates a colorful background for your project. In addition to the All in a Row Embossing Folder (166989). This card also uses a watercolor wash for the bunny to create a soft feel. Simple stamping was used for the eggs and sentiment. And of course a bit of Bubble Bath Faux Linen Ribbon (167075) adds a bit of texture to the card and a fun detail.
So what do you think? Want to try this simple technique to add color to your embossing folders? While it can be a bit messy if you’re not careful it is a lot of fun!
Check it out – notice the background of this card? It’s actually dry embossed and the embossed areas have had color added to them to make it “pop”. Then a bit of color was added with a Blending Brush to add a bit more impact and ground the hearts.
Done in Real Red, Bubble Bath and Pool Party, it pulls the color inspiration straight from the Designer Series Paper found in the Suite. And you’ll love the fun little 1/8″ Bubble Bath Faux Linen Ribbon (167075) that is so easy to tie and great for all kinds of projects.
How is this technique done? It’s so simple to do. You’ll simply apply ink to the raised “positive” embossed side with a brayer, add the card stock, and run thru your Stampin’ Cut and Emboss like normal. And Voila! Think of a letterpress. Want color on the negative area? Simply add color to the other half of your folder and you’ll get a totally different look.
I love this simple technique for creating backgrounds that pop. How about you? Why not give it a try with your favorite folder?
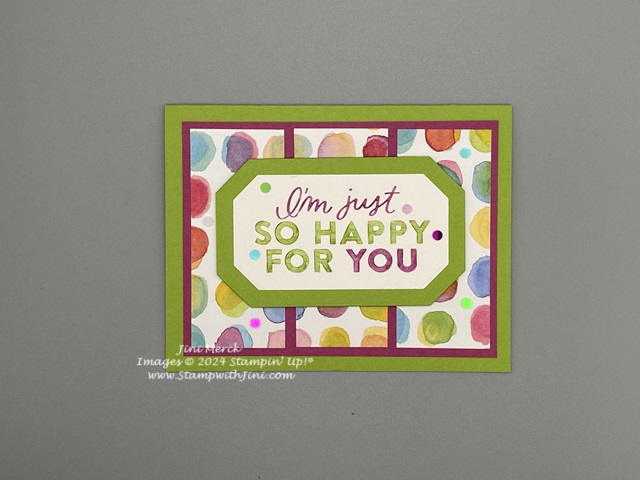
I needed a quick birthday card for a family member who loves purple and so I reached for the Beautiful Bokeh Designer Series Paper (164607) and came up with this soft feminine card that I thought my sister in law would enjoy.
I love the fact that the Layered Thoughts Stamp set (165346) has this big bold font making it a great focal point all on it’s own. And thought it would be perfect for a quick and easy technique like the one I used for the letters to add multiple colors.
Want to see how I created this card? I’ve got a quick tutorial for you along with a PDF today. Why not check them out?
Do you have a happy place? I know mine is the beach and listening to the waves roll in. Or maybe you need a retirement card? The Happy Place stamp set (165966) might be just what you need for card making and even scrapbooking with it’s bold senitments.
The topical feel is built into the word happy for you. Check out today’s card using the set. This first one if bright and cheerful and uses the Celebratory Sips Designer Series Paper (165586)
which sets the color pallet. The sentiment has been stamped using Strawberry Slush and a bit of Darling Duckling and Strawberry Slush 3/8″ Faux Linen Ribbon add some texture along the Rhinestone Jewel. You can feel the fun!
And this next card uses a more muted color pallet and allows the Happy to shine.
Color has been added to the stamp using Sponge Daubers (133773) along with Blueberry Bushel, Calypso Coral, Gorgeous Grape, and Secret Sea Classic Inks. Sponge Daubers are great to add color exactly where you want it since they give you more control making this technique quick and simple. Just make sure to start with the lightest color first and end with the darkest color last so you don’t contaminate your ink pad.
Monochromatic or filled with color – the choice is yours when you’re stamping! Part of what I love about stamping is the fact the same images can feel so different based on the choices you make when crafting. How about you? What do you love about paper crafting?
LAST CHANCE TO RSVP FOR MY CHRISTMAS CARD STAMP A STACK
Sign up today –Click HERE to see my Calendar of events and RSVP
Simply pay the PayPal invoice I send you after you RSVP with your choices for the Stamp-a-Stack to hold your spot.
I love the bold look of the Blackberry Bliss and Berry Burst together, how about you? Want to see how I created this card? I’ve whipped up not only a video tutorial to share with you but also a PDF with the supply list, measurements, YouTube link and step by step instructions too.
Why not check it out?
Floral Charm Water Color Technique Card Tutorial PDF
Enjoy! And don’t forget to stop back by next week when I’ll be sharing more fun projects with you.
Some Cajun Craze was added to be image using the Blending Brush. The sentiment was stamped and punched our using the Labeled with Love Punch (163569) and a second piece was punched out using Basic Black card stock to layer it on. It has a Basic Black card base .
Stepping it up – This next card adds a some additional layers of color. This time the image was stamped using Secret Sea Classic Ink onto Very Vanilla Card stock giving it a warmer feel.
Crushed Curry, Darling Duckling, Strawberry Slush, and Timid Tiger have been used and blended to create a dramatic sky with lots of depth. Layers of Timid Tiger and Darling Duckling have been used to mat the image on the Secret Sea Card base and some of the clear gems from the Strawberry Slush & Pretty in Pink Gems (Online Exclusive 165615) have been added for a bit of shine and sparkle.
Same image different color choices and layers. Whether you like to keep it simple or step it up this stamp is a fun one to work with it’s landscape image. What do you think?
Today is the 80th Anniversary of D Day and our landing on the beaches at Normandy. Deep appreciation is felt for our military and the sacrifices they made that day. How different our world would be without the sacrifice they all made. I remember my step father telling me about his days on the ground in France after the invasion. Both he and his older brother were part of the army that went forth to liberate France as they marched into Germany. The Greatest Generation, for sure and those that followed to protect our liberties. Today my daughter and her fiancé were able to participate and perform in the official ceremony at the Brittany American Cemetery and Memorial as part of the Collegiate Mass Band. A privilege I’m sure they will remember for years. History… we need to remember
So today’s cards reminded me of those men and women who protect our freedoms.
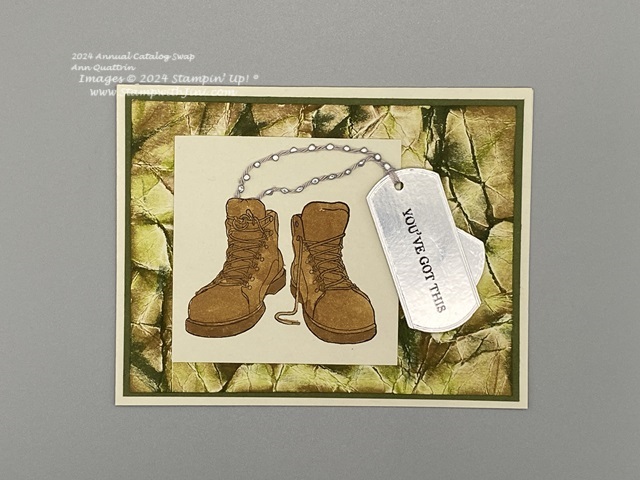
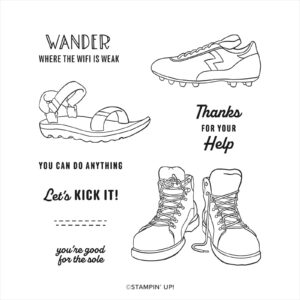
While the set isn’t a traditional military set I love the way this boots from the Let’s Wander stamp set (163594) were used to create this card. Isn’t it great how we are only limited by our imagination when stamping and creating?
Crumple the paper and then open it gently but don’t smooth out the paper too much.
Open your Classic Ink Pad and drag it over the top.
Repeat with the next color
This card uses Lemon Lime Twist, Mossy Meadow and Pecan Pie to create the camouflage effect.
You can add a spritz or two of water or rubbing alcohol to blend the colors a bit or even a bit of Blending Brush with some ink if you want to add color to the low spots. It’s a fun technique that I look forward to playing with. How about you?
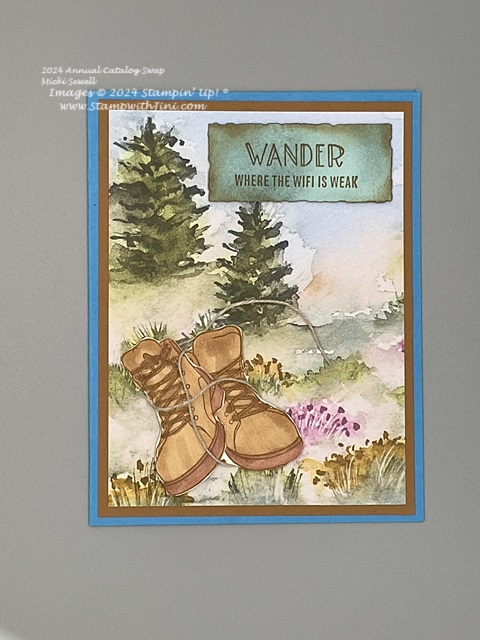
This next card uses the more traditional look that the set inspires – the great out doors and hiking.
This stamp set is one that I totally missed and after seeing these two cards will take another look at. I’m feeling inspired. How about you?
On a personal note: My procedure went well and feeling good about my recovery after seeing my surgeon today. Optimistic about the third time being the charm! I can spend time out of my sling which feels wonderful. I appreciate all your thoughts and well wishes and look forward to seeing everyone at classes again soon.
Don’t forget to stop back by tomorrow when I have another card tutorial for you
Shop at my Online Store and use June Host Code JYSWY33M with a product order of $50 or more and receive a FREE Gift from me; my Card Kit and Latte Love Card Class!
Sign up HERE for my FREE Newsletter and Class Schedule and receive my FREE 2024-2025 In Color Spotlight on Nature Card Class OR Get my Blog Posts delivered right to your inbox HERE
Today’s card uses a quick and easy technique using our Stampin’ Write Markers. It also uses the same sketch that I shared with you last week.
If you’d like to see the sketch and printable PDF you can click HERE and make one for your Sketch collection. I have simply flipped the sketch on it’s side and made it landscape instead of portrait.
Shop at my Online Store and use Host Code XM7XH6F2 with a product order of $50 or more and receive a FREE Gift from me; my Card Kit and my In Color Card Class!