Bombs Away Birthday

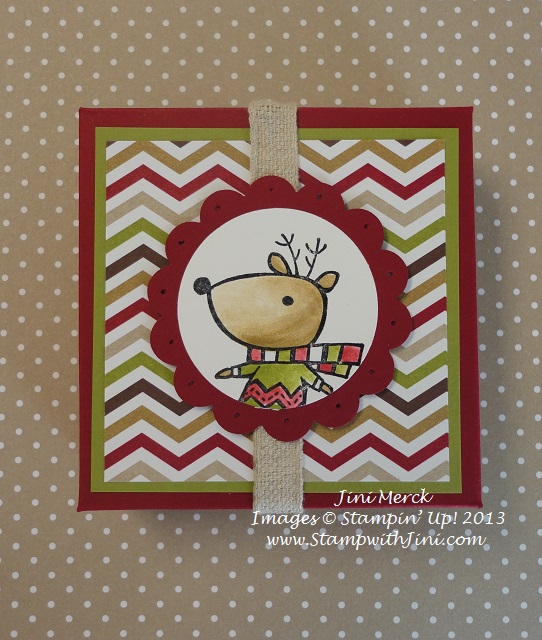
Today’s project is a quick and easy gift card holder using the Bombs Away Birthday Photopolymer Stamp Set (133411).

Bombs Away Birthday Gift Card Holder

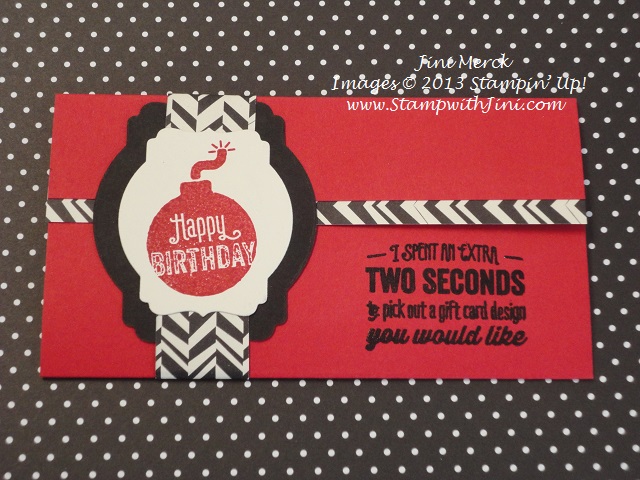
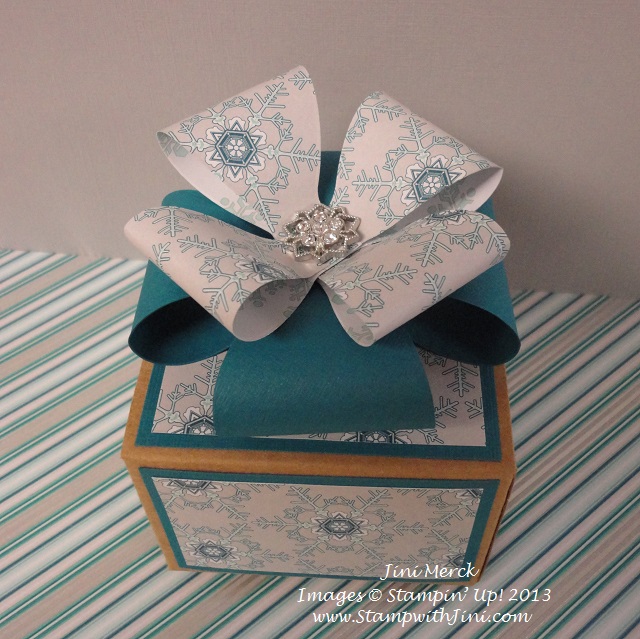
Would you believe that the trim I used for this project is from the Witches’ Brew Designer Series Paper pack in the Holiday Catalog? Well it is – I’ve made several non-holiday specific items using the patterns in this package.

How’d I make this gift card holder? Well it was easy – I took a piece of Real Red Card Stock that measured 6″ x 7 3/4″ and scored it at 3 1/4″ and 6 1/2″ and then folded it to make my basic holder. I added a strip of my Witches’ Brew Designer Series Paper that measured 6″ x 3/4″ to the top flap. Stamped the sentiment in VersaMark and used Black Embossing Powder on the bottom flap. (Make sure you fold it first so that you know which flap is which – LOL.)

For the Belly Band I stamped my “Happy Birthday bomb” in Real Red on Very Vanilla card stock and cut it out using the Deco Labels Collection Framelits. I also ran a piece of Basic Black card stock through the Big Shot at the same time using the next largest Deco Labels Collection Framelits die.

I cut a piece of the same Witches’ Brew DSP 1″ x 7″ I used for the trim and adhered one end to the Basic Black Deco Label on top side. Closed my gift card holder and just wrapped it around, lightly scoring it with my fingers as I went, until I got back to the Deco Label again. (Don’t make this too tight since you want to be able to slide it on and off the holder.) I adhered the second end and then placed my “Happy Birthday bomb” image on top to hide where the Designer Series Paper met.

Then all you need to do is add your gift card – How easy is that right?

Supplies:

Stamp Set: Bombs Away Birthday Photopolymer (133411)

Inks: Real Red Classic Ink (126949) and Versa Mark (102283)

Paper: Witches’ Brew Designer Series Paper (132185), Real Red (102482), Basic Black (121045), and Very Vanilla Card Stock (101650)

Accessories: Black Embossing Powder (10913), Heat Tool (1298053), Simply Scored Scoring Tool (122334), Big Shot (113439) and Deco Labels Collection Framelits (130102)

Click here to order your Stampin’ Up! Products online 24/7! (US only)

Use Hostess Code UHRUCJ9X and get a special Class from me for FREE!

Clearance Rack Blitz (while supplies last)

Weekly Deals (Special ends December 23, 2013 at 11:50 p.m. (MT)

Festive Flurry Ornament Kit (while supplies last)

Christmas Candy Bar Holder Video Tutorial

Need a quick and easy little treat to hand out for family and friends this holiday season? Why not try my Color Me Christmas Candy Bar Holder? I’ve made this cute little Color Me Christmas Candy Bar Holder for my husband and his coworkers as a little something special to brighten their day at work. I figured what’s better than chocolate right?

DSC00243

And since I was using the Santa image from the Color Me Christmas Stamp Set I chose to use Cookies ‘n’ Crème miniature candy bars to fill them with (get it – cookies – Santa, I wonder if my husband will pick up on that?)

These little treats are so easy to make and you can get 4 of them from one piece of Season of Style Designer Series Paper, so with one package of Designer Series Paper you can make 48 of them. Whoo hoo – Lots of treats for everyone!

Want to see how I made them? Why not watch my Christmas Candy Bar Video Tutorial – then leave me a comment and let me know what you plan on doing with your Christmas Candy Bar Holders.

Supplies:

Stamp Set: Color Me Christmas (131742/131745)

Inks: StazOn Jet Black Ink Pad (101406), Cherry Cobbler Classic Stampin’ Pad (126966)

Paper: Season of Style Designer Series Paper (132340), Cherry Cobbler (119685), and Whisper White Card Stock (100730)

Accessories: Envelope Punch Board (133774), 2 3/8″ Scallop Circle Punch (118874), 1 ¾” Circle Punch (119850), Blender Pen (102845), Dazzling Details (124117), Paper Piercing Tool (126189) and Stampin’ Pierce Mat (126199), Real Red (100052) and Basic Black Stampin’ Write Marker (100082), Snail Adhesive (104332), and Stampin’ Dimensionals (104430)

Click here to order your Stampin’ Up! Products online 24/7! (US only)

Use Hostess Code UHRUCJ9X and get a special Class from me for FREE!

Clearance Rack Blitz (while supplies last)

Weekly Deals (Special ends December 16, 2013 at 11:50 p.m. (MT)

Festive Flurry Ornament Kit (while supplies last)


Warmth & Wonder Bottled Treats

Remember on Wednesday when I told you about the sugar scrub I made for my daughter’s girlfriends at college? Well she also needed some quick gifts for the guys – and since we figured you can never go wrong with candy for those men in our lives I went back to my ever growing stash of Starbucks Mocha Frappuccino bottles and grabbed two of the larger size bottles – LOL.

Here is what I came up with for her guy friends – I kept them simple since after all they are guys. And since this was final week I knew the sugar rush would come in handy during those all night study sessions!

Warmth & Wonder Bottled Treats

This first bottle is filled with Christmas Candy Corn and I used the Warmth & Wonder Hostess Set (131880/131883) from the Holiday Catalog stamped in Baked Brown Sugar Classic Ink. I just love this elegant little deer image and since it fits into our 1 3/4″ Circle Punch it’s great for all kinds of quick gifts and projects.

I first wrapped my bottle using a 9″ long piece of Season of Style Designer Series paper that I cut 2″ wide. I used a piece of Sticky Strip to attach this to the bottle. Punched a 1 3/4″ circle of Designer Series Paper and attached that with Glue Dots. (I didn’t wrap the side of the lid with Designer Series Paper this time since the mocha’s brown lid coordinated with my project.) I adhered my image and layered it onto my 2 3/8″ Scallop Circle Punch Baked Brown Sugar piece and quickly pieced some holes in the scallops using my Paper-Piercing Tool and Stampin’ Pierce Mat and finally I added a couple of Dimensionals to the back so that it would stay really well on the slick glass surface.  Voila! all done with gift number one and onto the next one.

A Gift for You Bottled Treats

I wanted them basically the same but different so this second bottle uses the single stamp A Gift For You stamped in Cherry Cobbler and punched out using its coordinating punch, the Label Bracket. Easy pease – after I decorated it I just filled the bottle with some spice gum drops. Twenty minutes later she was set to hit the road!

Supplies:

Stamp Set: Warmth & Wonder Hostess Set (131880/131883) and A Gift for You Single Stamp (134765)

Inks: Baked Brown Sugar (131174) and Cherry Cobbler (126966)

Paper: Season of Style Designer Series Paper (132340), Baked Brown Sugar (131296), and Whisper White Card Stock (100730)

Accessories: Paper-Piercing Tool (126189) and Stampin’ Pierce Mat (126199), 2 3/8″ Scallop Circle Punch (118874), 1 3/4″ Circle Punch (119850), Label Bracket Punch (132153), Sticky Strip (104294), Glue Dots (103683), and Stampin’ Dimensionals (104430)

Click here to order your Stampin’ Up! Products online 24/7! (US only)

Use Hostess Code UHRUCJ9X and get a special Class from me for FREE!

TWO NEW COUNTLESS SAYINGS PHOTOPOLYMER SETS

Check out these two new Countless Sayings Photopolymer stamp sets just introduced yesterday –  I think your going to love the fun fonts in these two sets.

Countless Sayings 1 Photopolymer Stamp Set (item 135892)

countless Says 1 image

Countless Sayings 2 Photopolymer Stamp Set (item 135893)

Countless Says 2 image

Want to see the flyer with all the details? Click on the flyer image below for your copy.

Countless Sayings flyer image

Clearance Rack Blitz (while supplies last)

Weekly Deals (Special ends December 16, 2013 at 11:50 p.m. (MT)

Festive Flurry Ornament Kit (while supplies last)

Festive Flurry Sugar Scrub & Gift Bag

This weekend my daughter wanted to make a couple of gifts for her college girlfriends, of course she informed me of this last minute so I needed something quick and easy.

Kaitlin decided to make them Pumpkin Spice Sugar Scrub and since I had one of our Festive Flurry Ornament Kits (item 135813) that seemed like a great place to start. So while Kaitlin mixed up the sugar scrub I got to work on the gift bags and jars.

Sugar Scrub & Gift Bag together

Here is what we came up with – In less than an hour the two of us had these great handmade gifts for her girlfriends that I think they will really enjoy.

Here is a close up of the gift bag – What did I do to create this lovely gift bag?

Sugar Scrub & Gift Bag  (2)

I used the Festive Flurry Ornament Kit to create the focal point on my bag – It was quick and simple to do with just my glue gun needed, since everything else was in my kit. So all I had to do was punch the pieces out, score and then assemble.

I used the single stamp, A Gift for You (item 134765) that I stamped in Soft Suede onto Whisper White card stock and then punched out the sentiment with the matching Label Bracket Punch. I added a Pool Party snowflake that I cut out using the Festive Flurry Framelits Dies (item 132193) to create the little tag that I hung with Whisper White Baker’s Twine on the handle.

I didn’t have any tissue paper in the color I wanted and the white was kind of blah with the white gift bag – it needed a pop of color. So to create the coordinating tissue paper, I simply took some that I already had laying around and stamped it using one of the snowflakes from the Festive Flurry Stamp Set in Crumb Cake, Isn’t it cool how you can make your tissue paper match your gift bags?

Ok so now the bag was finished and I wanted to decorate the little jars that hold the Pumpkin Spice Sugar Scrub, right?

Sugar Scrub  (4)

So I simply used the Festive Flurry Ornament Kit again – but this time I only used the two smaller snowflakes and punched a 2 1/2″ Circle from Crumb Cake as the base. Once I built my snowflake with the hot glue gun I added it to the lid using Glue Dots, of course you could also use Sticky Strip.

Sugar Scrub  (1)

Sugar Scrubs are a lot of fun to make and are very popular right now. I love the fact that you can find everything in your kitchen to mix up a batch and it doesn’t have any preservatives in it – so they are great for those of us with sensitive skin. And this Pumpkin Spice Sugar Scrub is particularly yummy – when you use it you’re surrounded with the wonderful smell of pumpkin pie!

I love to use mine in the shower, since this recipe is gentle enough you can use it for both a hand scrub or body scrub. It is a wonderful way to moisturize during the winter. Even my hubby likes to use it on his dry hands in the winter.

Want the recipe? I figured you’d would so here it is:

Pumpkin Spice Sugar Scrub

2 c. Brown Sugar

1 c. Sugar

2 T. Pumpkin Pie Spice (reduce, if desired for less intense scent)

1 c. Sunflower Oil (you can also use Safflower or Vegetable oil)

Place ingredients into bowl. Mix until well blended. Store in a air tight container.

This recipe makes enough for a pint jar and can be used anywhere on your body. Just moisten your hands, scoop out a spoon full and rub in a circular motion on your moistened skin. Rinse and enjoy.

Be careful if you’re using this in the shower since the sunflower oil will make the floor slick. You’re going to love how soft this makes your skin feel! I use mine 2-3 times a week and the scrub should last for weeks and weeks if you are careful not to get water into it. You can add a cute little spoon to your gift for scooping if desired.

Sugar Scrub & Gift Bag (7)

If you like this my Pumpkin Spice Sugar Scrub you may want to try my Peppermint Stick Sugar Scrub too. Click HERE for more on my Peppermint Stick Sugar Scrub.

Supplies:

Stamp Set: A Gift for You (item 134765), and Festive Flurry (131778/131781)

Inks: Soft Suede (126978) and Crumb Cake (126975)

Paper: Pool Party (122924), Crumb Cake (120953), and Whisper White (100730)

Accessories: Festive Flurry Ornament Kit (135813),  Label Bracket Punch (132153), Big Shot (113439),  Festive Flurry Framelits Dies (item 132193), Whisper White Baker’s Twine (124262), Glue Dots (103683), 2 1/2″ Circle Punch (120906), plain white gift bag and small mason jar

Click here to order your Stampin’ Up! Products online 24/7! (US only)

Use Hostess Code UHRUCJ9X and get a special Class from me for FREE!

Festive Flurry Ornament Kit (while supplies last)Festive Flurry Ornament Kit

Clearance Rack Blitz (while supplies last) There was a glitch yesterday with the online store – so if you looked early yesterday at the items the pricing was incorrect – you may want to check it out again.

Weekly Deals (Special ends December 16, 2013 at 11:50 p.m. (MT)

Gift Bow Angel Bag & Card

I love these little angels that you can make with the Gift Bow Bigz L Die that I thought I would make some gift bags to put those odd shaped gifts into.

Cherry Cobbler Gift Bow Angel bag

I also made a coordinating card to give along with my gift. Want to see how I made the Gift Bow Angel? Click HERE to see my Gift Bow Angel Video Tutorial and my earlier project.

Cherry Cobbler Gift Bow Angel card

So what do you think? Why not leave me a comment and let me know.

Cherry Cobbler Gift Bow Angel bag & card (1)

Inks: Blushing Bride (131172)

Paper: Silver Glimmer Paper (124005), Season of Style Designer Series Paper (132340), Blushing Bride (131198), Basic Black (121045), Cherry Cobbler (119685), and Old Olive Card Stock (100702)

Accessories: Gift Bow Bigz L Die (129977), Basic Black Stampin’ Write Marker (100082), 1 3/8″ Circle Punch (119860), Large Oval Punch (119855), Big Shot (113439), Apothecary Accent Framelits (127003), Petals a Plenty Embossing Folder (116824), Glue Dots (103683), Multipurpose Liquid Glue (110755), Bone Folder (102300), Sponge Dauber (102892)

Click here to order your Stampin’ Up! Products online 24/7! (US only)

Hostess code UHRUCJ9X

Weekly Deals (Special ends December 16, 2013 at 11:50 p.m. (MT)

Festive Flurry Ornament Kit (while supplies last)

Clearance Rack Blitz banner image

NEW Clearance Rack Blitz

  • A New Clearance Rack Blitz begins today – Tuesday, December 10th
  • Retired products – up to 80% Off
  • Only Available while supplies last

Popular items tend to go fast so I recommend shopping sooner than later to make sure you have a chance to stock up on your favorites.

Use Hostess Code UHRUCJ9X and get a special Class from me for FREE!

Shop HERE  – Clearance Rack Blitz

Color Me Christmas Envelope Treat Pouch Video Tutorial

Today I wanted to share a new video tutorial with you of something I made to tuck into my holiday packages I was mailing. It’s just a little something, so that when they got their package they had something they could open right away. I have a very impatient bunch – LOL. So to hold my little treat I came up with this Envelope Treat Pouch.

I used the deer image from the Color Me Christmas stamp set that you can find in the Holiday Catalog on page 32 – It is a great set for coloring. And of course you have a lot of different choices as to how you color, but for this project I chose to use my Blender Pen and Classic Ink Pads.

Color Me Christmas Envelope Treat Pouch

I really love the way this Envelope Treat Pouch turned out and it holds a good size treat. So I tucked some Russell Stover Chocolates in mine.

Russell Stover Chocolates image

Even better yet,  since you get 4 per 12” x 12” piece of Designer Series Paper you can make a lot to share with your loved ones.

 Color Me Christmas Envelope Treat Pouch Video Tutorial

I don’t know about you, but I find the Envelope Punch Board a fantastic addition to my stamping supplies and have been finding all kinds of things besides envelopes to make with it! If you haven’t already seen my Getting Started with the Envelope Punch Board Tutorial – why not check it out now?

Want to learn more about stamping? Why not sign up for my FREE Newsletter and Class Information. (Just look for the sign up box above on the right or click HERE). Sign up and get a FREE Pinwheel Tutorial just for joining. Then you’ll get my FREE emails with great information on what is going on with Stamp with Jini along with helpful hints and tips.

Supplies:

Stamp Set: Color Me Christmas (131742/131745)

Inks: StazOn Jet Black Ink Pad (101406), Baked Brown Sugar (131174), Cherry Cobbler (119685), Old Olive (126953), Chocolate Chip (126979)

Paper: Season of Style Designer Series Paper (132340), Cherry Cobbler (119685), and Whisper White Card Stock (100730)

Accessories: Envelope Punch Board (133774), 2 3/8″ Scallop Circle Punch (118874), 1 ¾” Circle Punch (119850), Blender Pen (102845), Dazzling Details (124117), Paper Piercing Tool (126189) and Stampin’ Pierce Mat (126199), Cherry Cobbler 1″ Stitched Grosgrain Ribbon (132135), Sticky Strip (104294), and Stampin’ Dimensionals (104430)

Click here to order your Stampin’ Up! Products online 24/7! (US only)

Hostess Code UHRUCJ9X

Season of Style Candy Bar Slider Tutorial

Today’s project is a quick and simple one – it also makes a quick and easy stocking stuffer. After all you can’t go wrong with chocolate right? So here is my Season of Style Candy Bar Sliders. 

I’ve made two versions of this slider one using the Best of Christmas Stamp Set (134384) and the other using the Tag It Stamp Set (130300/130303).

Season of Style Candy Bar Slider (2)

I’ve also created a Season of Style Candy Bar Slider Tutorial for you using the Tag It version of the project.

Season of Style Candy Bar Slider (1)

Click HERE for my FREE Season of Style Candy Bar Slider Tutorial (PDF) 

Want to see how quick and easy they are to make? You can check out my video tutorial for my Halloween Candy Bar Slider HERE.

Fun right? Pull the ribbon up and there is a sweet surprise for that special someone.

Season of Style Candy Bar Slider (3)

Supplies:

Stamp Set: Best of Christmas (134384)

Inks:  Jet Black StazOn (101406) and Chocolate Chip Classic Ink (126979)

Paper: Season of Style Designer Series Paper (132340), Old Olive (100702), Chocolate Chip (102128), Cherry Cobbler (119685), and Whisper White (100730)

Accessories: Soft Suede Taffeta Ribbon (122967), Sticky Strip (104294), Simply Scored Scoring Tool (122334), 1 ¾” Circle Punch (119850), 2 3/8″ Scallop Circle Punch (118874), Modern Label Punch (119849), Word Window Punch (119857), Real Red (100052), Old Olive (100079), and Bushing Bride Stampin’ Write Markers (131265), Dazzling Details (124117)

Click here to order your Stampin’ Up! Products online 24/7! (US only)

Hostess code UHRUCJ9X

Weekly Deals (Special ends December 9, 2013 at 11:50 p.m. (MT)

Festive Flurry Ornament Kit (while supplies last)


Bubble Gift Bow Tutorial

I’ve been having the best time making all kinds of bows with the Gift Bow Bigz L Die that is available in the holiday catalog (page 37) and I’ve been finding all kinds of things to do with it.

Bubble Bow (2)

So today’s video tutorial shows you how to make what I call a Bubble Gift Bow.

I love the combination of the Season of Style Designer Series Paper and Midnight Muse Card Stock used for this project and since this bow is quick and easy to make and you can make a lot of them from one piece of Designer Series Paper too! So go ahead and decorate all your holiday packages!

Bubble Bow & Frosted Finishes Embellishments

This little box is one that I use all the time and it’s so easy to make when you use your Simply Scored Scoring Tool and Diagonal Plate. (Shhhh…. don’t tell my daughter, but I made this little box to hold a special pair of earrings I made using our Frosted Finishes Embellishments.) If you’d like to see how I made this box you can CLICK HERE to see my Spring Sampler Treat Box Video Tutorial.

Supplies:

Stamps: Loving Thoughts (128436/125845) and Festive Flurry (131778/131781)

Ink: Midnight Muse (126860) and VersaMark Pad (102283)

Paper:  Season of Style Designer Series Paper (132340), and Midnight Muse (126843), and Crumb Cake Card Stock (120953)

Accessories: Big Shot (113439), Gift Bow Bigz L Die (129977), Glue Dots (103683), Bone Folder (102300), Frosted Finishes Embellishments (132150), Simply Scored Scoring Tool (122334) and Diagonal Plate (125586)

Click here to order your Stampin’ Up! Products online 24/7! (US only)

Hostess code UHRUCJ9X

Cyber Monday – 24 Hour Sale

     Cyber Monday image - small image                  

Whoo hoo! Cyber Monday starts today.  You’ll want to check these special deals along with all the other items in our Weekly and Holiday Sale before the 24 hours is over. Sale ends Monday, Decmeber 2nd at 11:50 (MT)

Envelope Liners Framelits Dies (item 132172)
Expressions Thinlits Dies (item 132171)
Holly Jolly Greetings Simply Sent (item 132159)
Snowflake Season Simply Sent  (item 132176)
Large Rhinestone Basic Jewels (item 129324)
Extra-Large Gift Box (item 132147)

Place an order for any item/items, (not just sale items) with me using Hostess Code UHRUCJ9X  and I’ll give you a special Holiday Grab Bag FREE. It’s my way of saying thank you.

Here are the details:

Place an order for $30 in product and get a Holiday Grab Bag valued at $5

Place an order for $50 in product and get a Holiday Grab Bag valued at $15

Place an order for $75 in product and get a Holiday Grab Bag valued at $25

(The Holiday Grab Bag Offer is only available through me and while supplies last.)

Click here to order your Stampin’ Up! Products online 24/7! (US only)

Hostess code UHRUCJ9X

Holiday Sale (Runs Through December 2nd at 11:50 p.m. (MT)

Holiday Sale Flyer PDF

Weekly Deals (Special ends December 2, 2013 at 11:50 p.m. (MT)

Festive Flurry Ornament Kit (while supplies last)

Need Gift Ideas Image

Color Me Christmas Treat Box Tutorial

I like to make little treats for each of my family members for the holidays. So here is my latest “pillow gift” that I made for the family using the Color Me Christmas stamp set. Each Treat Box is filled with a chocolate for them to enjoy Christmas morning.

Color Me Christmas Treat Box   (2)

You can check out my earlier video Spring Sampler Treat Box Video Tutorial below to see how the basic box was made.

I used a piece of our 7/16″ Trim to create the band that keeps the box closed and hid the seam with my image.

Want a complete and printable PDF tutorial?  Click HERE for my Color Me Christmas Treat Box Tutorial.

Click here to order your Stampin’ Up! Products online 24/7! (US only)

Hostess code AJZK6FWH

Holiday Sale (Runs Through December 2nd at 11:50 p.m. (MT)

Holiday Sale Flyer PDF

Weekly Deals (Special ends December 2, 2013 at 11:50 p.m. (MT)

My Digital Studio 30% Off Sale (Sale ends November 30, 2013 at 11:50 p.m. (MT)

Festive Flurry Ornament Kit (while supplies last)

Winter Frost Fancy Gift Box Bow

I’ve fallen in love with our Gift Bow Bigz L Die recently and find myself reaching for it constantly. I’m really looking forward to making my own gift bows this holiday season and in the new year too, and since this die makes it so easy to create gift bows I hope to be able to share more projects with you in the next few weeks.

Fancy Gift Box Bow

This is one of our Kraft Gift Boxes (found in our 2013 Annual Catalog on page 160). They are a great size for holiday a little something – I’m thinking I maybe filling this one with some homemade rum balls.

I’ve covered the 4 sides of the Kraft Gift Box with panels of Island Indigo Textured Card Stock that I cut 3 1/4″ x 2 1/4″ and layered with a  3″ x 2″ piece of the Winter Frost Specialty Designer Series Paper. I added these panels to the box using Sticky Strip (104294) for a really strong hold. For the top of the Kraft Gift Box I layered a 3 1/4″ x 3 1/4″ piece of Island Indigo with a 3″ x 3″ piece of the Winter Frost.

This bows a lot of fun to make and I thought it would be easier to show you how I put it together so here is my Fancy Gift Box Bow Video Tutorial to show you how.

Quick and Easy right?  Isn’t it great that this Gift Bow Bigz L Die is part of the Weekly Deals? Want one too, you won’t want to delay since our Weekly Deals only last today until 11:50 p.m. (MT). Order one through me and I’ll send you a FREE Gift Bow Die Chart,  It’s a handy reference PDF for making all kinds of bows with this die.

And don’t you love the Frosted Finished Embellishments (132150) I added to the center – I hope the video showed you just how much of a wow factor they have for any of your projects.

Want to see another project I made with this bow? Check out my Facebook page – Stamp with Jini.  While your there why don’t you like my page so you can get quick updates and see more fun projects.

Supplies:

Paper: Winter Frost Specialty Designer Series Paper (132341), Island Indigo Textured 12 x 12 Card Stock (132132)

Accessories: Kraft Gift Boxes (124106), Gift Bow Bigz L Die (129977 – Weekly Deal Item), Big Shot (113439), Frosted Finished Embellishments (132150), Glue Dots (103683), and Sticky Strip (104294)

Click here to order your Stampin’ Up! Products online 24/7! (US only)

Hostess code AJZK6FWH

Holiday Tag It Bundles (Offer ends November 19th, 2013)

Weekly Deals (Special ends Today, November 18, 2013 at 11:50 p.m. (MT)

My Digital Studio 30% Off Sale (Sale ends November 30, 2013 at 11:50 p.m. (MT)

Festive Flurry Ornament Kit (while supplies last)