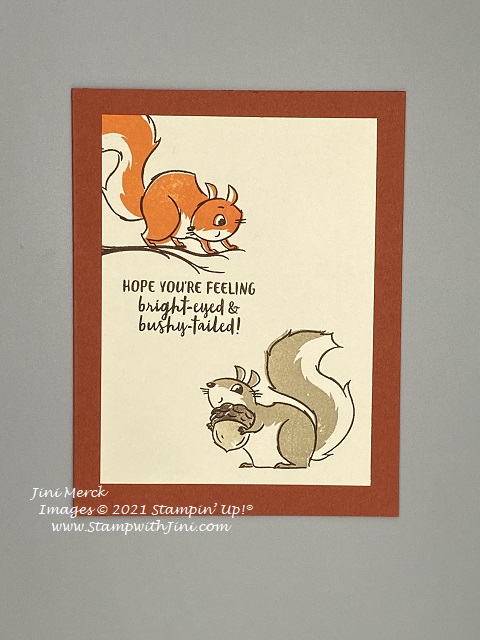
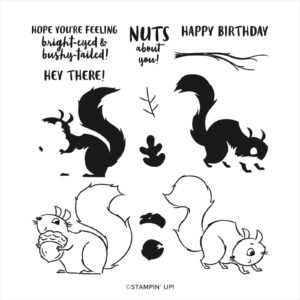
Today’s card is one I took right from the pages of the Mini Catalog using the Nuts About Squirrels stamp set. I love this kind of project where you can make it simply or you can step it up by using a few extra items that you may have. I’ll be sharing 3 card tutorials with you in this series using the same basic supplies. Today’s card is perfect for the stamper who is just starting to collect supplies or someone who just wants a clean and simple card. Isn’t that the great thing about stamping?
This stamp set is just so cute with it’s 2 step images and it’s great with it’s all occasions sentiments.
Here is a quick video for you and a PDF too that you can print with a complete supply list and step by step instructions.
Step It Up Series 1 – Nuts About Squirrels Card #1Video Tutorial
Step It Up Series 1 – Nuts About Squirrels Card #1Tutorial PDF
Enjoy! and then stop back by tomorrow when I’ll be sharing the second card in this series with you.
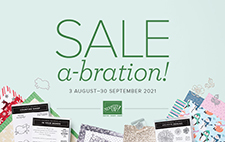
Just a Reminder Sale-a-bration Ends Tonight!
There is still time to get your favorite Sale-a-bration items before they are gone! Why not place an order today and get your favorites?
It’s also the last day to get your Sale-a-bration Starter Kit for just $99!
When you choose this option you’ll receive not only $125 in product but also a Bundle from our Mini Catalog list and start receiving a 20% discount on your favorite products from Stampin’ Up!. It’s the best Kit in the catalog!!! and That’s almost a $200 value for just $99 plus tax. Click HERE to learn more.
Shop at my Online Store and use Host Code NHWM3ADB and receive a FREE Gift, a Cutest Halloween Treat Tag Class
Click Here to learn more about using the Hostess Code If you order Online make sure your profile information is up to date and you’ve allowed me to send you your free gift.
If your Online order is $150 or more make sure not to use the host code so that you can take advantage of the Host Benefits yourself – No worries, I’ll still send you your free gift. It’s my way of saying thank you for choosing me as your demonstrator!
How about some swaps, team time and a fun treat tutorial? Today I thought I’d share what we’ve been doing as a my group recently. I’ve got a great team and we have a lot of fun together when we gather each month, so I thought I’d share some of the groups swaps first. I’ll start with some of the Sale-a-bration cards.
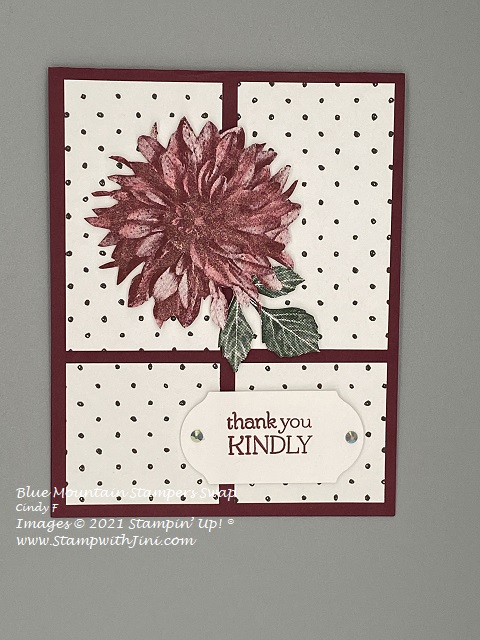
this first card uses the lovely Feels like Home stamp set (Sale-a-bration 156607) and has been colored with our Watercolor Pencils (141709 & 149014) assortments for a softer look. And this next card was created using the Delicate Dahlia stamp set (Sale-a-bration 156601) and Merry Merlot for a bold look.
If you don’t recognize the polka dots it’s from the Beautifully Penned Designer Series Paper pack (Sale-a-bration 156630) which as you can see is quite versatile. A bit of fussy cutting and some Wink of Stella finish off this lovely card. And how about this big bold sunflower?
This card uses the Celebrate Sunflowers (152517) and the coordinating Sunflower Dies (152704) and it’s also a fun buckle card, the sentiment tucks into a punched slot behind the sunflower.
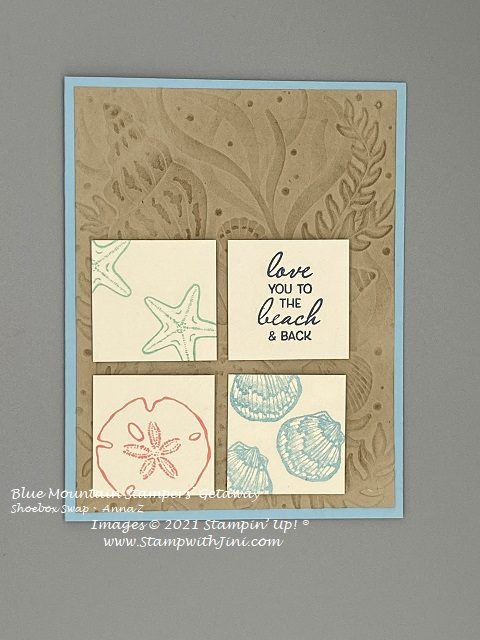
Not only do we do team meetings each month, but we also had a team retreat in August, so I thought I’d share a couple of the swaps from that today. This first project uses the Friends are Like Seashells Bundle (159516) and Seashells 3D Embossing Folder (154309).
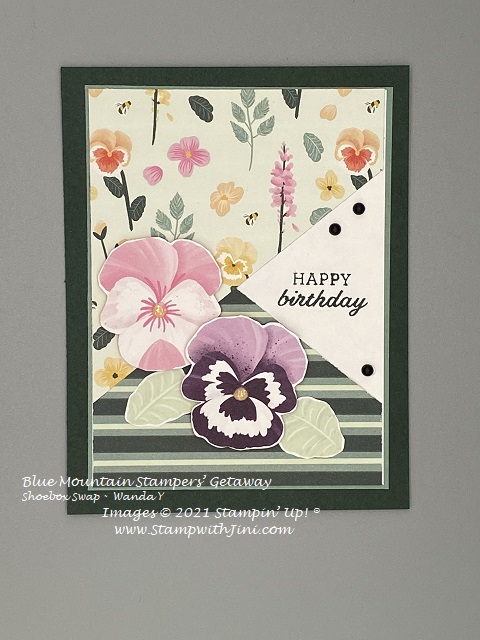
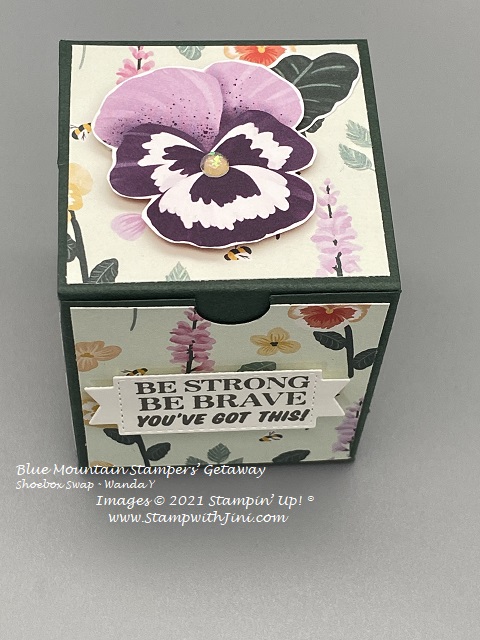
And how about some pansy fun using the Pansy Petals Suite (155810)? A simple cutting technique creates this criss-cross pattern for the card front.
We also made a fun little box that was filled with some treats.
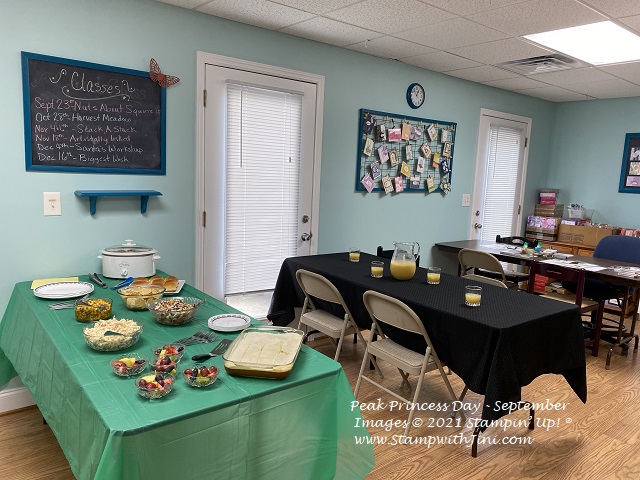
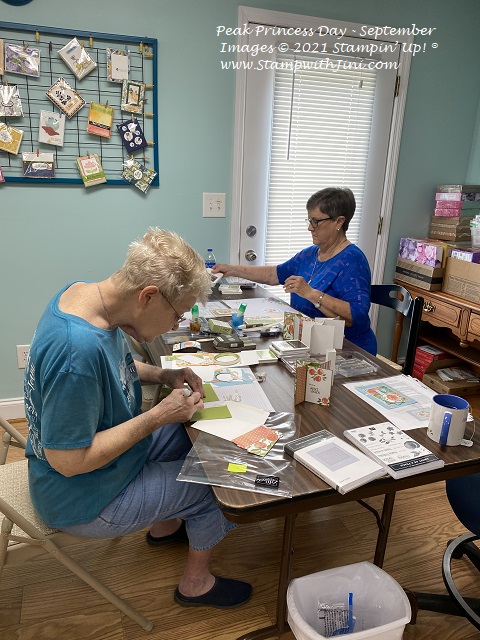
I really love this Pansy Petals Designer Series Paper (155807) and the fact you can cut tons of flowers out with the bundle’s dies and isn’t the little box adorable? Want to see more team fun? This month was our bi-annual Peak Princess event. What is that? It’s a special day filled with pampering that my team can earn. This time we made 3 special projects, won prizes and enjoyed a nice Hawaiian inspired luncheon together.
The pulled pork and Mango Salsa we had were a hit so I thought I’d share the recipes with you. The pulled pork is soooo easy with just 3 ingredients and you make in the crock pot too! And you may find the Mango Salsa addictive – eat it with chips, or you can add it on top of fish or shrimp taco too.
Whew – that’s a lot I know but I hope you enjoyed a bit of a peek into what it’s like to be a Blue Mountain Stamper.
What are the Blue Mountain Stampers?
That’s the name of our stamping community. I enjoy welcoming new members to our group. We’re from all over. If you’re considering joining Stampin’ Up!, you may have questions about how I would support you as part of my team. I do offer a variety of ways to learn, grow and to have FUN as a Blue Mountain Stamper!
Exclusive Team Resource Page – videos, PDFs and more
Exclusive Face book Group – A great way to share and connect with other team members and share
Monthly Creative Challenges
Swapping Opportunities
Team Retreats
Meetings – both local and online/virtual
Monthly Crafting Day
Monthly Lunch & Learn
Recognition & Incentives
Training available for workshops, clubs, classes and more!
Additional support and business coaching available
We have a very active group that share and answer each other’s questions on our Exclusive face book group. If you’re looking for fun, a place to grow and share with others…You’ll fit right in!
Hobbyists are welcome!
Did you know? 90% of my Blue Mountain Stampers’ areHappy Shoppers – purchasing for themselves, (along with their family and friends.) That’s right…you can just get a discount on products you love!
We welcome the crafter who’s looking to be a “happy shopper” (and save money), as well as those of you that want to build a business (and make money).
Everyone is welcome after all there’s room for both and everyone in between.
And there is NO Obligation when you purchase your starter kit – Join the Blue Mountain Stampers and see what it’s all about!
As you can see we love stamping and sharing together and are very active though out the year. If you think you’d enjoy joining us, right now is a great time to do so. But you’ll want to hurry since this special Sale-a-bration Kit offer ends in just 2 days!
For just $99 and tax you’ll get to choose not only $125 in product of your choice, but you’ll also get to choose one of our Bundles from the MINI Catalog! That’s almost a $200 value for just $99! And there is no obligation when you join. You can learn more about this fantastic offer HERE along with the benefits of joining my team too. Got questions, I’m happy to answer any questions you have about earning a discount on your favorite Stampin’ Up! products.
Shop at my Online Store and use Host Code NHWM3ADB and receive a FREE Gift, a Cutest Halloween Treat Tag Class
Click Here to learn more about using the Hostess Code If you order Online make sure your profile information is up to date and you’ve allowed me to send you your free gift.
If your Online order is $150 or more make sure not to use the host code so that you can take advantage of the Host Benefits yourself – No worries, I’ll still send you your free gift. It’s my way of saying thank you for choosing me as your demonstrator!
Whoo! our first kit for the holidays is now live and it is adorable!
The Christmas Whimsy Kit is an adorably festive card kit with a modern design! Santa’s elves might be hard at work in the North Pole but with this all-inclusive kit, the hard work is done for you! All pieces are printed, die cut, and ready for you to craft.
The simple steps of this kit are perfect for beginner crafters and kids, too! Grab a kit or two and gather around for a simple Christmas activity that everyone will enjoy. The kit contains everything you need to create eight elf-centric Christmas cards including printed card bases, die cuts, embellishments, an exclusive stamp set, a Night of Navy Classic Stampin’ Spot, and more!
Kit contains enough supplies to create eight cards—4 each of 2 designs.
Includes printed card bases, printed die cuts, adhesive, embellishments, gold foil die cuts, gold twine, and coordinating envelopes with gold foil accents.
Includes an exclusive stamp set and a Night of Navy Classic Stampin’ Spot.
And check out this wonderful video showing you how to assemble these fun holiday cards and then order yours today. Remember these kits are while supplies last so you won’t want to delay!
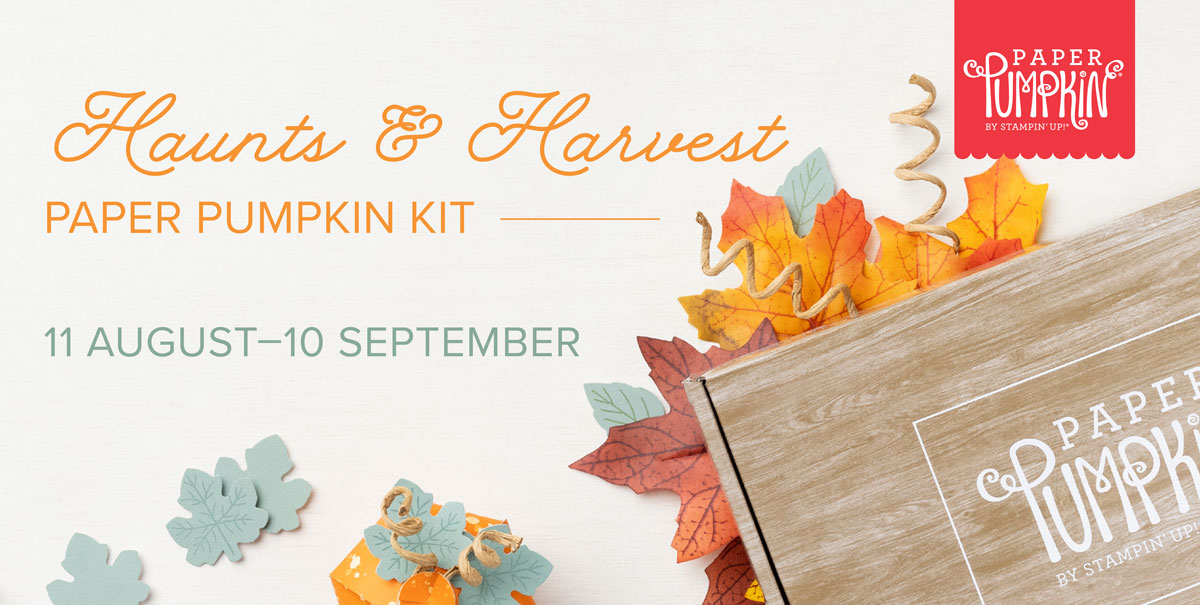
Just 2 days left to get your Paper Pumpkin Haunts & Harvest Kit for September!
And if you love cute little 3D items and our Paper Pumpkin Kits you’ll want to make sure to sign up today since there are only 2 more days left for the September Kit!
September Paper Pumpkin Kit
Hay, there! Experience everything the autumn season has to offer with the Haunts & Harvest Paper Pumpkin Kit! This month’s kit includes enough supplies to create 12 treat boxes—4 each of 3 designs. That means you can take your pick of apple, pumpkins, or jack-o-lantern treat boxes! Plus, the Paper Pumpkin box is designed to easily transform into a vintage wheelbarrow for you to display your harvest!
Whether you’re thinking about crisp red apples or you’re ready to carve some spooky jack-o-lanterns (or both!), the Haunts & Harvest Paper Pumpkin Kit—designed in a vivid fall palette—is a hands-on crafting experience for all autumn lovers!
About the Kit
Haunts & Harvest
Details
Kit contains enough supplies to create 12 treat packages—4 each of 3 designs. The all-inclusive kit includes printed die-cut boxes, die-cut sheets, adhesive, and more!
Finished treat box size: 2-1/2″ x 2″ (6.4 x 5.1 cm)
Includes an exclusive stamp set and a Classic Stampin’ Spot
Subscribe or stop by my Online Store and get a PrePaid Paper Pumpkin and it will qualify for Sale-a-bration products to when you add it to your order! Simply make sure when you get your prepaid email with the information you create or add it to your Paper Pumpkin account by the end of the day Friday, September 10th so that you’ll receive this fun kit in the mail.
Then if you want to craft with me, bring your kit along to my monthly Craft Time ! It’s free when you purchase a kit from me!
Want to know what’s happening? Why not sign up Sign up HERE for my FREE Newsletter and Class Schedule or Get my Blog Posts delivered right to your inbox HERE
Shop at my Online Store and use Host Code HCM37JXW and receive a FREE Gift, a Peaceful Deer Card
Click Here to learn more about using the Hostess Code If you order Online make sure your profile information is up to date and you’ve allowed me to send you your free gift.
If your Online order is $150 or more make sure not to use the host code so that you can take advantage of the Host Benefits yourself – No worries, I’ll still send you your free gift. It’s my way of saying thank you for choosing me as your demonstrator!
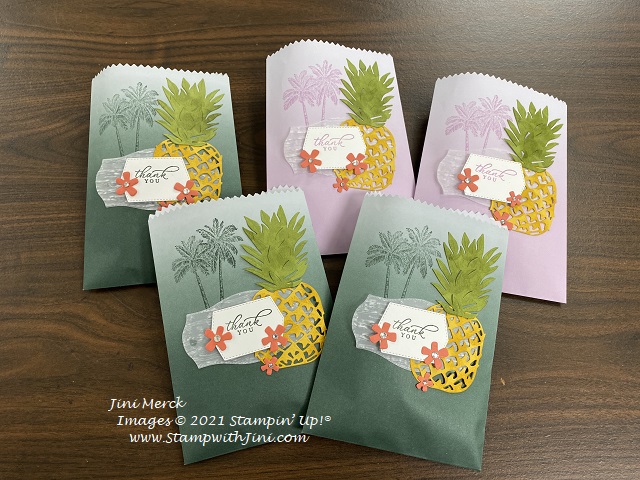
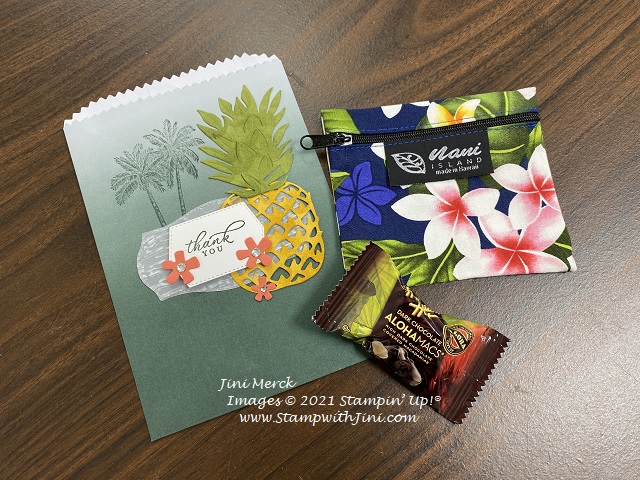
Love quick and easy treats? If so our Ombre Gift Bags might be just the think you are looking for since they make creating a treat quick and easy. I was inspired to create my own little gift bag by a swap that I received (you can see it HERE).
Make them up ahead and simply slide your goodie inside when you’re ready.
Bags are 4 3/4″ x 7″ so they’ll hold quite a bit too. This batch I whipped up for a little Team gift for our Meeting, I filled them with a sweet little treat for my along with a little something I picked up on the Maui Incentive Trip in May.
They were a hit for sure.
Want to see how I made them? I’ve got a quick little video tutorial and PDF for you.
Timeless Tropical Ombre Gift Bag Video Tutorial
And here is the PDF for you – you can print this off. It includes the video link too so you can easily find it again when you want to.
Shop at my Online Store and use Host Code 62NDFPPQ
Click Here to learn more about using the Hostess Code If you order Online make sure your profile information is up to date and you’ve allowed me to send you your free gift.
If your Online order is $150 or more make sure not to use the host code so that you can take advantage of the Host Benefits yourself – No worries, I’ll still send you your free gift. It’s my way of saying thank you for choosing me as your demonstrator!
LAST DAY TO RSVP & HOLD YOUR SPOT IN MY JULY CARD CLASS
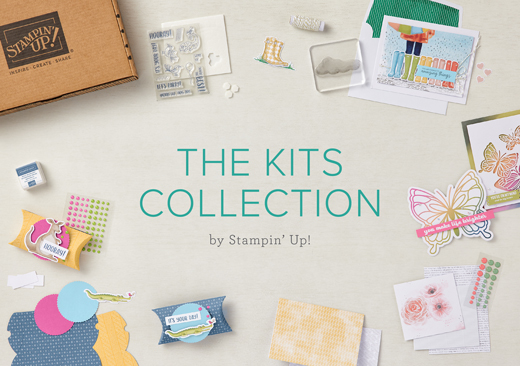
Woohoo! They are here and I’m excited to share with you a new line of creative products called the Kits Collection by Stampin’ Up!
Stampin’ Up! has taken the guess work out of creativity and done the hard parts, and you get to do the fun stuff: craft! Each kit is all-inclusive and includes the predesigned projects, preprinted pieces, and even the adhesives you need to complete the projects. These kits are great for new and experienced stampers too!
There’s a wide variety of kits for all different occasions, and new kits are being added regularly. You can shop the current selection in my Online Store HERE. But hurry! Kits are available only while supplies last!
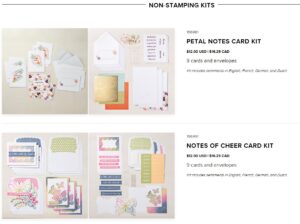
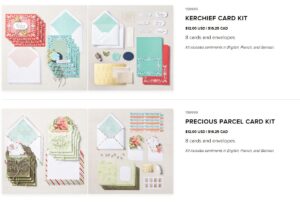
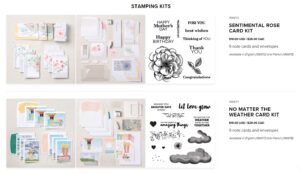
Pick the kit that’s right for you. Stamping Kits or Non Stamping Kits.
These make great gifts for all ages and provide quick and easy project while your relaxing at the beach too since everything is included in the box!
If you’ve never tried our kits here is a quick video telling you about what you can expect in our Kits
Why not stop by my Online store and check out this fun NEW crafting option today?
And great news if you’d like to craft with me I’ve got a Kit Time for you to do that! Every month we’ll be crafting in my classroom on the fourth Tuesday of the month 10 am – 12 pm. Bring your kit or choose from a kit that I have available and enjoy some time crafting with others! Click on my Calendar HERE to see more information about this fun craft time.
Or want to craft with friends? Why not choose a date and we’ll set up a time and place where you can host a Kit party with your friends! Everyone can choose the kit that they want to make and you can earn some free products at the same time. Email at StampwithJini@gmail.com or call me at 706 754-7124 to learn more about this fun crafting option.
Shop at my Online Store and use Host Code Y3ES9HYC
Click Here to learn more about using the Hostess Code If you order Online make sure your profile information is up to date and you’ve allowed me to send you your free gift.
If your Online order is $150 or more make sure not to use the host code so that you can take advantage of the Host Benefits yourself – No worries, I’ll still send you your free gift. It’s my way of saying thank you for choosing me as your demonstrator!
This lists contain discounts that are not part of the video, so you’ll be sure to want to check them out! So you’re ready to order your favorites first thing tomorrow so you don’t miss out on your favorite products and these great deals!
Remember items are while supplies last.
If you have any questions please feel free to contact me.
And of course you can stop by my Online Store, tomorrow on Tuesday, June 1st to SEE all the products on the list – just look for the Retirement Category in the drop down menu
Shop at my Online Store and use Host Code Y3ES9HYC
Click Here to learn more about using the Hostess Code If you order Online make sure your profile information is up to date and you’ve allowed me to send you your free gift, and you’ll receive the new 2021-2023 In Color Swatches
If your Online order is $150 or more make sure not to use the host code so that you can take advantage of the Host Benefits yourself – No worries, I’ll still send you your free gift. It’s my way of saying thank you for choosing me as your demonstrator!
Need a quick and easy gift? Love to create 3d projects? If so you’re going to love this quick and easy sticky note holder that I created for my Maui Incentive Trip swap. Pop it into one of our little cello bags, add a pen and wrapped it up with some ribbon. Voila!
This cute little project uses our NEW Hand-Penned Designer Series Paper and it’s soft subtles shades perfect for spring! And of course the very popular Brilliant Wings Dies. I just love this die set since you cut multiple butterflies at one time. Makes things quick and easy. I did a trips and tricks video for this die to help you get the best results. You can see that video HERE.
Want to see how I made them? Why not check out my video tutorial? I’ll warn you they are a lot of fun to make and so easy, once you get started you may not want to stop. lol
Brilliant Wings Easel Sticky Note Holder Video Tutorial
And here is a PDF that contains measurements, supply list and step by step directions. As always I’ve included the video link on the PDF so you have everything you need once you get your supplies.
Brilliant Wings Easel Sticky Note Holder Tutorial PDF
Enjoy!
Supplies:
Stamp Set: Enjoy the Moment (155523)
Inks: Basic Gray Classic Ink (149165/149166)
Paper: Hand Penned Designer Series Paper (155499), Mint Macaron (138337), Basic Gray (121044), and Basic White Card stock (159276)
Accessories: Double Oval Punch (154242), Brilliant Wings Dies (*155523), and Genial Gems (155500)
Shop at my Online Store and use Host Code Y3ES9HYC
Click Here to learn more about using the Hostess Code If you order Online make sure your profile information is up to date and you’ve allowed me to send you your free gift, and you’ll receive the new 2021-2023 In Color Swatches
If your Online order is $150 or more make sure not to use the host code so that you can take advantage of the Host Benefits yourself – No worries, I’ll still send you your free gift. It’s my way of saying thank you for choosing me as your demonstrator!
Want a 2021 Annual Catalog?
It’s FREE simply pay the shipping or pick up. Contact me today at stampwithJini@gmail.com for yours today!
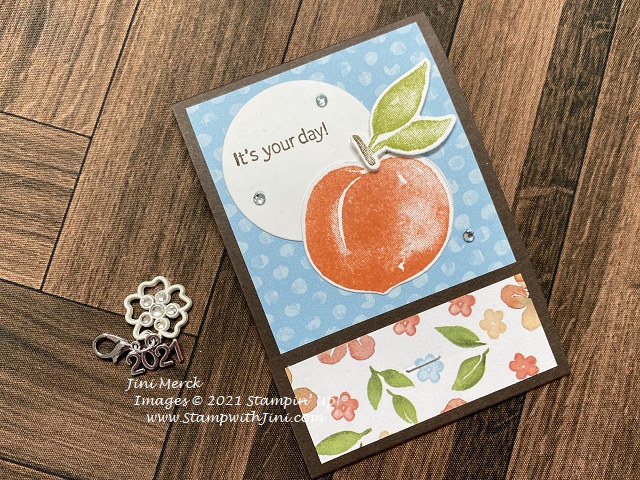
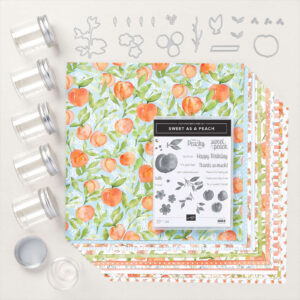
Today’s card uses one of the Suites from the Annual Catalog, It immediately drew my attention with it’s wonderful color pallet. After all I live in Georgia, so how could I resist a set great sentiments and images of peaches? We are the peach state after all.
I think you’re going to really like this Suite, so much so I’m going to be doing a class with it in August! I made today’s card for the Maui Incentive Trip card swap that I will be participating in this week. And really love the way it turned out using a simple sponging technique to create a two tone effect on the fruit and branches.
And it’s a fun fold too! So why not check out my video tutorial and see what you think?
Sweet as a Peach Joy Fold Card Video Tutorial
And of course I’ve whipped up a PDF tutorial for you with the complete supply list, measurements, and step by step directions too.
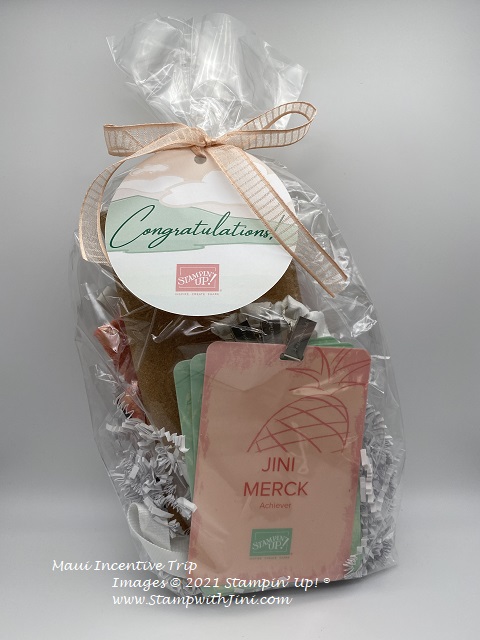
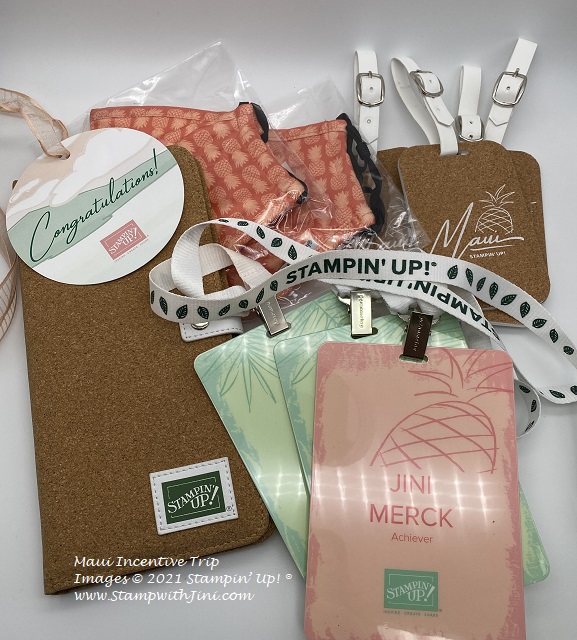
And on a personal note since today is the first day of the Maui Incentive Trip I wanted to share the little package that I received last month with our travel documents.
This little package contained a Maui pin, along with our name tags, luggage tags, travel wallet with paperwork, and masks since Maui has a mask mandate still in place.
I can’t tell you how excited we are to be in Maui, courtesy of Stampin’ Up! And we wouldn’t be going if it weren’t for my amazing team, The Blue Mountain Stampers and my wonderful stampers, and customers. This will truly be a trip of a life time for us. So thank you again and stop back by, as I’ll be sharing some photos will you both here and on my facebook page with you as I’m able.
Stop back by tomorrow when I’ll be sharing the cute little 3D project I made for the swap with you.
Shop at my Online Store and use Host Code Y3ES9HYC
Click Here to learn more about using the Hostess Code If you order Online make sure your profile information is up to date and you’ve allowed me to send you your free gift, and you’ll receive the new 2021-2023 In Color Swatches
If your Online order is $150 or more make sure not to use the host code so that you can take advantage of the Host Benefits yourself – No worries, I’ll still send you your free gift. It’s my way of saying thank you for choosing me as your demonstrator!
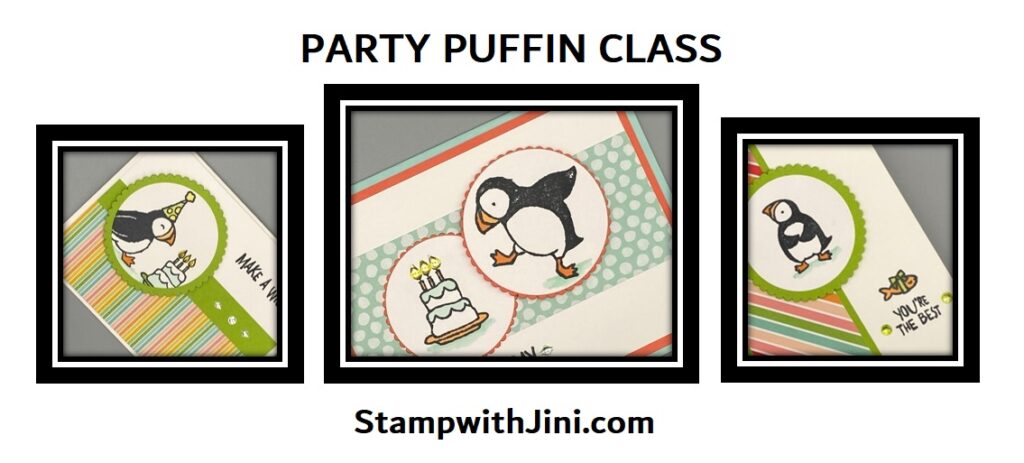
I just love this little set, it has such cute images and sentiments for all kinds of projects. Today’s card uses our NEW In Color, Polished Pink, and it’s a very popular color, so it makes it a great choice to add to your collection of colors. I’ve teamed it up with one of my favorites, Coastal Cabana for a fun summer time feel.
Check out this cute little 3d card I made using a fun fold to create card with tons of dimension.
It has a signature panel on the back of the box
And it will fold flat for mailing. Cool, right?
Here is a quick video tutorial for you that shows you how I made this bright, colorful card.
Party Puffin Pop Up Box Card Video Tutorial
And of course, a PDF with a complete supply list, the measurements, and step by step insturctions too.
If you love this set as much as I do, you’ll be happy to know that I’ll be highlighting this set in my July Card Class. Did you know you can get my classes for free each month when you place a minimum order using my Host Code? Check out my calendar of events HERE to learn more about my classes.
Shop at my Online Store and use Host Code Y3ES9HYC
Click Here to learn more about using the Hostess Code If you order Online make sure your profile information is up to date and you’ve allowed me to send you your free gift, and you’ll receive the new 2021-2023 In Color Swatches
If your Online order is $150 or more make sure not to use the host code so that you can take advantage of the Host Benefits yourself – No worries, I’ll still send you your free gift. It’s my way of saying thank you for choosing me as your demonstrator!
Host a Party and get more free stuff!
Contact me today to chose a time that works well for you and your friends! Can’t gather? That’s ok you can choose between my book party or facebook party.
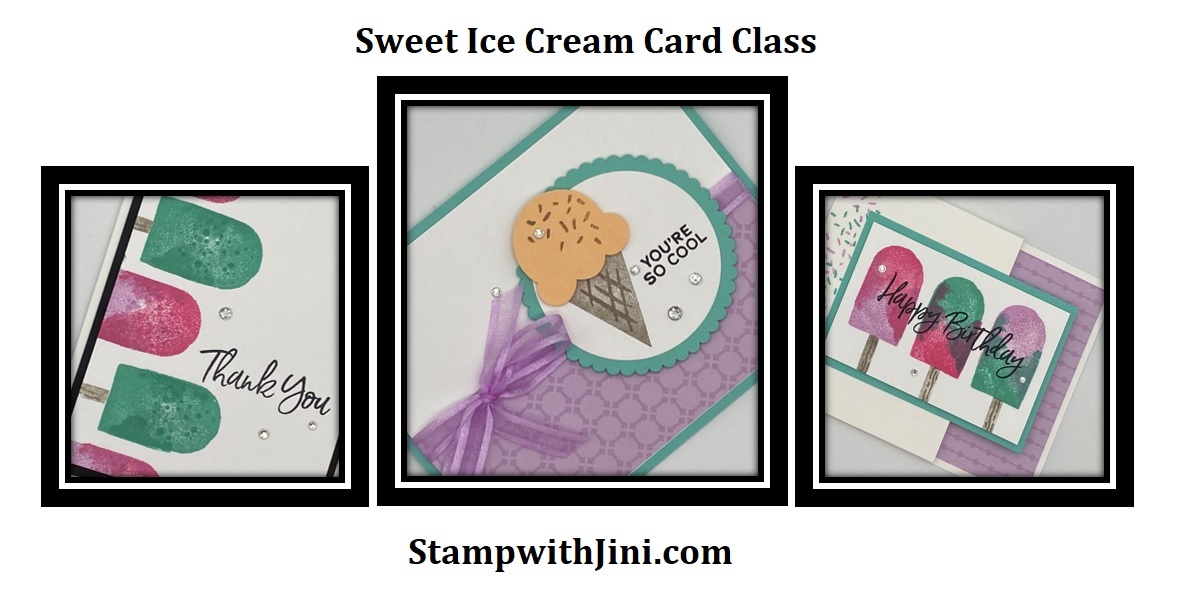
Today’s card is one I created to share during our OnTour event. I wanted to show case the NEW 2021 In Colors that I had just received during PreOrder. Here is what I came up with.
I like the way the card turned out. I used the Basic Borders Die to create a “table cloth” since I thought the Soft Succulent gave off a vintage vibe. I’m really loving the Evening Evergreen since it can be used as a neutral color like I did here.
I’ve whipped up a quick video tutorial for you. This is a two step stamp set and so you’ve got all kinds of options.
So what do you think? Is this a set that you’d enjoy creating with? Did you know that the Sweet Ice Cream stamp set is being highlighted in my May Card Class? Yep, and you can earn this class for FREE when you place a qualifying order in product. Attend my LIVE event or do the Online version the choice is your. You can click HERE to learn about this fun class option. But you’ll want to hurry since RSVP ends on May 14th.
Maui here we come!
On a personal note I wanted to let you know that Larry and I are getting ready for the Stampin’ Up! Maui Incentive Trip. Since this is a very special trip and we haven’t had a real vacation in many years, we decided to fully immerse ourselves in the experience. Starting this Thursday I plan on having blog posts scheduled for you to enjoy while we are gone, and if everything works correctly you’ll see them like normal. My regular office hours will resume on May 26th. I will check email, but I won’t be able to respond as quickly as I normally would. Stay tuned – I will share on face book group and when here I return.
If you are interested in setting up a Facebook or book party to take advantage of the extra Host Benefits we can get you started tomorrow. Please let me know before the end of the day Wednesday. This way you can have your party ready to go after the first of June if you’d like to gather with friends.
Shop at my Online Store and use Host Code Y3ES9HYC
Click Here to learn more about using the Hostess Code If you order Online make sure your profile information is up to date and you’ve allowed me to send you your free gift, and you’ll receive the new 2021-2023 In Color Swatches
If your Online order is $150 or more make sure not to use the host code so that you can take advantage of the Host Benefits yourself – No worries, I’ll still send you your free gift. It’s my way of saying thank you for choosing me as your demonstrator!