Butterfly Gala Floating Frame

Today’s project is one that I made for part of my Team gift that I gave everyone attending OnStage in Charlotte this past weekend. It’s a twist on the floating frame cards you’ve been seeing pop up – but this really is a frame lol. I thought it would be great to have a special frame of our stamping friends and a reminder of the wonderful time we had last weekend.

I really like the way the frame turned, out so I thought I’d share a video tutorial with you on how I made them. They are really easy to do. It’s a few days late since the first time I filmed it the file was corrupted so I had to do it again, not sure exactly why, but then that is the way with technology, right?

I’ve used the Stampin’ Blends to color the butterflies and I chose the shades of blue since our Team name is The Blue Mountain Stampers. Get it?

I placed those that I could on their pillows once we arrived in Charlotte.

The bags were stamped using the retiring Bloom by Bloom stamp set (148820) and Happiness Blooms Designer Series Paper (148795) was used for the tags.

I also used the Large Letter Framelits (141712) that are also on the retirement list for the tags – boy, do I hate to see these go, I use them all the time! Get yours before the supply is gone.

And here is a close up of the back.

Want to see how I made these Butterfly Gala floating frames?

Here is a video for you and of course a PDF tutorial too. I’ve also included a complete supply list below for you so you can make some too. So keep scrolling since it is at the very bottom!

Butterfly Gala Floating Frame Video Tutorial

Butterfly Gala Floating Frame Tutorial PDF

Last Chance List Update:

Retirement List: Please note that I’ve updated the PDF with items that are carrying over noted. They are both highlighted and * is behind their names. These items are being reconfigure and will only be offered in our new Cling offering in the 2019 Annual Catalog. Please let me know if you have any questions I know that the lists can be a bit confusing. The easiest way to see everything is in my Online Store HERE.

Stop back by tomorrow when I’m hoping to post some of the fun of OnStage with you – today I’m heading to the vet. Our four legged family member, Chewie decided to have a run in with the fence and lost on Friday night while I was gone to OnStage.

Poor thing. She has needed a lot of extra attention since I’ve been home and is not liking the confinement needed so she can heal.

Enjoy!

Supplies:

Stamp Set: Butterfly Gala (148580*)

Inks: Balmy Blue Classic Ink ( 147105/147168 ), Memento Tuxedo Black Ink Pad (132708/133456), Pool Party (144605) and Bermuda Bay Stampin’ Blends Combo Pack (144600), Night of Navy (144036) and Balmy Blue Stampin’ Blends Light (148540), and Color Lifter (144608)

Paper: Whisper White Card stock (100730)

Accessories: Butterfly Duet Punch (*148523), Paper Snips ( 103579 ), Stampin’ Sponges (141337), Mini Stampin’ Dimensionals (144108) and Stampin’ Dimensionals (104430)

Other Non-Stampin’ Up! products: wood frame, white acrylic ink and brush

*Butterfly Gala Punch (*148523)

Click here to order your Stampin’ Up! Products online 24/7! (US only)

Shop at my Online Store and use Host Code GXJ4CGDM

Click Here to learn more about using the Hostess Code If you order Online make sure your profile information is up to date and you’ve allowed me to contact you (If you chose no contact in the past you’ll need to call 1-800-Stamp Up to have them change your profile for you.)

Sign up HERE for my FREE Newsletter or Get my Blog Posts delivered right to your inbox HERE

The Annual Catalog is right around the corner and I won’t be able to mail you one if you have chosen no contact.

Fable Friends

It was almost 70 here in the North Georgia mountains and it was a wonderful breath of spring. Don’t you love that first sunny day, where you can shed your coat and bask in the rays? For me it’s all the shades of green now that I live in North Georgia. I’m surrounded by fields and love all the different shades of green. I’m lucky, yesterday I got to watch the calves frolicking in the new grass next to the house. Ah, spring….

So today’s card is perfect for that spring feeling – Fable Friends can be found in the Occasions Catalog on page 30 and it’s filled with images perfect for spring!

How can you not love these little faces – ducks in particular hold a special place in my heart since as a child my dad bought me 4 baby mallards ducks at the 7 Mile Fair that I raised as pets.

Anyhow…. want to see the card?

I love this guys little sailor top so I knew exactly what I wanted to do with him – Poppy Parade and Blueberry Bushel make this sweet little squirrel pop. I’ve whipped up a tutorial for you so you can make some too. Why not check it out?

Fable Friends Card Video Tutorial

Fable Friends Card Tutorial PDF

Enjoy! And then stop back by tomorrow when I’ll be sharing a fun 3d project with you that is perfect for your spring needs!

A Quick Note about supplies:

The Sale-a-bration products and Occasions Catalogs have been hugely popular and as you know our catalogs do state on the back that products are while supplies last. So if you don’t see something in the Online Store it is sold out, or has been removed until supplies are replenished (like with the Butterfly Duet and Cake Builder Punches that will be in our 2019 Annual Catalog).

Make sure you order the products on your Must Have Shopping List now to prevent disappointment and of course if you have questions please let me know. Keep in mind Stamps are typically available until after the retirement list posts since we produce these.

Here is what Stampin’ Up! told us yesterday:

Due to complications with our die supplier, we’ve run out of the Doily Builder Thinlits Dies (item 148553) in North America and they will not be available in the future

Here is a current list of Dies that are in low supply at this time and will sell out soon If we sell out of these dies, they will no longer be available to order:

  • Wonderful Floral Framelits Dies (item 148529)
  • Rose Trellis Thinlits Dies (item 148549)
  • Detailed Birthday Edgelits Dies (item 148548)

And of course the Sale-a-bration Coordinations Dies have been extremely popular – the Call Me Cupcake and Hop Around Framelits Dies have already sold out.

As always please let me know if you have any questions.

Supplies:

Stamp Set: Fable Friends (148670)

Inks: Memento : Blueberry Bushel Classic Ink (147138/147176), Tuxedo black (132708/133456), Crumb Cake Stampin’ Blends Combo Pack (144601), Poppy Parade (147275), Night of Navy (144039), Granny Apple Green (146877), Daffodil Delight (144585) and Pumpkin Pie Dark Stampin’ Blends (144577), Petal Pink Light Stampin’ Blends (146866) and the Color Lifter (144608)

Paper: and Whisper White Card stock (100730)

Accessories: Layering Circles Framelits Dies (141705)

Click here to order your Stampin’ Up! Products online 24/7! (US only)

Shop at my Online Store and use Host Code 44SNJGKN

Click Here to learn more about using the Hostess Code If you order Online make sure your profile information is up to date and you’ve allowed me to contact you (If you chose no contact in the past you’ll need to call 1-800-Stamp Up to have them change your profile for you.)


Home to Roost – March Thank You Card

Today’s card uses another FREE Sale-a-bration stamp set that you can earn when placing a qualifying order. Home to roost has this image of a wonderful rooster – I couldn’t resist reaching for my Stampin’ Blends to create a bold image for today’s project.

If you haven’t tried our Stampin’ Blends yet, you’ll want to be sure to do so. They are so easy to use, weather doing some blending with the two shades or just coloring with the one tone you’ll end up feeling accomplished – and it is so easy. Check out my quick video tutorial for this card and you’ll see just how easy they are to use!

And make sure you have our Memento Tuxedo Black Ink Pad – you’ll need this pad when you uses our Stampin’ Blends since the StazOn won’t work with the Alcohol markers.

Home to Roost Card Video Tutorial

A funny story I had some help on this card during my last team craft time – it took 3 of us putting our heads together for the perfect rooster colors. LOL I’d was having so much fun making the roosters a bit different. Sue’s suggestion of the Subtle Embossing Folder background added just the right touch. She’s right it is a great folder. I love to craft with friends and share ideas, how about you?

Here is a PDF tutorial so you can have a printed version to go along with the video in case you’d like to make some of thee cards which will be mailed out today kicking off my March Thank You cards.

Home to Roost Card Tutorial PDF

Don’t forget during Sale-a-bration it is easy to get this set for FREE. Simply place a qualifying order or an order for the products to create this card and you’ll be able to get yours too! There are lots of great Sale-a-bration products – if you’d like a brochure contact me with your name, address and phone number and I’ll be happy to mail you one. But don’t delay, because this special ends soon on March 31st!

Happy Stamping!

And don’t forget to stop by tomorrow when I’ll be sharing another card project with you highlighting our Stampin’ Blends.

Supplies:

Stamp Set: Home to Roost (Sale-a-bration 149736)

Inks: Memento Tuxedo Black Ink Pad (132708), Cajun Craze Stampin’ Blends Combo Pack (147931), Real Red Stampin’ Blends Combo Pack (147935), Shaded Spruce Stampin’ Blends Combo Pack (147938), Soft Suede Stampin’ Blends Combo Pack (147273), Mango Melody Dark Stampin’ Blends (147944), Ivory Stampin’ Blends (144606) and Color Lifter (144608)

Paper: Regals 6×6 Designer Series Paper (146965), Cajun Craze (119684), Crushed Curry (131199), and Whisper White Card stock (100730)

Accessories: Layering Circles Framelits Dies (141705) and Subtle Embossing Folder (143706)

Click here to order your Stampin’ Up! Products online 24/7! (US only)

Shop at my Online Store and use Host Code BAMJPSMW

Sign up for my FREE Newsletter My Newsletters include stamping tips, tutorials, ideas and Classes!

Country Home

I’m still feeling a bit country, must be the nip in the air! So here is another great card using the Country Home stamp set found in the Holiday Catalog – I’m loving this suite of products.

Our Stampin’ Blends have been used to color the images on this card – loving them!!! And so glad we have 6 new options (Basic Black, Mango Medley, Blackberry Bliss, Cajun Craze, Real Red and Shaded Spruce) from the Holiday Catalog. I’m not sure that these will carry over, but I am hoping, so you’ll want to be sure to order them now so you don’t miss out.

And great news the Chicken Wire Elements (147807) are available to order again!

Supplies:

 Stamp Set: Country Home (147678)

Inks: Memento Tuxedo Black Ink Pad (132708/133456), Cajun Craze (147931), and Old Olive Stampin’ Blends Combo Packs (144597), Light Crumb Cake Stampin’ Blends (144582)

Paper: Mint Macaron (138337), Cajun Craze (119684), Silver Foil Sheets (132178), and Whisper White Card stock (100730)

Accessories: Metallic Pearls (146282) and  Tin Tile Dynamic Embossing Folder (147906)

Click here to order your Stampin’ Up! Products online 24/7! (US only)

Shop at my Online Store and use Host Code SGA3ZW9U


Click Here to learn more about using the Hostess Code If you order Online make sure your profile information is up to date and you’ve allowed me to contact you

Stampin’ Blends Holder

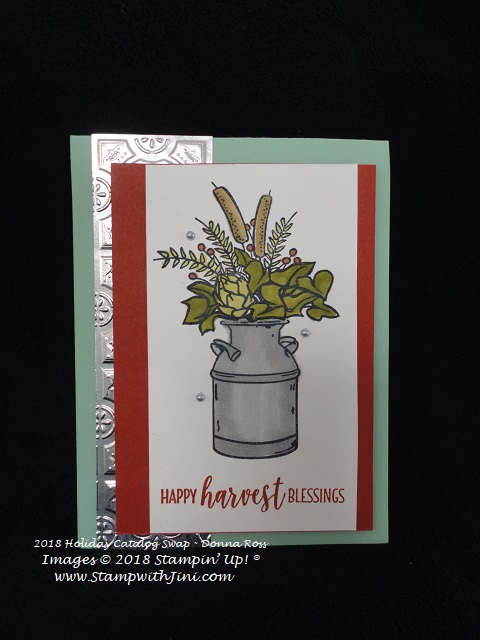
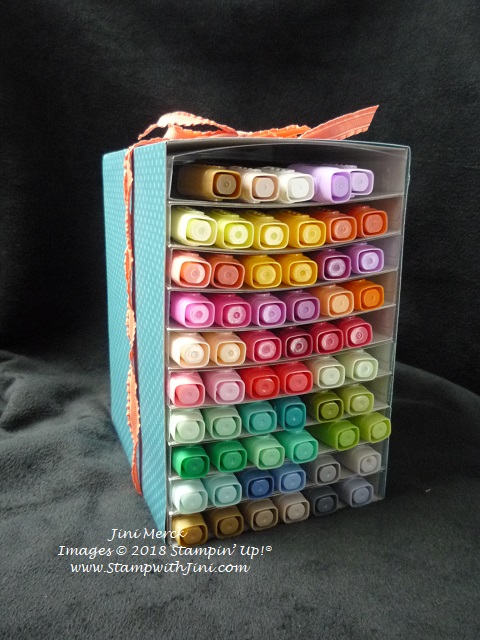
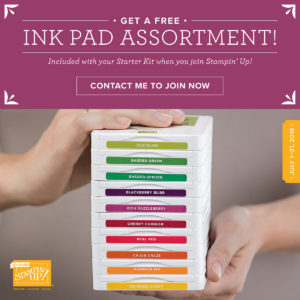
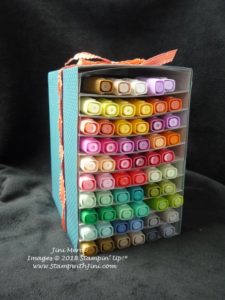
I’m loving my Stampin’ Blends and as my collection has grown I’ve needed to find a better way to hold them. And since I’m a very visual person I wanted to be able to see the colors easily too, rather than them laying in my drawer. Here is what I came up with after checking out my options.

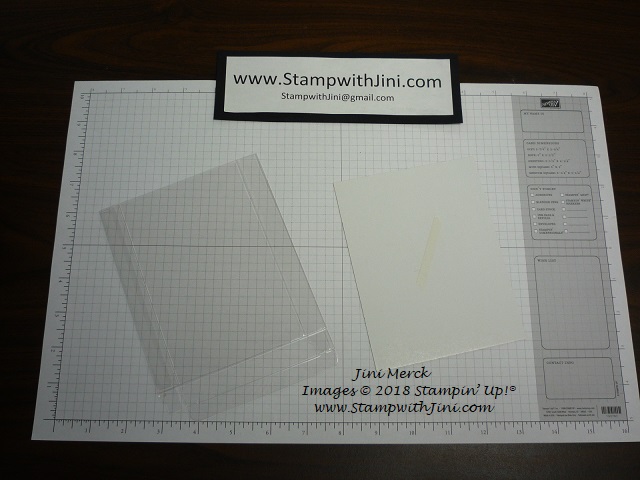
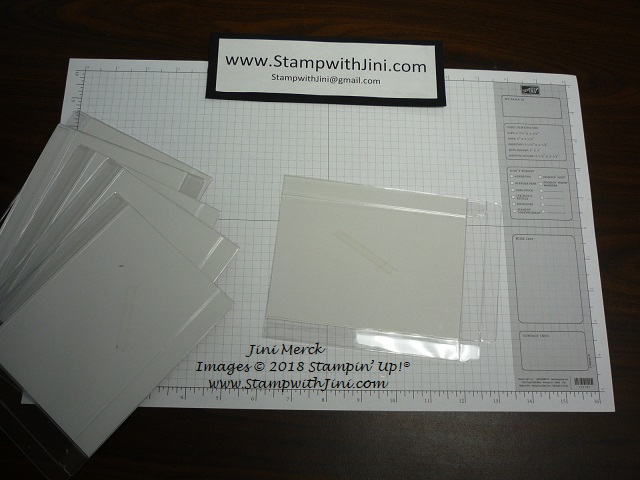
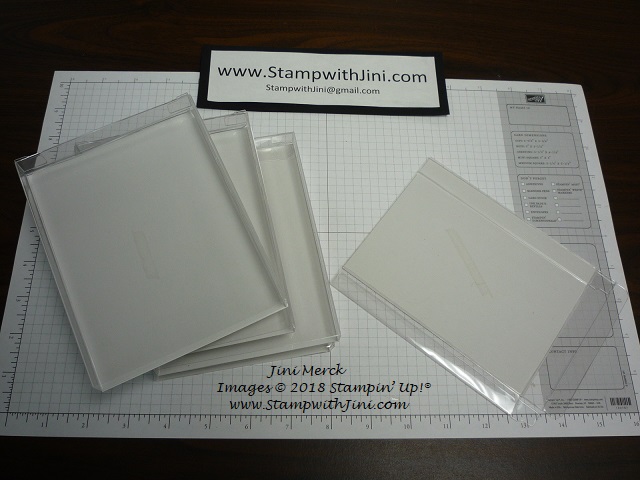
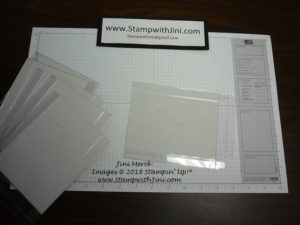
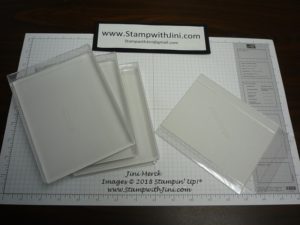
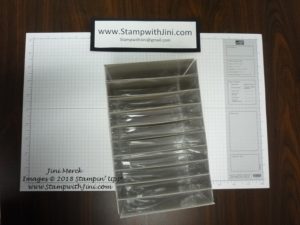
Want to see how I made it? You’ll need just a couple of things: a package of our Acetate Card Boxes, Tear & Tape,  tag board (such as Designer Series Paper backing), and 12×12 Designer Series Paper of your choice

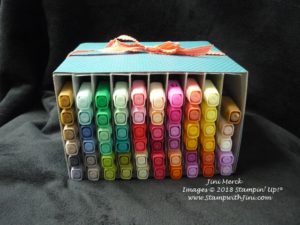
I will say I have a couple of things I would do differently. I used the white tag board from our Designer Series Paper. I found this was not stiff enough and would use our Glimmer Paper or Specialty Designer Series Paper backing the next time to give it more support. I would also add card stock strips to each layer so that see the color and so I know where to place my markers when I’m finished. (Since each shelf holds 3 combo sets I’d simply cut the 3 colors for each shelf and add them to the top of the heavy tag board to make them pretty!)

(I’ve given you the measurements I used for this project. Just know if you use the thicker tag board the measurements will change a bit so you’ll want to modify the measurements so that they work for you.)

Or if you make it like mine you could lay it on it’s side so the Blends stacked on each other which would help the sagging since the weight would be on the small edge of the Acetate Card Boxes.

Here is how I made mine:

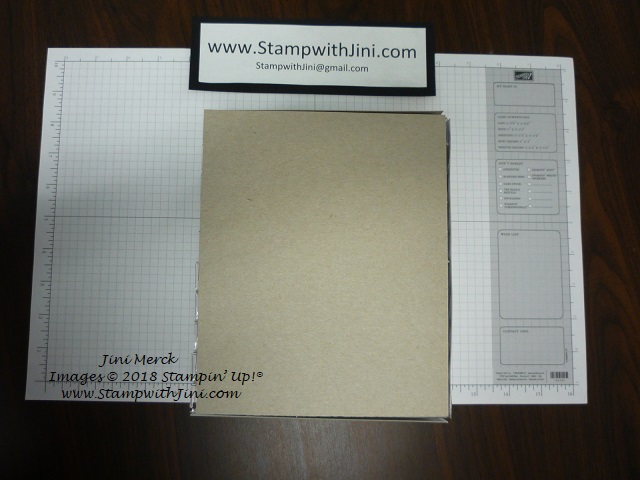
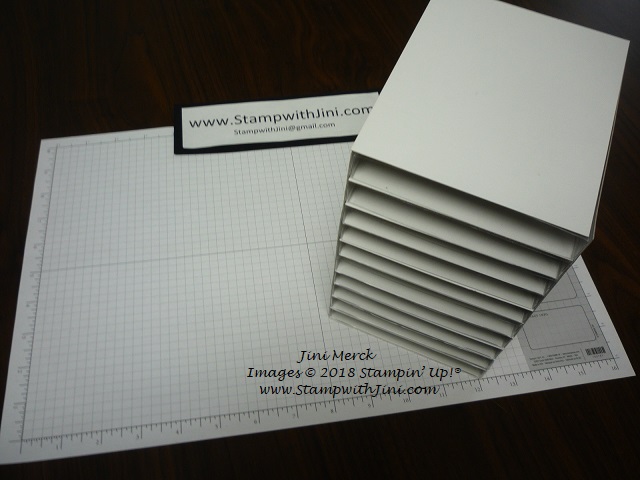
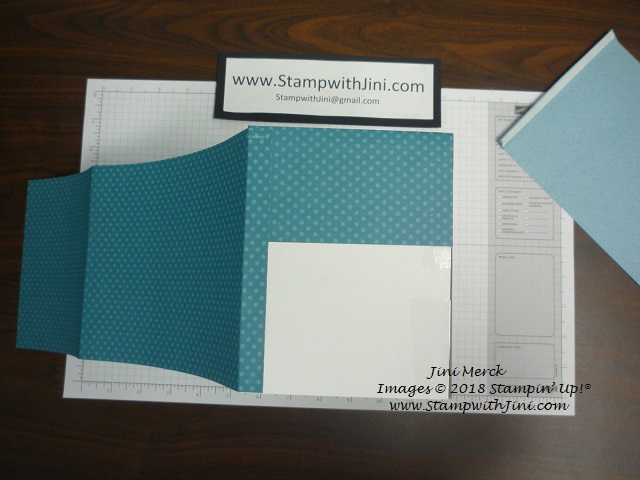
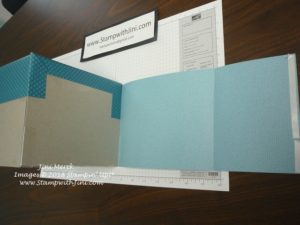
  1. I cut the one flap end off of each box. I measured the box and cut my board backing. (4 1/2″ x 5 3/4″)

2. I repeated this for the number of boxes I wanted. I did the complete package so I had a bit of room to grow.

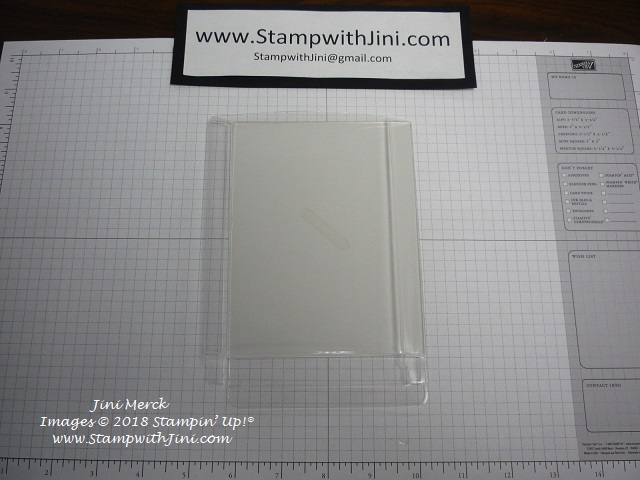
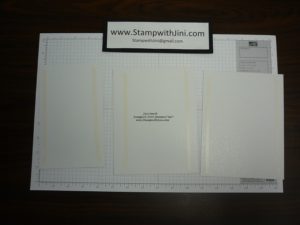
3. I added Tear & Tape to the tag board backing and then adhered them to each box.

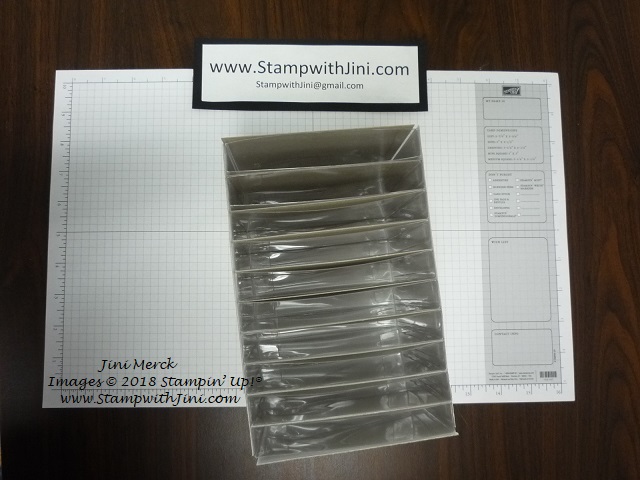
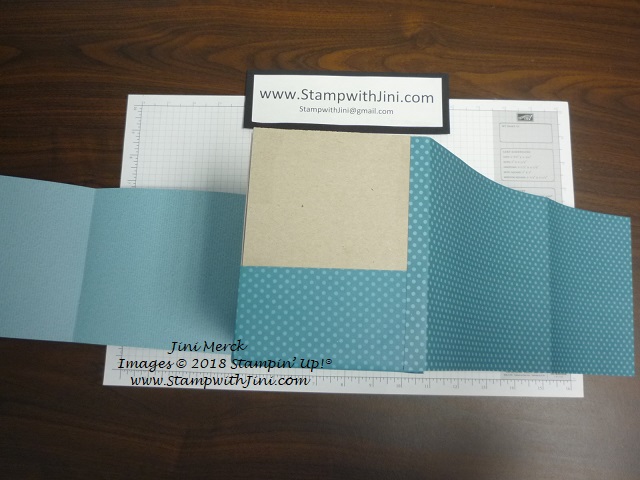
4. I then assembled the boxes

5. Added Tear and Tape to the back side of the tag board backing and stacked them together

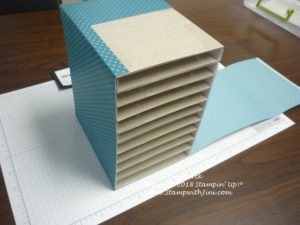
At this point I measured the tower of boxes.

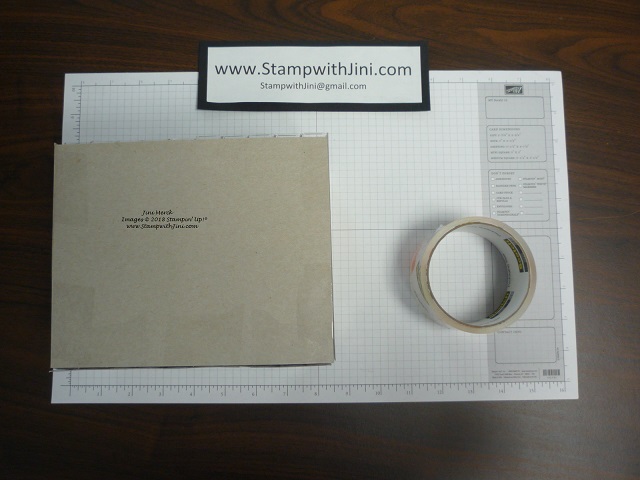
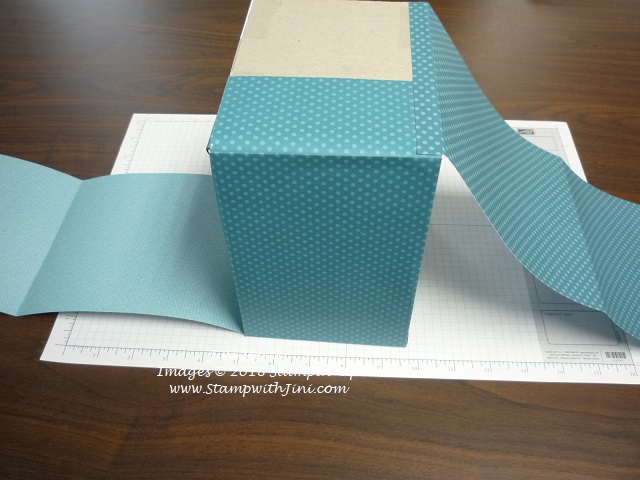
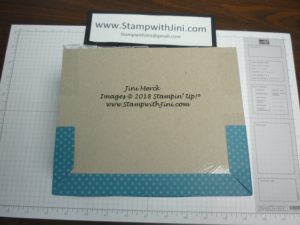
5. Cut the tag board sides, and top and added more Tear and Tape. (7″ x 5 3/4″ for sides and 7″ x 4 1/2″ for back)

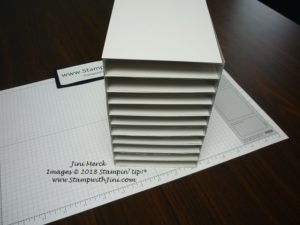
6. Cut another piece for the bottom and added it with Tear & Tape

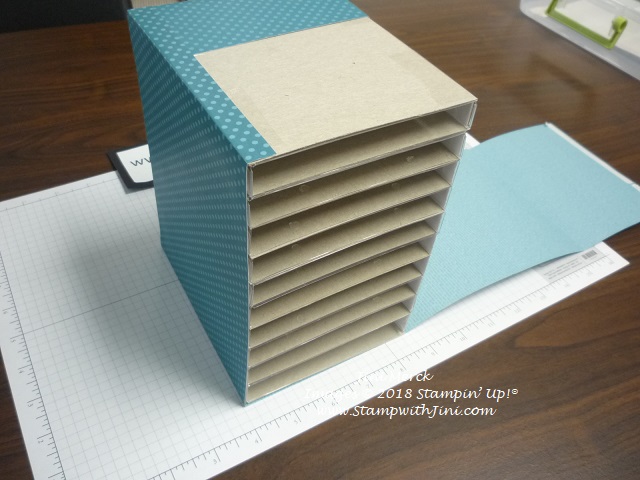
So that now my tower looked like this

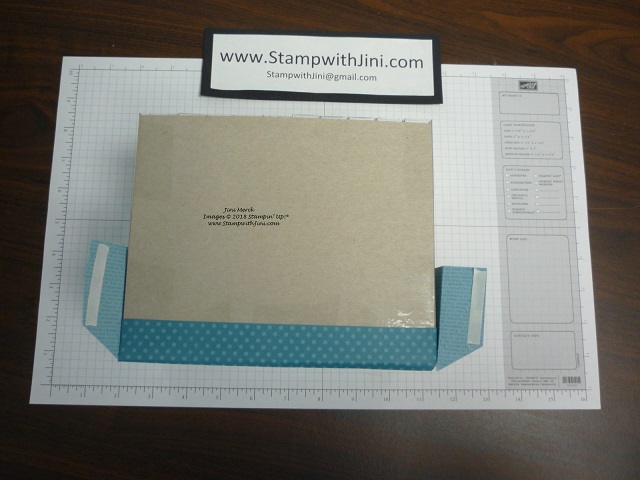
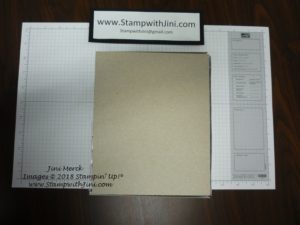
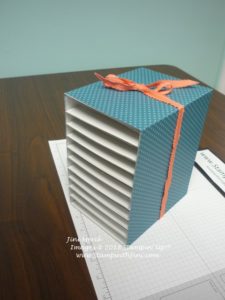
7.  I took some clear packing tape and taped the seams together on all the sides. This gave me some stability and finished the edges so they were clean.

8. I started to decorate my tower. (I chose some retired Island Indigo Designer Series Paper since it matches my crafting space and all of my storage items are that color at this point.)

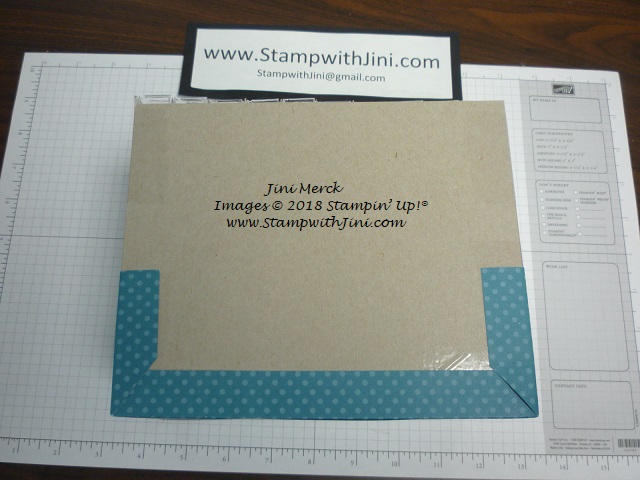
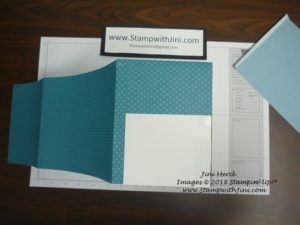
9. I measured the back of the box with enough to wrap around it a bit. Adhered it to the back and sides and then the bottom and top of the tower. Trimmed the corners. Added some more Tear & Tape to the side flaps. ( 12″ x 6 1/4″)

10. And adhered things down.

11. Now that the back was done I could move on to the sides – Because I wanted the fewest seams to show I measured two side panels that would have a bit of over hang and wrap the side and top/bottom completely. (5 3/4″ x 12″ scored 1/2″ on one end)

12. So I added some tear and tape to the top section and started to wrap around my tower

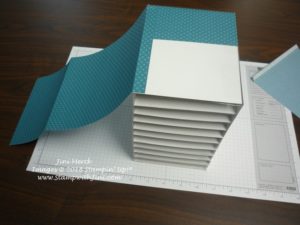
scoring with my fingers as I went.

13. Then added a second piece. Adhering again only on the small flap that would be the bottom of my box.

At this point I could wrap the second piece around to make sure things lined up the way I wanted them too. Making sure that the seams were flat and the edges lined up.

14. Now I added more Tear and Tape along the edges where I wanted it and Multipurpose Liquid Glue on the center areas. Then I carefully adhered each side down starting the the bottom (since I wanted the top seam to look the best.)

15. Then I repeated the process for the top piece – added more adhesive  and began wrapping it.


Once everything was the way I wanted I wrapped a ribbon around the tower as a handle so that I could easily lift it to move the tower.

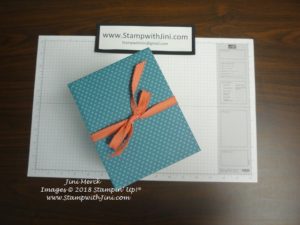
That’s it. I love the fact that this tower can be customized the way you want it – make it as tall or short as you’d like. Even make two 5 box towers and attach them to each other! The options are unlimited.

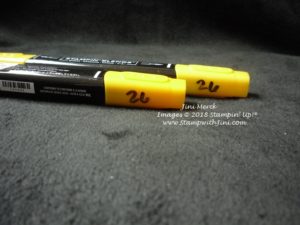
And a quick tip for you: Number your Stampin’ Blends – I’ve put a number on each cap with my Sharpie so that I can quickly see which ones go together. So for instance my Light & Dark Mango Melody has the number 26 on them. Mine happen to be in the order I got them – but you can number them any way you would like.


Supplies: 

Accessories: Acetate Card Boxes (1446258), Tear & Tape (138995), and  Multipurpose Liquid Glue (110755)


Click here to order your Stampin’ Up! Products online 24/7! (US only)

Shop at my Online Store and use Host Code W2NX46E9

Trick or Tweet Treat Box

I love to make little treat items for family and friends and so when I saw the Trick or Tweets stamp set in the Holiday Catalog I knew it would be perfect for this year’s Halloween treats.

Check out this cute little box I made using the set

My fellow stamper, Pam gave this cute little box idea last spring and so I wanted to give it a try myself. Turns out these little boxes are sooooo easy to make, that they are kind of addictive once you get going.

Or at least I couldn’t stop – LOL!  The images and color combinations were just a lot of fun to play with once I got coloring with my Stampin’ Blends.

I thought you might like to try some too for your treats so I’ve whipped up a quick video tutorial.

Trick or Tweets Treat Boxes Video Tutorial –

And of course I’ve included a complete supply list on my PDF tutorial for you.

Why not leave me a comment and let me know which combination is your favorite?

Trick or Tweet Treat Box Tutorial PDF

And why not stop back by tomorrow when I’ll be sharing another fun little treat box with you?

Enjoy!


Supplies: 

Stamp Set: Trick or Tweets (147725/147722)

Inks: Memento Tuxedo Black Ink Pad (132708)

Paper: Pumpkin Pie (105117), Gorgeous Grape (146987), and Whisper White Card stock (100730)

Accessories: Black 3/8″ Glittered Organdy Ribbon (147897), Scallop Tag Topper Punch (133324), Layering Circles Framelits Dies (141705), Simply Scored Scoring Tool (122334), and Assorted Stampin’ Blends

Click here to order your Stampin’ Up! Products online 24/7! (US only)

Shop at my Online Store and use Host Code FZ3P6HGN


Click Here to learn more about using the Hostess Code If you order Online make sure your profile information is up to date and you’ve allowed me to contact you

Live local and want to stamp with me? Why not check out my upcoming Calendar of Events?

Country Home Folding Box & Tutorial

Today’s project was one that I made for my Holiday Catalog Kick Off this past Saturday. It’s a great little box and it folds flat which makes it a lot of fun and super when you need to travel with something.

It uses the Country Home stamp set a fast becoming a favorite of mine and who can resist the Tile Tin Dynamic Embossing Folder – so perfect for a vintage feel.

I found these yummy little Russell Stover Pecan Delights as treats to go inside. I think the wrapper looks like Cajun Craze, how about you?

I’ve made a video tutorial for you so you can make some too. Why not take a few minutes and check it out?

Country Home Folding Box Tutorial –

And how about a printable version? It includes a complete supply list and instructions to go with the video.

Country Home Folding Box Tutorial PDF

Enjoy! And why not stop back by tomorrow when I’ll be sharing another tutorial with you using the Falling for Leaves stamp set.

NEW Items Added to the Clearance Rack

New items have been added to the Clearance Rack today – so why not check them out?  If you love Fast Fuse you’ll be excited to know that there is a limited supply available too!

Supplies: 

Stamp Set: Country Home (147678)

Inks: Memento Tuxedo Black Ink Pad (132708)

Paper: Blackberry Bliss (133675), Mint Macaron (138337), Cajun Craze (119684), and Whisper White Card stock (100730)

Accessories: Tin Tile Dynamic Embossing Folder (147906), Metallic Brads (146929), Cajun Craze (147931), Blackberry Bliss Light (147909), Mint Macaron Stampin’ Blends Combo Pack (147283)

Click here to order your Stampin’ Up! Products online 24/7! (US only)

Shop at my Online Store and use Host Code FZ3P6HGN


Click Here to learn more about using the Hostess Code If you order Online make sure your profile information is up to date and you’ve allowed me to contact you

Sign up for my FREE Newsletter My Newsletters include stamping tips, tutorials, ideas and Classes!

Sign up HERE for my FREE Newsletter or Get my Blog Posts delivered right to your inbox HERE

How Do You Get a 2018 Holiday Catalog?

Don’t have a Demonstrator? Email me at StampwithJini@gmail.com include your name, address, and phone number and I’ll be happy to mail you one.


Painted Glass & Blends

The Graceful Glass Suite is a perfect fit for our NEW Stampin’ Blends. The Graceful Glass Designer Vellum is a easy way to create lovely elegant cards. Check out these two cards made using the floral patterns from the stack.

And the color options are endless

Creating this stain glass looks is easy – simply color the back side of the vellum with the Stampin’ Blends and you’ll create the look of stained glass. Yes it is that quick & easy!

Love the set? How about this card made with the Stained Glass Thinlits Dies?

The Rich Razzleberry 1/4″ Velvet Ribbon (147016) is gorgeous!

Supplies:


Stamp Set: Painted Glass (*147458/147461)

Paper: Graceful Glass 6×6 Designer Vellum (146344)

Accessories: Stained Glass Thinlits Dies (*146347)

*Stained Glass Bundle (148361/148362)


Click here to order your Stampin’ Up! Products online 24/7! (US only)

Shop at my Online Store and use Host Code 7GTJDB3N

Click Here to learn more about using the Hostess Code If you order Online make sure your profile information is up to date and you’ve allowed me to contact you

Sign up for my FREE Newsletter My Newsletters include stamping tips, ideas and updates on what is happening with me! You’ll also receive a FREE Class Tutorial using the 2017-2019 In Colors when you sign up!

Painted Glass Tutorial

Do you love our Stampin’ Blends? If you love this newer coloring option that we have then you’ll love the fact that you can use them to color our latest 6×6 choice of paper, the Graceful Glass Designer Vellum. It’s perfect for our Stampin’ Blends AND with the new color choices you’ve got a ton of options too! This pack of paper has designs that give you the feel of stain glass and can be cut down to create multiple cards since it’s designed with card fronts in mind.

Want to see the card now? Here we go.

Done in our two new In Colors, Lovely Lipstick and Pineapple Punch its bright and bold graphic design draws you in. And I love there is a coordinating Stamp Set called Painted Glass (147458/147461) that has wonderful sentiments and images.

Here is the tutorial – so why not make some of your own?

Painted Glass OnStage Card Tutorial PDF

Good news, all of our Stampin’ Blends are now available for order. So now you have 22 great color options! And you can get them in Combos or single, so they’ll fit any budget! But don’t forget your Color Lifter, it’s great for fixing those little oops we sometime get when coloring.


Supplies: 

Stamp Set: Painted Glass (147458/147461)

Inks: Memento Tuxedo Black Ink Pad (132708)

Paper: Graceful Glass Designer Vellum (146344),Lovely Lipstick (146970), Pineapple Punch (146971),and Whisper White Card stock (100730)

Accessories: Black 1/8″ Cord (146350), Lovely Lipstick Stampin’ Blends Dark (147028), Pineapple Punch Stampin’ Blends Dark (147030), and Banner Triple Punch (138292)


Click here to order your Stampin’ Up! Products online 24/7! (US only)

Shop at my Online Store and use Host Code J4YKW2KG, place a qualifying order of $50 and you’ll receive a FREE Gift from me

Click Here to learn more about using the Hostess Code If you order Online make sure your profile information is up to date and you’ve allowed me to contact you

You’re Inspiring Easter Card Tutorial

I loved the daffodil images in the You’re Inspiring stamp set (145805/145808) as soon as I saw it, so was excited to sit down and play with it the other day. I came up with a bunch of cards quickly and wanted to share one with you today.

I designed this card for Easter. Seemed there were always these smiling little faces trying to pop up on a warm winter day – next to the snow in Wisconsin it was a cheerful pop of color. LOL!

I love the way the faux embossed Letter Press technique that I used for this card turned out using the Basket Weave Embossing Folder that is part of the Sale-a-bration Blooming Basket Bundle (147504/147505). I can’t wait to play more with this folder.

If you haven’t seen this bundle – check out this video

beautiful right?


Well good news about this card I’m sharing with you today – I’ve made a quick tutorial for you so you can make some too.

You’re Inspiring Easter Card Tutorial (printable) PDF

So what do you think? Want to make one too?

Enjoy! And don’t forget to stop back by tomorrow when I’ll be sharing a little Easter treat I made yesterday with you.


Supplies: 

Stamp Set: You’re Inspiring (145805/145808)

Inks: Memento Tuxedo Black Ink Pad (132708) and Soft Suede Classic Ink (126978)

Paper: Old Olive (100702), Crumb Cake (120953), and Very Vanilla Card stock (101650)

Accessories: Crumb Cake 3/8″ Classic Weave Ribbon (144162), Basket Weave Embossing Folder (Sale-a-bration 147504/147505), Layering Ovals Framelits Dies (141706), Dark Daffodil Delight Stampin’ Blends (144585), Dark Old Olive Stampin’ Blends (144573), Calypso Coral Stampin’ Blends Combo Pack (144045), Clear Wink of Stella (141897), and Classic Label Punch (141491)

Click here to order your Stampin’ Up! Products online 24/7! (US only)

Shop at my Online Store and use Host Code EKH3K3CF