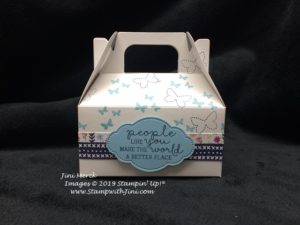
Today’s project is a quick and easy 3d treat item that you can whip up for your next event. It uses our Lustrous White Mini Gable Boxes and since they come in packs of 12 it’s easy to whip some up for a large group.
After all who doesn’t love butterflies and these dies that go with the Needle & Thread stamp set are a lot of fun to work with.
Here is a quick video tutorial for you.
Needle & Thread Mini Gable Box Video Tutorial
And of course a quick PDF Tutorial to go along with the video.
This is part of our Needlepoint Nook Suite of Products – so it’s got more coordinating products! You can find these products on page 38 & 39 of your Occasions Catalog.
Shop
at my Online Store and use Host Code 44SNJGKN
Click Here to learn more about using the Hostess Code If you order Online make sure your profile
information is up to date and you’ve allowed me to contact you (If you chose no
contact in the past you’ll need to call 1-800-Stamp Up to have them change your
profile for you.)
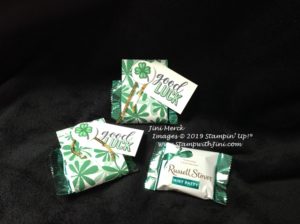
As soon as I saw the Happiness Blooms Designer Series paper I thought of the cute treats I could create with it for St Patty’s Day. The pattern looked like clovers to me. So here is what I came up with.
So I reached for the Amazing Life stamp set which contains not only the Good Luck sentiment but a 4 leaf clover too – both perfect for my project.
I’m a mint fan so when I found these little Russel Stover mints I picked up a bag – I love little prepackaged treats like this!
Want to see how I made them? Here is a quick video for you.
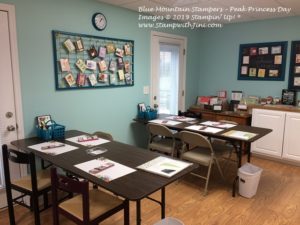
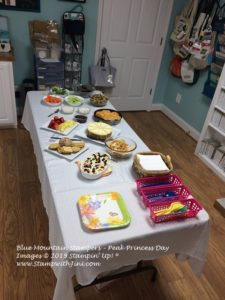
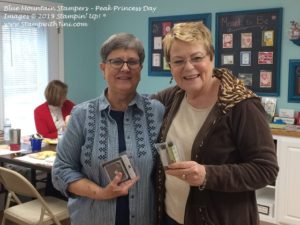
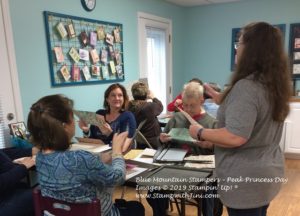
Today’s project is one that we did as last Weekend’s Peak Princess event. What is that you ask? This event is a special one for those on my team who qualify for it. It’s an afternoon of pampering – filled with games, prizes, and a special project and best of all time together.
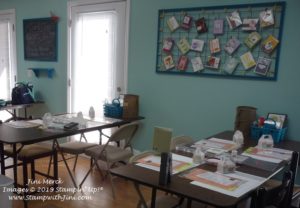
Want to see some photos? This first one is of the class room, ready to go – the little skinny notepads that I shared with you yesterday are at everyone’s seats.
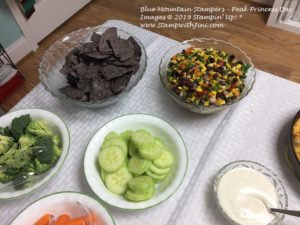
And of course there has to be some goodies, right?
One of the dishes I served was a delicious Black Bean Salsa that Sara Douglas shared with us on her face book page, sorry I can’t find it again to link it for you. She gave approximate measurements since she doesn’t measure the chopped ingredients – so I’m giving you what I did below. You can tweak it to fit your tastes.
Black Bean Salsa
Sara Douglass, Stampin’ Up! CEO
2 cans of black beans, drained and rinsed
2 cans of corn, drained and rinsed
1 bunch green onion, chopped
½ purple onion, chopped
1-2 cups red, orange, yellow and green peppers, chopped
Cilantro, leaves pulled and chopped
2 tsp olive oil
2 tsp Apple Cider Vinegar
2 tsp. Lime juice
¼ tsp. Garlic powder, salt and pepper (to taste)
Mix and serve. This makes a big bowl, the picture below is just half of what it made. So if you want the recipe can be cut in half.
Serve with corn chips – I used blue ones.
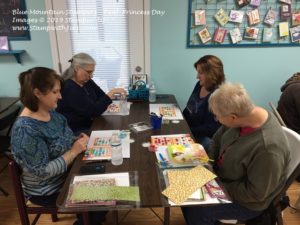
We played bingo – my daughter was home on break so she called Bingo for us (She thought it would be great practice for her upcoming band fundraiser too. Yes, believe it or not she is a Band Director. This is her second year of teaching now!)
Here are just a couple of the prize winners – we played 5 games
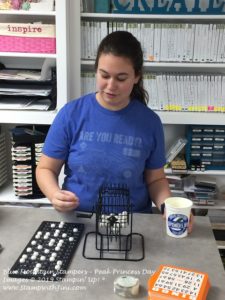
And of course we crafted together
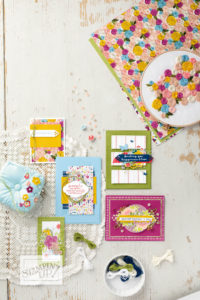
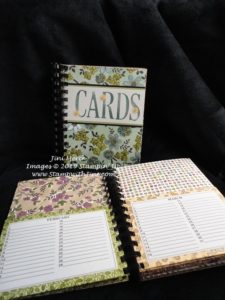
And this February’s project was such a hit I thought I’d share it with you today in case you’d like to make some too. It’s a book that holds your cards – it includes a perpetual calendar for you too. It’s a great item that I’ve been using myself for years!
I really love the Share What You Love Specialty Designer Series Paper and it’s beautiful pearl finish that some of the sheets have so I started there. I think the fact that this Designer Series Paper is a bit heavier will help it hold up for years to come.
Here is the video I did for you.
Share What You Love Perpetual Calendar Card Book Video Tutorial
I’ve also created a pdf for you with the step by step directions and supply list.
Share What You Love Perpetual Calendar Card Book PDF
And here is the link for the Calendar pages for you. I simply printed them off onto Whisper White card stock.
I think these are going to make great gifts, so I’ll be getting a few more packages of this DSP so I can start my holiday gifts now and earn FREE Sale-a-bration items too! This pack of Designer Series Paper has 24 sheets in it so you can make several per pack of DSP and then use the extra sheets to create cards to go with the book!
Love the project but don’t have a binding machine? That’s not a problem – check with your local Office Supply Store. They normally can bind things for you or allow you to use their machine when you purchase the combs from them.
Enjoy!
And if you think this might be something you may enjoy – why not consider joining my team? It’s a great time to join with the fantastic kit option and right now you have the ability to get the NEW coordinating products for Sale-a-bration (March promotion) in your starter kit too! Click HERE to learn more about the Blue Mountain Stampers and joining today!
Shop
at my Online Store and use Host Code BAMJPSMW
Click Here to learn more about using the Hostess Code If you order Online make sure your profile
information is up to date and you’ve allowed me to contact you (If you chose no
contact in the past you’ll need to call 1-800-Stamp Up to have them change your
profile for you.)
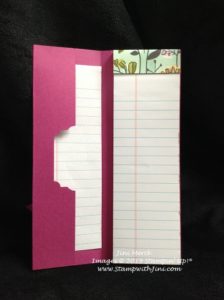
If you love note pads like I do, you’re going to love this quick and easy project that I made recently for my Team’s Peak Princess Day. This fun holder uses the Share What You Love Suit of products and holds a skinny notepad perfect for jotting notes on the go.
Check out this video tutorial so you can make some too!
Share What You Love Skinny Notepads Video Tutorial
I know you’ll want to make some too so here is a printable tutorial for you.
I’ve used a typical Junior Legal Pad that I took to my local office supply, Office Pros in Cornelia. For a small fee they cut the legal pads in 1/2 for me. (If you don’t live locally most office supply stores offer this service, so you’ll just want to check with them on their requirements.)
I love getting together with my team at our monthly meeting and sharing. We have a lot of fun together learning new things and sharing. Today’s projects were all part of our team swaps.
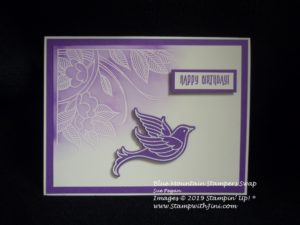
This first card uses the Serene Garden bundle (148395) and the emboss resist technique.
Simply use our Versa Mark Ink Pad and White Embossing Powder stamp the image and then use a Sponge Dauber and Gorgeous Grape Ink (147099) to create this lovely soft background.
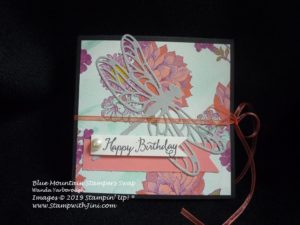
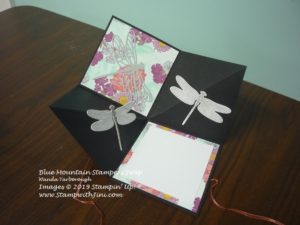
And how about this fun square card using the Dragonfly Dreams stamp set (142924) and Thinlits Dies (142749).
It’s fun fold pops open making it extra special.
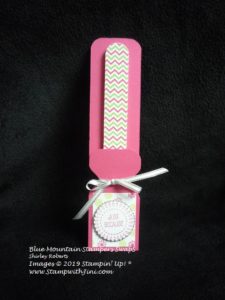
And this fun project is a 3d that holds a bright and cheerful nail file. The holder was created with our Envelope Punch Board (133774).
And the A Good Day stamp set (145870/145873) was used for this fun 3d not only were stamps used for the sentiment, but also to create a background to match the nail file using the Granny Apple 147095/147163) and Melon Mambo Classic Inks (147051/115662).
And this final card was made using the Lasting Lily (Sale-a-bration 149717) stamp set and our Wood Textures (144177) and Gingham Gala Designer Series Paper (148554).
Just lovely don’t you think?
Have you ever thought about joining? Would you love to craft and share with others and get a discount on your favorite products? If so, then our team might just be the thing you are looking for!
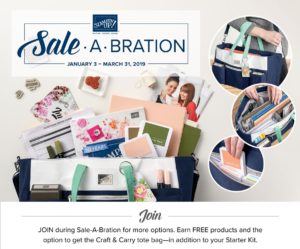
And right now is a fantastic time to join! Since during Sale-a-bration not only will you get a $175 in product for just $99. You also have the option of a beautiful exclusive Craft Tote to carry your crafting items.
And as an added benefit you can choose from the Sale-a-bration 2nd release items and our March Special to add to your kit. Want to learn more? Click HERE to learn more about the Blue Mountain Stampers and joining today.
What are the Blue Mountain Stampers?
That’s the name of our stamping community. I enjoy welcoming new
members to our group. We’re from all over. If you’re considering joining
Stampin’ Up!, you may have questions about how I would support you as part of
my team. I do offer a variety of ways to learn, grow and to have FUN as a Blue
Mountain Stamper!
Exclusive Team Resource Page – videos, PDFs and more
Exclusive Face book Group – A great way to share and connect with other team members and share
Monthly Creative Challenges
Swapping Opportunities
Team Retreats
Meetings, monthly – both local and online/virtual
Lunch & Learn, monthly
Monthly Crafting Day
Recognition & Incentives
Training available for workshops, clubs, classes and more!
Additional support and business coaching available
We have a very active group that share and answer each other’s questions on
our Exclusive face book group. If you’re looking for fun, a place to grow
and share with others…You’ll fit right in!
Hobbyists are welcome!
Did you know? 90% of my Blue Mountain Stampers’ areHappy Shoppers – purchasing for themselves, (along with their family and friends.) That’s right…you can just get a discount on products you love!
We welcome the hobbyist who’s looking to be a “happy shopper” (and save money), as well as those of you that want to build a business (and make money).
Everyone is welcome after all there’s room for both and everyone in between.
And there is NO Obligation when you purchase your starter kit – Join the Blue Mountain Stampers and see what it’s all about!
Got questions? Contact me and I’m happy to answer any questions you may have.
Shop
at my Online Store and use Host Code H3Z3YTVZ
Click Here to learn more about using the Hostess Code If you order Online make sure your profile
information is up to date and you’ve allowed me to contact you (If you chose no
contact in the past you’ll need to call 1-800-Stamp Up to have them change your
profile for you.)
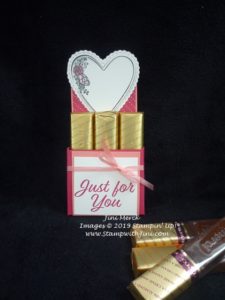
Merci chocolates are so yummy that I thought I’d create some treat holders to share them – plus it stops me from eating them since they seem to call my name! So I reached for the Meant to Be Bundle and got to work.
Here is what I came up with
This little treat holder holds 3 Merci Chocolates – a perfect size for just a little taste of chocolate when you want it.
I love the way the heart shape is at the top without any card stock behind it. Want to know how I made them? Here’s my video tutorial.
Meant to Be Merci Treat Holder Video Tutorial
And how about a PDF you can print? Do you find these helpful to go along with the video? Why not leave me a comment and let me know?
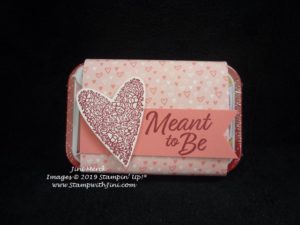
Valentine’s Day is right around the corner and I’ve been having fun creating little treats for my fellow stampers, family and friends. Today’s Tin Wrap is quick and easy to do – so you can make lots of them quickly! A plus for Valentine’s Day treats.
I thought this sentiment was a fun twist on the mints – get it? Meant….Mint…. lol
The tins I’ve used came from my local discount store and are cinnamon, but they are a standard size tin so you can use your favorite mints or tin.
Here is a quick Video Tutorial for you
Meant to Be Tin Wrap Video Tutorial
And of course a PDF so you can print it with a complete supply list and step by step directions.
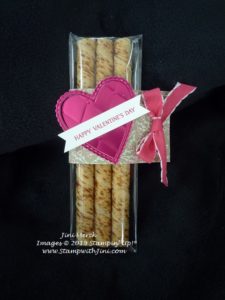
I made today’s project as a little goodie for my team members and put one at everyone’s tables for the Winter Retreat this past weekend. I couldn’t resist these yummy little Creme Filled Wafer Rolls when I saw them and was hoping they were individual wrapped. However, that turned out not to be the case so our 2×8″ Cello Bags to the rescue!
I simply slipped 3 of the little sticks inside and sealed then decorated. I really like how they came together and think they turned out quite elegant with the Lovely Lipstick Foil Sheets. The little heart looks just like a chocolate box since I used the Tufted Embossing Folder. What do you think?
I’ve put a video together for you in case you’d like to make some of these treats too
Forever Lovely Valentine Treat Video Tutorial
And of course, I’ve got a complete supply list below for you along with a PDF tutorial too.
Shop
at my Online Store and use Host Code FFCVWYHC
Click Here to learn more about using the Hostess Code If you order Online make sure your profile information is up to date and you’ve allowed me to contact you (If you chose no contact in the past you’ll need to call 1-800-Stamp Up to have them change your profile for you.)
Sign up HERE
for my FREE Newsletter or Get my Blog Posts delivered right to your inbox HERE
How Do You Get a 2019 Occasions Catalog?
Don’t have a Demonstrator?
Email me at StampwithJini@gmail.com include your name, address, and
phone number and I’ll be happy to mail you one.
Sign up HERE
for my FREE Newsletter or Get my Blog Posts delivered right to your inbox HERE
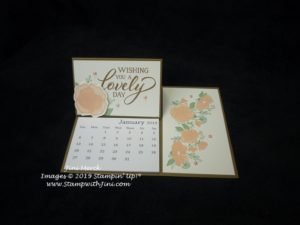
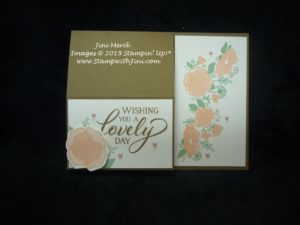
I created today’s projects for my January Thank You Cards. They are a bit different from what I usually do since they contain a little calendar but I really like the way they turned out and hope everyone who receives them will enjoy them.
They are so easy to make and even better they fold flat for mailing.
Want to learn how I made them? I’ve filmed a Tutorial for you today and also typed up a PDF to go along with it so you can make some too if you would like.
FOREVER LOVELY CALENDAR CARD VIDEO TUTORIAL
January Thank You Forever Lovely Calendar Card Tutorial PDF
Shop
at my Online Store and use Host Code FFCVWYHC
Click Here to learn more about using the Hostess Code If you order Online make sure your profile
information is up to date and you’ve allowed me to contact you (If you chose no
contact in the past you’ll need to call 1-800-Stamp Up to have them change your
profile for you.)
Today’s project is one I made for every last week for my 2019 Occasions Catalog Kick Off using the Sale-a-bration stamp set, Hello Cupcake.
The Lustrous White Mini Gable Boxes made this project quick and easy since all I had to do was decorate and assemble, the box was already to go with a lovely shimmery finish.
Everyone seemed to enjoy the little treat box they found at their seats when they arrived.
Did you know that the Hello Cupcake stamp set is FREE during Sale-a-bration when you place a qualifying order of $50 (before shipping and tax)? So when you order the supplies used to create this little box you’ll earn the stamp set. Yes, it’s that easy!
Want to learn how I made them? Here is a video tutorial for you.
Hello Cupcake Mini Gable Box Video Tutorial
And I’ve also got a written tutorial for you too with a complete supply list.
Hello Cupcake Gable Mini Box Tutorial (printable) PDF
Stop back by tomorrow and see one of the projects we made along with a tutorial for it too.
Shop
at my Online Store and use Host Code FFCVWYHC
Click Here to learn more about using the Hostess Code If you order Online make sure your profile
information is up to date and you’ve allowed me to contact you (If you chose no
contact in the past you’ll need to call 1-800-Stamp Up to have them change your
profile for you.)