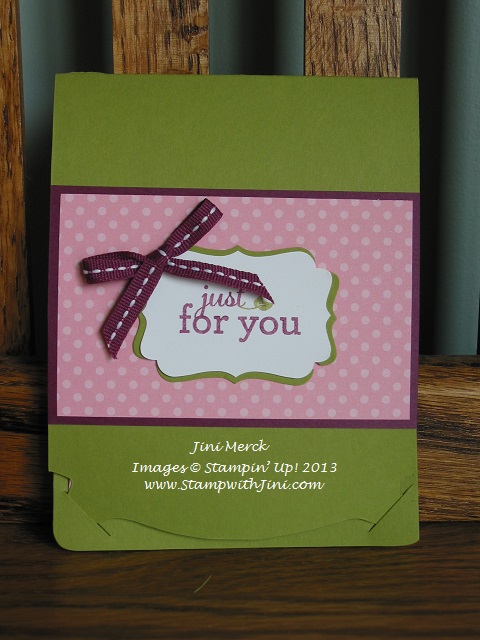
I hated to see the Two Tags Die (item 115954) on the Retirement List (click HERE for the Retiring Accessories list). I’ve shed some tears over this one – It is absolutely one of my favorite dies and is a lot of fun to use too.
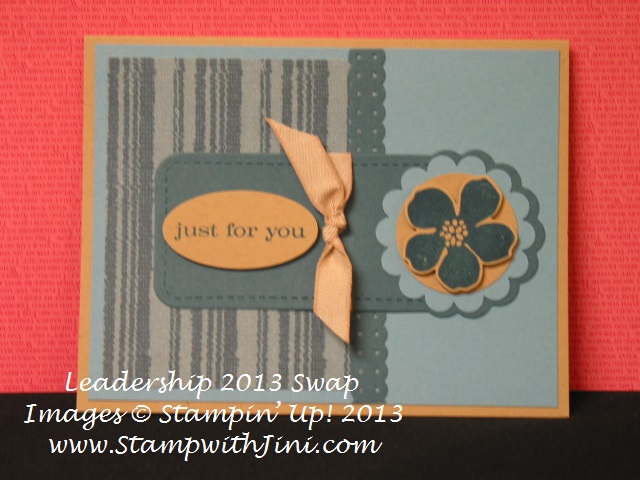
Here is a great card I got in a swap at Leadership using our Parker’s Pattern Designer Series Paper (item 131021) and the Two Tags Die. Isn’t it lovely?
And here are the great little bookmarks I made earlier this spring using the Spring Sampler Stamp Set (item 125510/125512). Click here to see my earlier post with more details on these little guys.
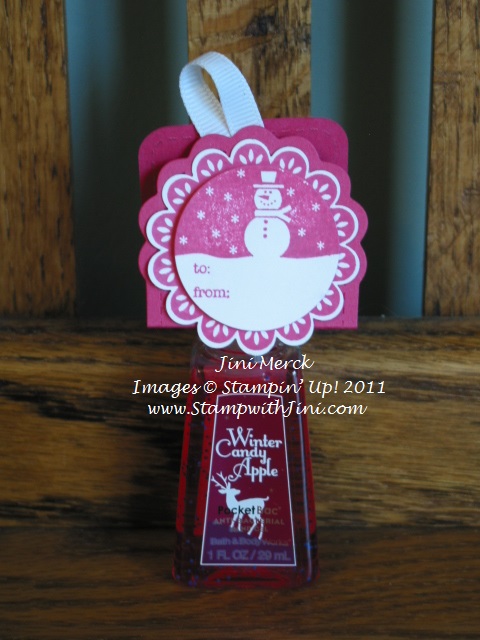
And a cute little topper for hand sanitizers using the retiring Tags til Christmas Stamp Set (item 120847/121169).
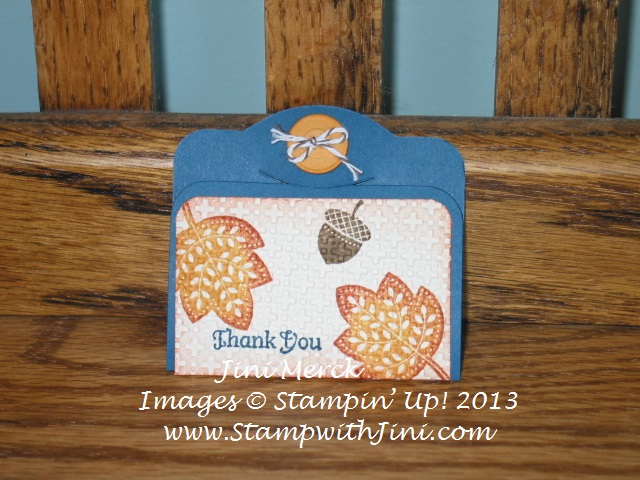
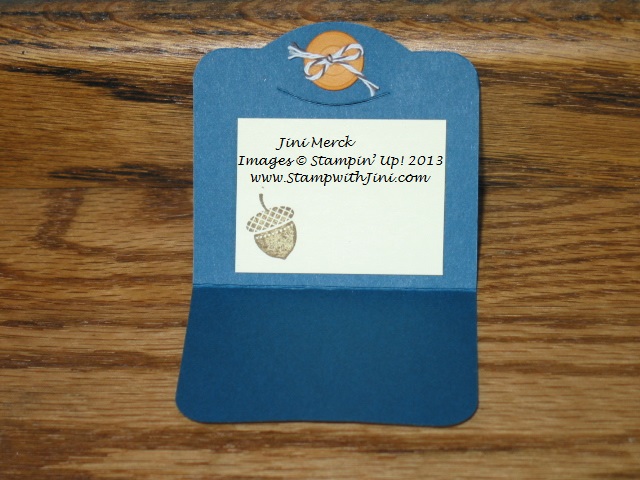
And finally these cute little post it note holders that I made for my Regional Swap in Chattanooga last fall. This little post it note holder also uses one of my favorite fall stamp sets, Day of Gratitude (item 120835/121148)
Want to say Bon Voyage along with me? I’ll be hosting a special FREE event to say goodbye to all of our favorites on May 19th here in Clarkesville and there is still time to RSVP.You can see all the details HERE. And don’t forget about my Retirement Party Giveaways everyone can play – click HERE for details and how to enter my Retirement Giveaway drawings
There are just 15 days left to take advantage of this great Hostess Promotion and Join Now Offer. Click HERE to see all the details.
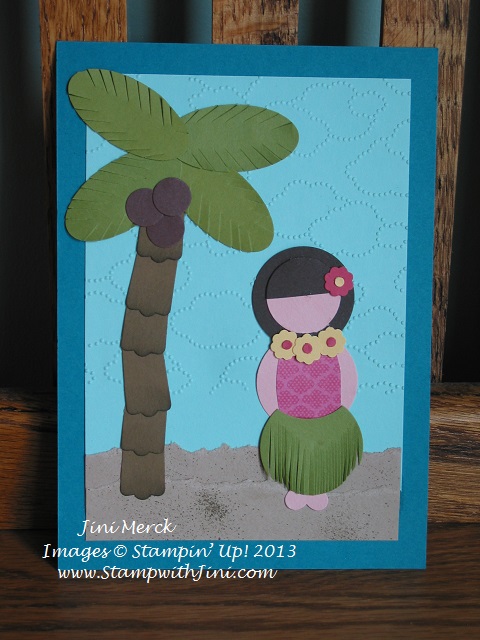
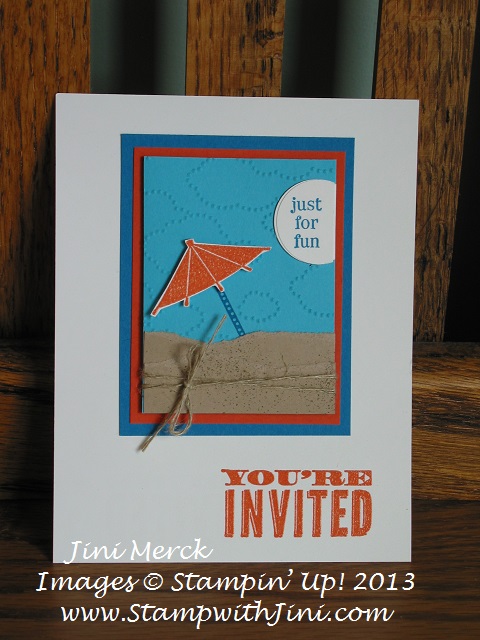
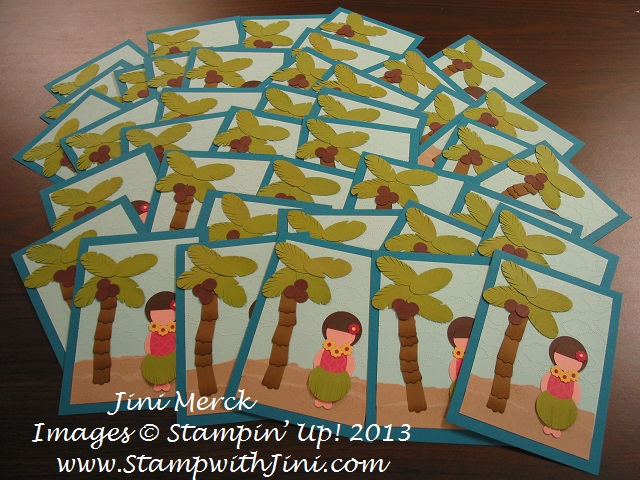
Yesterday I shared with you the first party invitations I created for my daughter’s luau themed graduation. Today I’ll share with you the final item I created for her to choose from my luau punch art card.
This card is actually 5″ x 7″ since I couldn’t get it down to the traditional 4 ¼” x 5 ½” like the others from yesterday. But since it was just the front and not a full card I was ok with that too. The My Digital Studio graduation announcements I made with the Embark Graduate Ensemble (click HERE)were post cards that were 5″ x 7″ also.
Want to know which of the four cards I made for her she chose? Drum roll please…… She narrowed it down for me the two cards based on what she liked
Then asked me which one was harder. She is so sweet. In the end we both decided that the punch art card was just too stinking cute! So we went with it. I know called me crazy, right? But this is my baby and the last one to graduate from high school for us. So why not do it up big….and I knew I had a stamping pal who would be game to help me out.
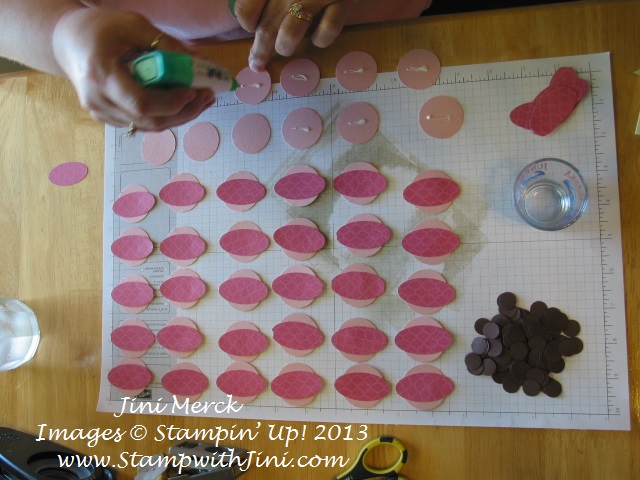
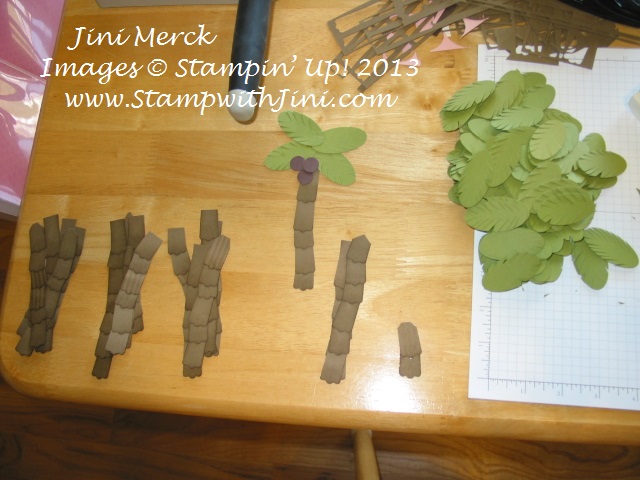
What does mass assembly luau punch art cards look like? Here are a couple of shots of Cindy and me working on parts of the cards – at least the first 40, LOL. We had a great time visiting and punching together!
My daughter later added another 30 for her friends she’d forgot to put on my list. I didn’t get to take a shot of them all together since I’d already mailed the first group but by then it was quick and easy and I had a lot of fun so I found it a great break and creating them rather relaxing. I know crazy – but they are sooo cute!
Want to know how these cute luau punch art cards were made? Just watch the video below.
Supplies:
½” Circle Punch (item 119869)
1″ Circle Punch (item 119868)
1 3/8″ Circle Punch (item 119860)
Itty Bitty Shapes Punch Pack (item 118309)
Small Heart Punch (item 117193)
Large Oval Punch (item 119855)
Modern Label Punch (item 119849)
Two Step Owl Punch (item 118074)
Color Spritzer Tool (soon to be retired item 107066)
Cloudy Day Embossing Folder (item 127022)
Paper Snips (item 103579)
Soft Suede Classic Ink (item 126978)
Soft Suede Stampin’ Write Marker
Stampin’ Sponge
Island Indigo Card Stock (item 122923): 5″ x 7″ for card base
Pool Party Card Stock (item 122924): 4 ¼” x 5 ½”
Crumb Cake Card Stock (item 120953): 4 ¼” x 3 ½”
Blushing Bride Card Stock (item 131198): scraps for punching
Early Espresso Card Stock (item 1119686): scraps for punching
Old Olive Card Stock (item 100702): scraps for punching
Daffodil Delight Card Stock (item 119683): scraps for punching
Rose Red Card Stock (item 102544): scraps for punching
Soft Suede Card Stock (item 131198): scraps for punching
Chocolate Chip Card Stock (item 102128): scraps for punching
Designer Series Paper: scraps for punching (I used Floral District item 126919)
Don’t forget – Time is running out to sign up for Paper Pumpkin this month. You have to sign up by midnight tonight (May 10th) so you won’t miss out on any more kits.
Remember each month’s kit is only available for a month at a time; Click HERE to sign up!
Get a FREE Tutorial just for placing an order! Use Hostess Code 69D43KUE (Click Here to see more)
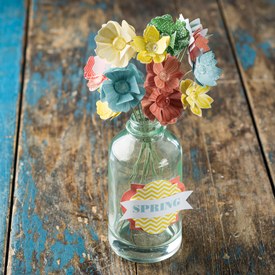
Mothers Day, Teacher appreciation, or Just Because. Say thank you with this no maintenance bouquet. This easy to assemble Bloomin’ Bouquet Project kit comes complete with the petals, stems, and buttons to create the flowers, as well as four different tags to make this the perfect gift for any occasion.
As if that weren’t enough, the kit contains a “baker’s dozen” – This means you can create and give or keep a dozen flowers, and have a bonus flower left over!
Ordering information
Item 134542 $12.95
Available starting April 29, while supplies last.
Kit contains:
2 sheets of preprinted and precut flowers on 12″x12″ cardstock; makes 13 flowers using Pool Party, Gumball Green, Calypso Coral, Daffodil Delight and Rich Razzleberry
Wow, its Friday already – the week has really flown by. Today I’m going to share with you a new video showing you my Oh, Hello Pop ‘n CutsTreat Box that I recently did with the Blue Mountain Stampers during our monthly TEAM meeting.
I love the way this little Pop ‘n Cuts Treat Box turned out. It is a quick and easy project since you start with our Card BasePop ‘n Cuts Die (item 130099). And the little box is really good sized so you can get a lot of great chocolate or other goodies into it. Hmm…I’m thinking it may be a great Treat Box for my daughter’s upcoming graduation party. I’ll have to get back to you on that one.
So without further ado…. here is my latest video – Pop ‘n Cuts Treat Box
Did you know if you like my videos that you can subscribe to my YouTube Channel? Well you can, just subscribe to the StampwithJini YouTube Channel when you’re finished watching the video or search for me on YouTube.
Hope you enjoyed my Oh, Hello Pop ‘n Cuts Treat Box project – if you did I’ve love for you to leave me a comment!
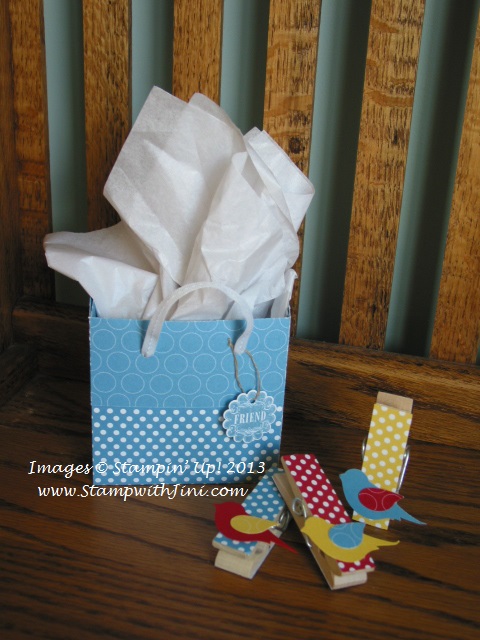
Do you love birds? Do you enjoy watching them? I love it in spring when all of the different birds come to my feeder on their trip north. I especially love to see the flocks of robins looking for worms as they come through. I’m not sure why but I don’t see a lot of them during the year in North Georgia. So their migrating for me they always signal spring has arrived.
Want to make some of your own little Polka Dot Parade of birds that can hang around? Well why not make these cute little Bird Builder Punch clothes pins?
They are so simple to make. Just cover the clothes pin, decorate and add a magnet to the back. Voila! You’ve got a cute way to hang notes on your frig or anywhere else you need a reminder.
My friend Cindy gave me this cute little set for my birthday last month. They came in this adorable bag made out of our Polka Dot Parade Designer Series Paper. How cute is that!
Supplies:
Paper: Polka Dot Parade Designer Series Paper (item 126902), Marina Mist, Real Red and Daffodil Delight card stock
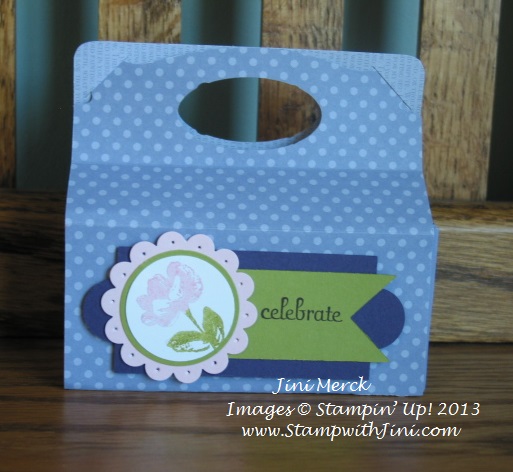
Recently I needed a birthday card for a friend and since I was having so much fun playing with the Pop ‘n Cuts Dress Form Die I thought I would make one for her using it.
I really have enjoyed playing with this group of coordinating products. I wasn’t really sure about them in the beginning but have quickly become addicted to “playing dress up” with them. There are so many fun things to do with the Pop ‘n Cuts Dies and Framelits. And of course Stampin’ Up! makes the deal even sweeter since there is the All Dressed Up Bundle (item 131096/131095) that you can buy and save 15% – Add that to the FREE SHIPPING OFFER this weekendand who can resist?
Wonder what was in the little bag I made for her? I wanted to pamper her a bit and knew she would enjoy something homemade so I made some of my yummy foot scrub. You can click HERE to get the recipe for it.
Here are close ups of the card itself-
and the outside –
I hope my friend enjoyed her card because I enjoyed making it for her and I know she’ll enjoy her foot scrub. If you missed my earlier post sharing my original design of this card, you can click HERE. Included in this post was a video showing you how to make these fun and flirty Paper Doily skirts.
I hope you’ll have fun playing dress up with your paper dolls too!
If you want to learn more about stamping and paper crafting why not sign up for my Free NEWSLETTER? My sign up box is on the top right hand corner here on my blog. It’s free and has helpful hint, tips and special things just for you!
Supplies:
Stamp Set: Memorable Moments (item 126680/126682)
Paper: Floral District Designer Series Paper (item 126919), Subtles Color Collection Designer Series Paper Stack (item 117152), Rich Razzleberry, Lucky Limeade, and Whisper White Stock
Accessories: Full Heart Punch (119883), Stampin’ Write Markers, Decorative Label Punch (item 120907), Pop Up Posies Designer Kit (item 131395), Raspberry Ripple ¼” Stitched Grosgrain Ribbon (item 126876), Rhinestone Basic Jewels (item 119246), Paper Doilies (item 129399), Old Olive 1/8″ Taffeta Ribbon (item 119256), Big Shot, Labels Collection Framelits (item 125598), Card Base Pop ‘n Cuts (item 130099), Dress Form Pop ‘n Cuts (item 130100) and Dress Up Framelits Die (item 130101)
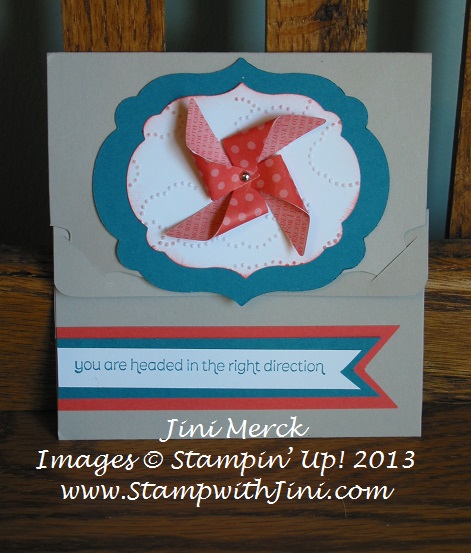
Last week I shared a card that I had created with the Card Base Pop ‘n Cuts Die. Today I am going to share another way to use the Card Base Pop ‘n Cuts Die – this time to make a Pop ‘n Cuts Gift Card Holder.
Isn’t this Pop ‘n Cuts Gift Card Holder cute? I love these little pinwheels and so I wanted to use them with the coordinating sentiment stamp set Wishes Your Way. I thought that the little greeting included in this set would be great for a graduate.
And since I’m currently gearing up for my daughters high school graduation I’ve been focusing on ideas for graduation gifts and cards. Gift card holders are always something I need. How about you? And the Card Base Pop ‘n Cuts Die makes this gift card holder not only cute, but easy too.
Want to learn how to make one of these Pop ‘n Cuts Gift Card Holders for yourself? Why not check out my latest video
Click HERE if you’d like to see the project I posted earlier using the Card Base Pop ‘n Cuts Die?
If you’d like to learn about my videos as I post them, why not sign up for my YouTube Channel? You can click HERE to subscribe.
Supplies:
Stamp Set: Wishes Your Way (item 129153/129156)
Inks: Island Indigo and Calypso Coral
Paper: Sahara Sand, Island Indigo, Calypso Coral and Whisper White
Accessories: Card Base Pop ‘n Cuts Die (item 130099), Big Shot, Pinwheel Sizzlits Die (item 129411), Label Collection Framelts (item 125598), Cloudy Day Embossing Folder (item 127022), and 1/8″ Silver Mini Brads (item 122941)
I love to make things to give and this week I want to try making some quick bookmarks for spring. The Spring Sampler stamp set (item 125510/125512) from the Spring Catalog is one of my favorites and since it has such a great variety of images I started there. And of course my Big Shot dies make things quick when I want to do a large number of items so I pulled out my trusty Two Tags Die – love it right!?!
Here is what I came up with – I think my Spring Sampler Bookmarks will be a hit when I hand them out.
Once I got started I was having so much fun with the images from the Spring Sampler set I didn’t want to stop – lol
I used a variety of sentiments for the Spring Sampler Bookmarks too as you can see in my group photo.
Supplies:
Stamp Set: Spring Sampler
Inks: Early Espresso
Paper: Subtles Collection and Whisper White card stock
Accessories: 1 1/4″ and 1 3/4″ Scallop Circle, 1 1/4″ and 1 3/8″ Circle Punches, Stampin’ Write Markers
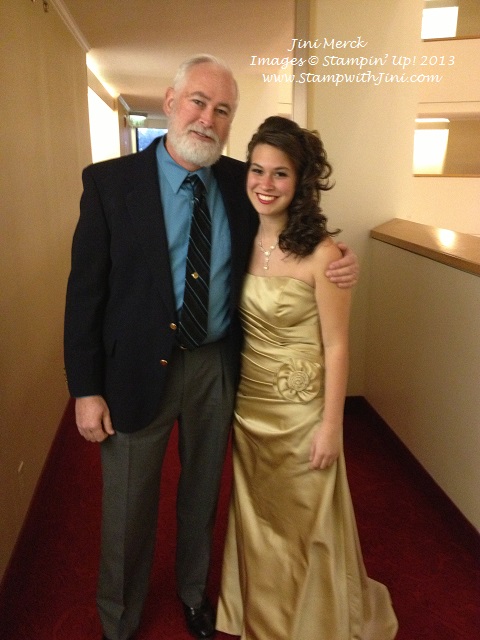
Today I thought I would share with you a project I did recently for my daughter, Kaitlin. In March, she attended her Key Club DCON (or district convention) event. It’s a special event at the end of their Key Club year that combines training, work, and celebration. Along with the recognition of the individual High School Key Club achievements throughout the state, they also elect new Officers for the 15 Divisions in the State of Georgia. I can’t tell you how impressed I was with these young adults who are making a difference in their communities with the help of their parent club, the Kiwanis.
Here is a photo of my daughter with my husband from the Talent and Awards Banquet during DCON. It was a formal event where they had to dress in a special color that the District Board voted on. Well long story short – my daughter chose the same dress as another young lady from another Division. A crisis moment…..
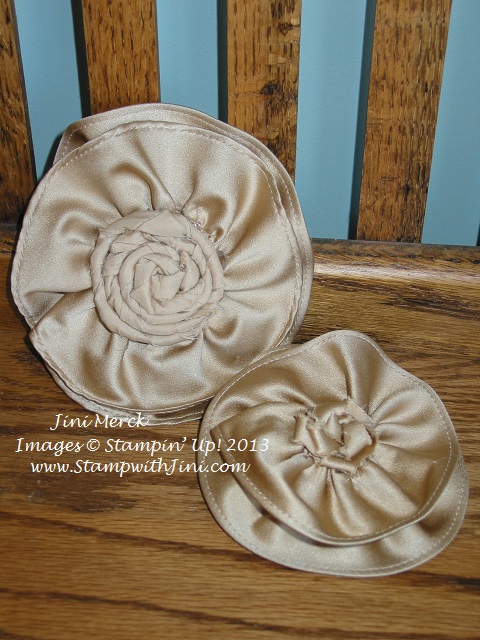
Mom to the rescue! At this point I bet your wondering what this has to do with stamping, right. Well, did you notice the decoration on her hip? Yep, your right – it’s one of our fabric flowers you can make with our Jumbo Sticky Rounds (item 127852). However instead of using our ribbon or fabric, I made this one using the left over fabric from her dress’s hem. I also made a matching one for her hair, sorry to say she didn’t get that picture for me – I thought it looked very nice with her fancy up do.
Would you like to help my daughter and the Habersham Central Key Club make a difference?
In effort to help our local Key Club I’ll be donating 10% of my sales for the next 21 daysto the Habersham Central Key Club.
You can make a difference in their lives and help them reach their goal of being able to attend ICON, the International Convention for Key Club, simply by placing an order using the Hostess Code BFPVTTCH so I know to give the Key Club credit.
Here are the details- its simple:
Now through April 21st when you place an order with me, directly or through my Online Store, using the Hostess Code BFPVTTCH I will donate 10% of my sales to the Habersham Central Key Club.
So now not only can you get the Stampin’ Up! products you love and want, you can also help the Habersham Central Key Club reach their goal.
fine print: This is a special promotion and purchases do not apply toward my 5th Anniversary 50/50 Board
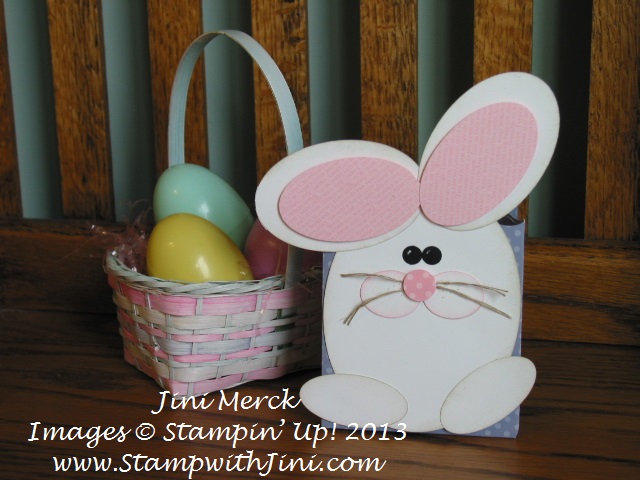
I thought I would share one last bunny project since Easter is tomorrow. This project is super quick and easy because the base of it is the Fancy Favor Die – Great for holding all kinds of chocolate treats that my family loves. Shhhh…don’t tell them, but they’ll be finding theirs tomorrow at their spot when we sit down for our Easter dinner.
My little bunny’s body was created using our Oval Collection Framelits Die. I used several of our punches to finish the little guy; you’ll find them listed below on the supply list.
Add a little sponging on the edges, some Multipurpose Adhesive and voila’ – The cutest little bunny around.
I hope that you’ll all have a wonderful Easter with your family. I’m really looking forward to spending the day with mine, my husband will even be home – yippee, so it will be wonderful to spend the day together celebrating Easter.
Just a reminder- Sunday, March 31st is the last day to order your Designer Fabric at 50% Off. You can place your order online before the end of the day Sunday.
Also, Sunday ends our Special Promotion for Joining my Team. You’ll get your kit for just $99 when you join before the end of the day Sunday, but you’ll get $156.50 in merchandise of your choice! It’s a great deal. You can click HERE to learn more about my team.
Supplies:
Inks: Sahara Sand
Paper: Subtles Designer Series Paper Stack (item 117152), Whisper White and Basic Black card stock
Accessories: Linen Thread, Fancy Favor Die (item 115965),Ovals Collection Framelits Dies (item 129381), 1/2″ Circle Punch (item 119869), Itty Bitty Shapes Punch Pack (item 118309), Small (item 120908) and Large Oval (item119855) Punches, Stampin’ Sponges (item101610) and Signo White Gel Pen (item105021)


 And don’t forget about my Retirement Party Giveaways everyone can play – click HERE for details and how to enter my Retirement Giveaway drawings
 There are just 15 days left to take advantage of this great Hostess Promotion and Join Now Offer. Click HERE to see all the details.