Shop at my Online Store and use Hostess Code GJH39UAM when you order
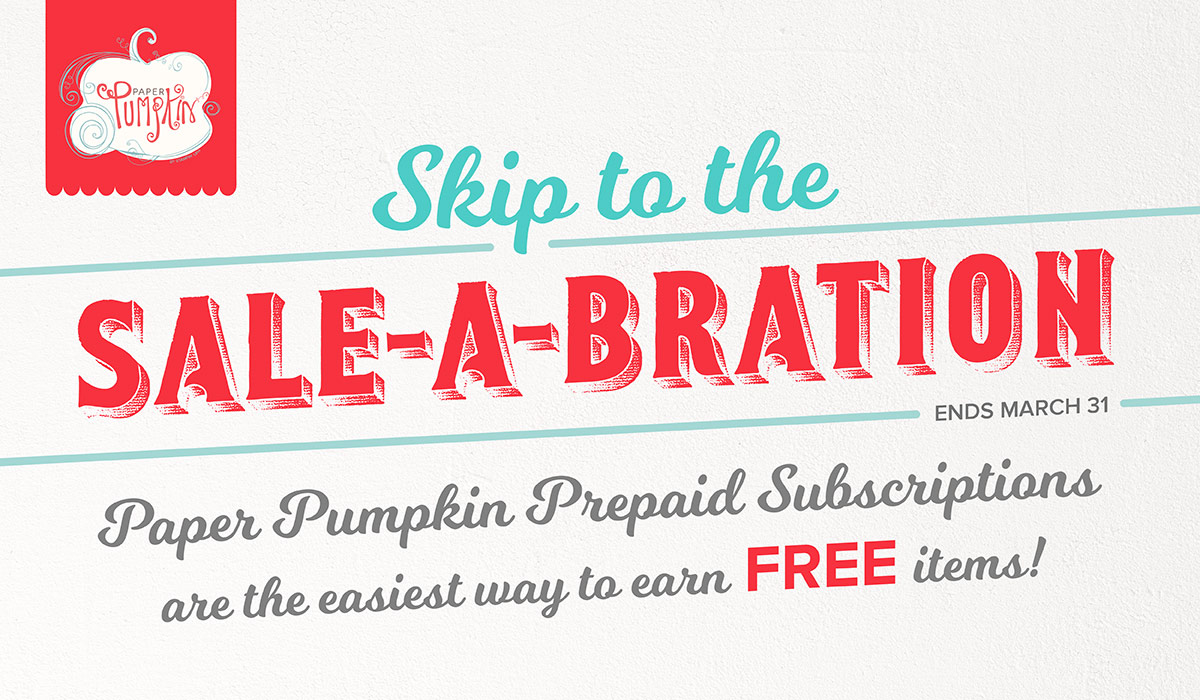
Looking for that perfect gift for yourself or a friend, try a Paper Pumpkin Subscription. Add one to your next order, they count towards Hostess Rewards. Prepaid subscriptions are the best way to enjoy Paper Pumpkin. Click HERE for more details.
I loved this quirky little set the minutes I set eyes on it – after all who doesn’t like chickens? So today I wanted to share this fun card that Jackie gave me in my recent swap.
Every time I look at it it makes me smile – how about you? Who could resist this fun little chick peeking out from the picket fence.
I thought you might enjoy learning how to make these quick and easy picket fences so you can make this little card too – so today’s video tutorial shows you just that!
Quick & Easy Picket Fences Video Tutorial:
What did I tell you – these are soooo easy to make! And Jackie simply cut a slit with her personal trimmer in the fence to tuck her chick into.
I’ve given you the supply list below in case you wanted to know the other supplies too.
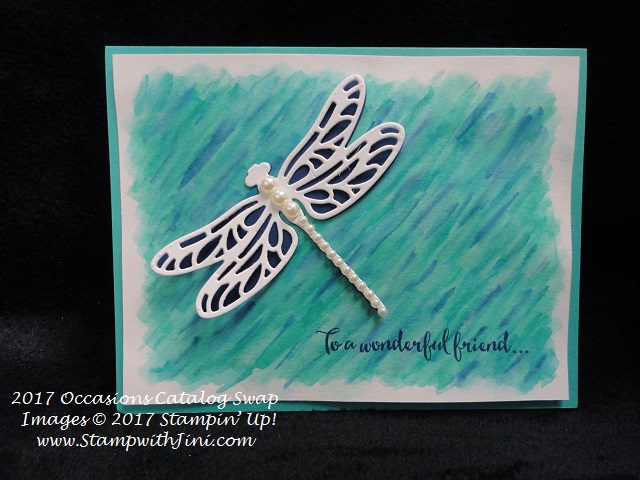
Dragonfly Dreams has been one of the most popular bundles in the Occasions Catalog. And when you see the lovely cards it can make you’ll know why.
This card uses a wonderful watercolor wash background created with our reinkers and Aqua Painter. The simplicity of this card is just wonderful I think.And I fell in love with this background as soon as I saw it – teals and water colored tones are some of my favorite colors so I was thrill when Cara shared with me how she made this background on her swap. If you would like to see how to create this background too I’ve made a quick video for you.
How to Create a Water Color Wash Background
I’ve also included a supply list for this card at the end of this post.
Love this bundle? Why not check out my Dragonfly Dreams Class below. Not only does the class include this bundle of products, you’ll also get to make 3 wonderful projects; including a technique and fancy fold to get you started. Why not sign up today?
Upcoming Classes
Card Class – February 23rd 10-12 pm or 6-8:30 pm
Paper Pumpkin Craft Time – February 28th 10 am – 12pm
Caring with Cards – Clarkesville Library February 21st 2 – 3 pm
FREE event – come make a difference in some one’s life. Cards are donated to Holiday for Heroes and Ronald McDonald House
Dragonfly Dreams Class: Saturday, March 11th 1 – 3:30 pm Class Fee $66
Class includes stamp set, Thinlits and Inside the Lines Designer Series Paper
RSVP and prepay by Wednesday, February 22nd
For more information on my classes CLICK HERE to see my Calendar of Events
And of course if you’ve ever thought about getting a discount on your Stampin’ Up! products, Sale-a-bration is a great time to join! Why not see what being a Demonstrator is all about and join the fun! Contact me for more information about my Blue Mountain Stampers Team Meeting- February 7th 1 – 3:30 pm
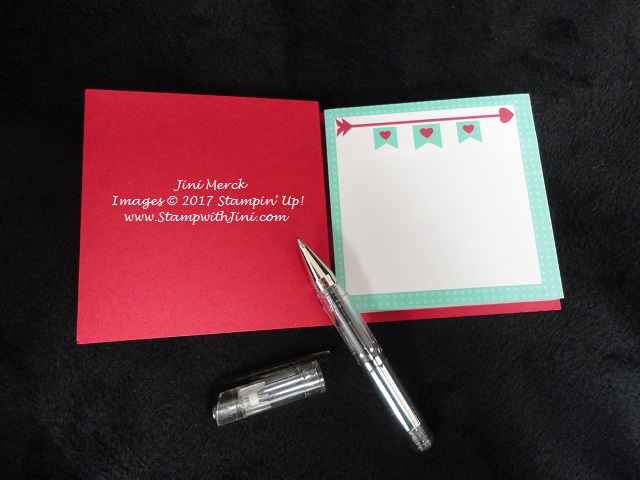
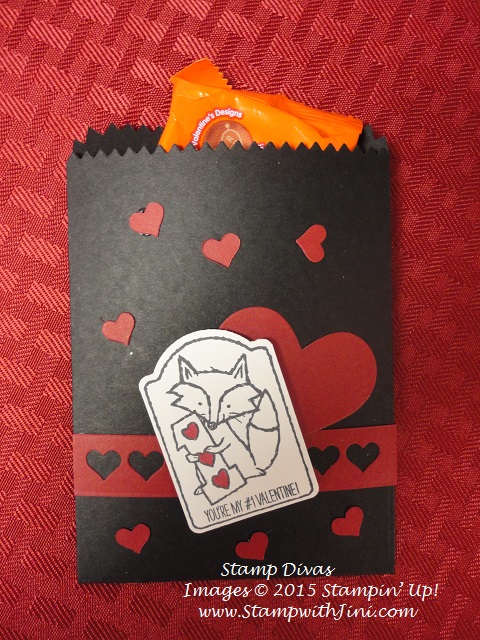
You know me, when I ran across the cutest post it note pad for Valentine’s Day I couldn’t resist making a little treat with it! And since it made me immediately think of the new Sealed with Love stamp set, that is what I grabbed during my recent Team Retreat to create with.
Here is what I came up with.
So what do you think? Cute?
And I love that this little post it note holder holds these cute little pens I found at Staples. I know you want to see how I made them, so here you go my latest tutorial.
Sealed with Love Post it Note & Pen Holder Video Tutorial
So what do you think? Quick and easy? I’ve given you the supply list below so you can make some too!
Do you have a hard time keeping those double case stamp sets together? Don’t like keeping track of the rubber band that come with double case sets? I know mine always get lost on in my crafting space.
We’ll if you want a quick and simple tip for keeping those cases together wait no more! My friend Lorraine shared this easy trick with me and I thought it was so great I wanted to share it with you right away! (Yes, I know – this is one of those videos I found cleaning up my computer. LOL!)
Check out my video tutorial below – it’s quick and easy!
How cool is that? All you need to get organized is some clear packing tape and your set!
JOIN ME FOR AN EVENING OF FUN
Relax you can put on your p.j.s, grab a glass of wine and kick back with your tablet or what ever you stay connected with…..
Join me for a fun VIRTUAL Party to kick off Sale-a-bration 2017! Samples, inspiration, fun and prizes!
It’s easy, it’s fun and you know you’re already on facebook!
Do you ever loose things on your computer? Frustrating, right? Good news since I’ve been having some computer issues lately (I’m hoping I’ve got most of them solved now.) I have found a couple of things that I didn’t share with you earlier. Yikes!
Here is the first project that I did a video for. It’s a great little treat holder that holds a yummy Ferrero Rocher candy.
Want to see how it is made? Check out this quick video tutorial.
Ferrero Rocher Treat Holder
So what do you think? Why not leave me a comment and let me know?
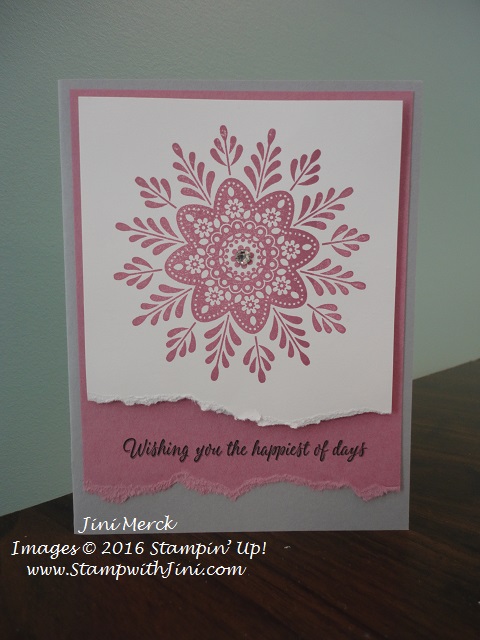
This set’s images are beautiful and are perfect for winter cards. And oddly enough the largest image also reminds me of Scandinavian designs from my childhood. And as a few stamping friends mentioned it reminds them of Pennsylvania Dutch and even Russian images. So there are lots of possibilities when designing cards with this set!
Here is a card I made using a sponging technique. I love the way it turned out – soft and lovely!
I simply inked up my image in the Soft Sky and then touched my Sponge Dauber to areas with the Sweet Sugarplum ink. Pure magic!
Or how about this card I created for my Christmas Card class? I just love the quick and easy torn edge that adds a lot of texture.
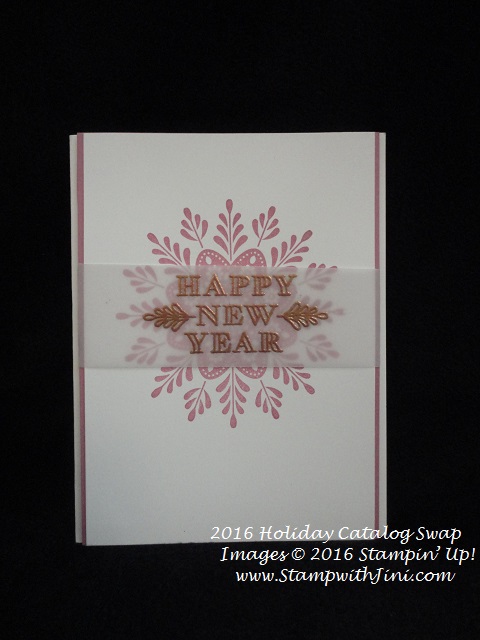
And here is a lovely card I received from Dawn using Copper Embossing Powder on White Vellum.
Did you know that this set is currently on sale for 20% OFF? Well this and other wonderful items are part of our Online Extravaganza – so why not check them all out?
It’s simple simply shop at my Online Store and use Hostess Code CFKNRN3F when you order!!!
**For everyone who places an order (at least $25 in product) through my store you will receive 5 homemade cards in the mail! If your order is over $50 in product then I will DOUBLE that and you will get 10 cards and an embellishment of your choice in the mail! You can choose from a package of Pearls, Rhinestones or White Perfect Accents. If you don’t email me your choice I’ll choose one for you.
(I will mail your items to you the first week of December)
It’s my way of saying thank you for choosing me as your Demonstrator!!!
Click Here to learn more about using the Hostess Code If you order Online make sure your profile information is up to date and you’ve allowed me to contact you so I can mail you your FREE gift!
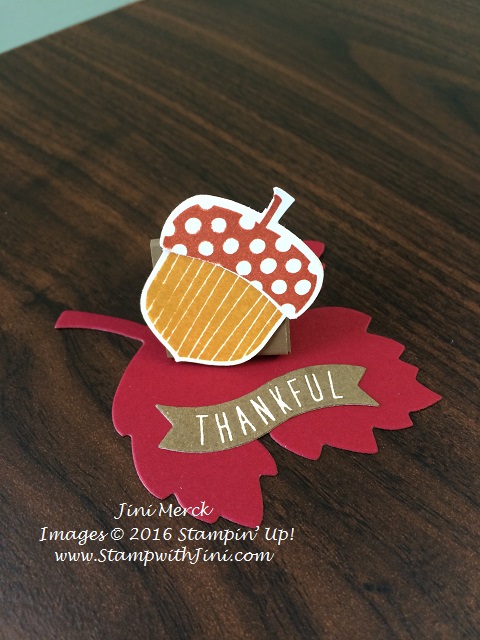
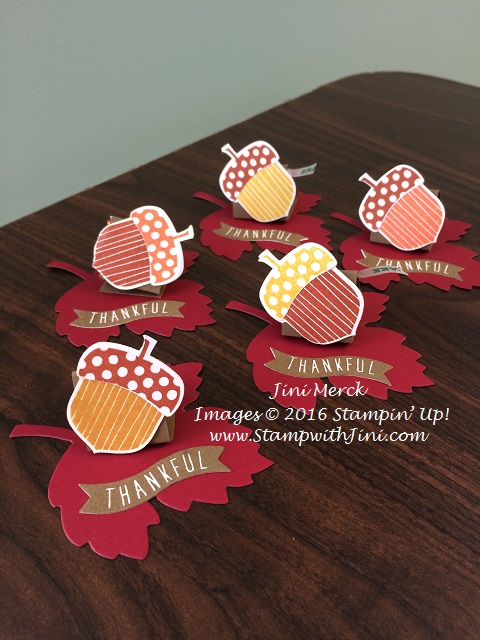
Want to dress up your Thanksgiving Day table with a little something special? Why not whip up some of these cute little table treats using the Acorny Thank You stamp set?
I’ve made a quick little video to share with you
Acorny Thank You Table Treat Video Tutorial
Warning: these little treats can be so much fun to make you won’t want to stop!
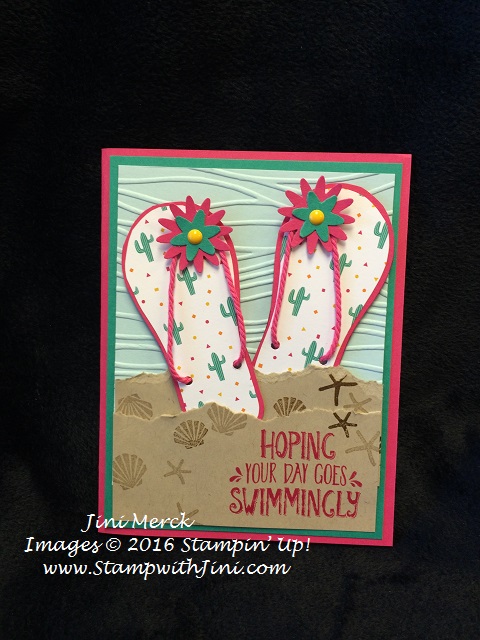
What says summer more than a new pair of flip flops? Today’s card uses our fun bold Designer Series Paper, Festive Birthday to create these fun cactus flip flops.
I’ve had several of you ask me how I created these when you saw my shoe box card HERE.
So I thought I’ve put together a video tutorial on how they are made. And I included some tips to make things easier.
Want the pattern? Well I’ve made one up just for you!
So, what kind of flip flops do you like? Plain, bright and colorful, or wild patterns? Why not leave me a comment and let me know.
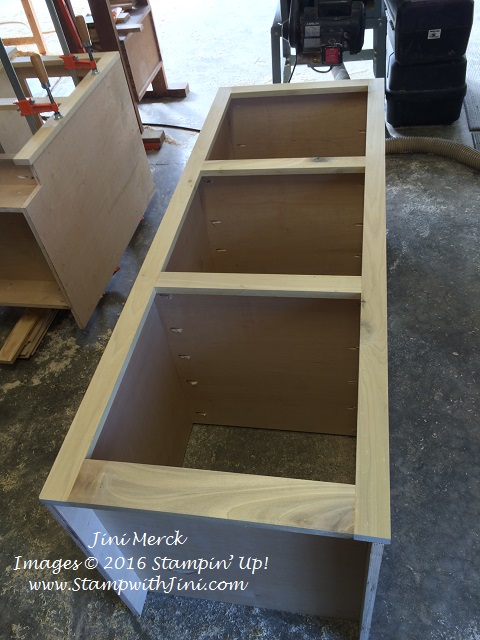
What’s Happening Here?
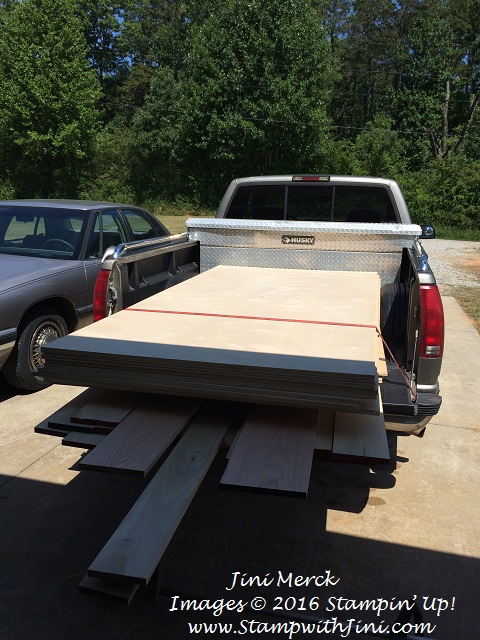
On a personal note I thought I’d share with you what is happening with all this wood my son, Johnathan and I brought home on June 20th. (Click HERE to see that post).
I’m excited to say my guys are making great progress on the project… my classroom!
Johnathan is always happy playing with his “toys” in the garage. (He built his garage cabinetry that you see in the background over his winter break.)
Over the weekend they finished the 12 x 12 paper storage unit.
and the base cabinet too! Wow that was fast!!!
I can’t tell you how excited I am to get painting! And you know how I dislike painting. LOL!!!
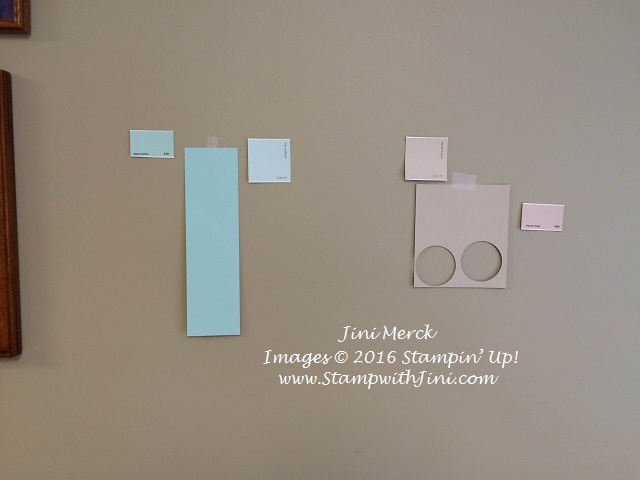
Right now, I’m trying to decide a new paint color for the classroom walls. After all, with this great cabinetry going in I need a new coat of paint, right?
I’ve got it narrowed down to two choices at this point.
A more bold one and a safe one. I’m trying to decide how crazy I want to be LOL!!! Pool Party or Sahara Sand ???? Hmmm…. what do you think? I’ve changed my mind so many times already, but these are the two I keep coming back to since I love the Island Indigo display item I already have.
Use Hostess Code 4JURAZXY and receive a FREE gift when you place a minimum order of $50
Click Here to learn more about using the Hostess Code If you order Online make sure your profile information is up to date and you’ve allowed me to contact you
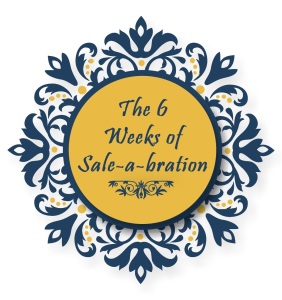
Can you believe it’s February 2nd already! Oh, my while I’m waiting to hear what’s happening with General Lee, our local ground hog I thought I would share with you my upcoming Weeks Weeks of Sale-a-bration Newsletter-
I love this time of year! Sale-a-bration is a lot of fun with all the FREE product choices we have. And I love making cards with my FREE Sale-a-bration products and now you can too! Why not join me and have fun making Sale-a-bration cards?
Starting Tuesday, February 9th….Those of you who are on my Newsletter Mailing List will receive my 6 Weeks of Sale-a-bration Newsletter email once a week for 6 weeks.
Each of these 6 exclusive newsletters will contain a special exclusive project with instructions to make them. Remember, I will not be sharing the 6 Weeks of Sale-a-bration projects on my blog. (These are exclusive projects that only my Newsletter subscribers shall receive – It’s my way of saying thank you to you for choosing me as your Demonstrator on your paper crafting journey!)
To join in all the fun – just sign up for my Newsletter mailing list. You’ll find the sign up box for my 6 Weeks of Sale-a-bration design in the upper right hand corner of my blog. Or you can click HERE.
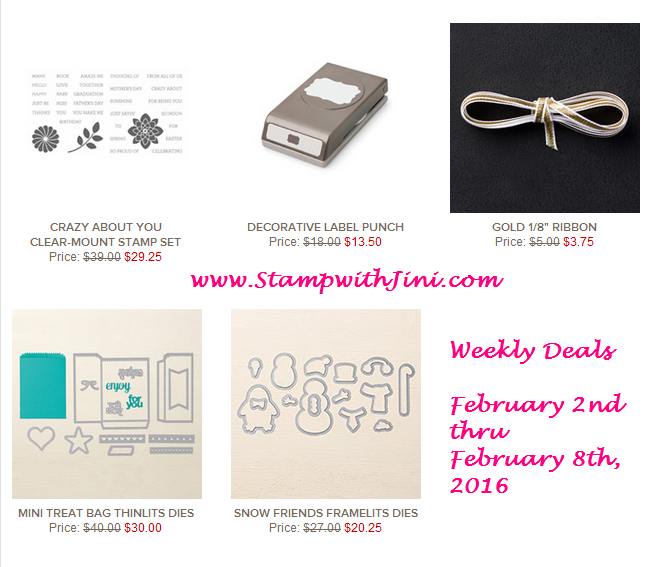
NEW WEEKLY DEALS
Why not consider adding to your Framelits Die Collection? Did you get the stamp set with out the die? Check out these great projects made with some of our Weekly Deals!
Our cute and easy Mini Treat Bag Thinlits Dies
Love punches? The Decorative Label Punch is a must have then.
Crazy About You is a wonderful set filled with all kinds of sentiments – It also has 2 coordinating punches! And at this price who can resist adding it to their collection!
And of course our Gold 1/8″ Taffeta Ribbon adds a touch of class to any project! You can see these items along with other products in my Online Store, simply click on the link below.