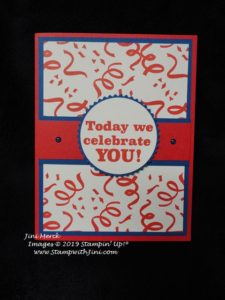
I loved the projects that came in the March Paper Box AND the additional stamp set too. What a great value and all the cutting and work was done for me all I had to do was assemble. Of course after that what do you do with all those goodies that are left over? Make something with them of course.
So today’s project uses the stamp set from the kit.
The kit came with the Poppy Parade ink spot so I started there – I added a couple of our great punch shapes and some Poppy Parade and Blueberry Bushel card stock.
So quick and easy to create a bunch of these cards. Check out my quick video tutorial
Paper Pumpkin March Poppin’ Birthday Card Video Tutorial
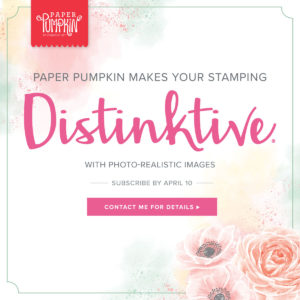
Like the idea of projects arriving on your doorstep? Getting exclusive stamps? These are awesome for crafting on the go or as gifts since everything is included.
Sign up today and get Aprils Kit that has our exclusive Distinktive stamps and give it a try – but you’ll want to hurry since you have to sign up and subscribe by the end of the day April 10th
Shop
at my Online Store and use Host Code GXJ4CGDM
Click Here to learn more about using the Hostess Code If you order Online make sure your profile
information is up to date and you’ve allowed me to contact you (If you chose no
contact in the past you’ll need to call 1-800-Stamp Up to have them change your
profile for you.)
The Annual Catalog is right
around the corner and I won’t be able to mail you one if you have chosen no
contact.
Today’s card is one that I made for this month’s birthday cards. I enjoy sending happy mail to my friends and family each month. I know that it’s a great feeling to go to the mail box and get something besides circulars and bills. How about you?
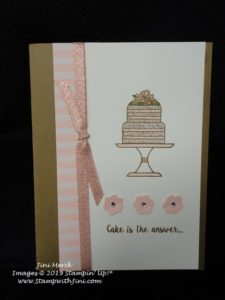
The Piece of Cake stamp set also has a coordinating Cake Builder Punch, but I didn’t use it for this card. Instead I chose to use my Stamparatus since it made stamping this project soooo easy.
Here is a quick video tutorial for you
#imbringingbirthdaysback Piece of Cake Birthday Card Video Tutorial
And of course a PDF that you can print too.
#imbringingbirthdaysback Piece of Cake Birthday Card Tutorial PDF
Enjoy!
Supplies:
Stamp Set: Piece of Cake (148610)
Inks: Soft Suede Classic Ink (147115/115663), Powder Pink Stampin’ Write Marker (144033) and Garden Green Stampin’ Write Marker (147155)
Shop at my Online Store and use Host Code GXJ4CGDM
Click Here to learn more about using the Hostess Code If you order Online make sure your profile
information is up to date and you’ve allowed me to contact you (If you chose no
contact in the past you’ll need to call 1-800-Stamp Up to have them change your
profile for you.)
The Annual Catalog is right
around the corner and I won’t be able to mail you one if you have chosen no
contact.
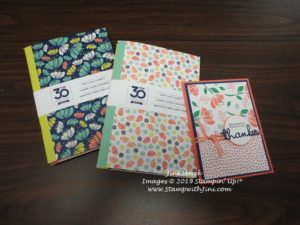
Today’s project is a thank you card that I designed to to go with a small gift as a little thank you for those customers that helped me reach my $100,000 in sales.
I whipped up a quick tutorial so that you can make some too. I used the Happiness Blooms Designer Series Paper for this project since it coordinated with the note books. I just love the bright, bold, and cheerful colors used in this pack of paper.
Sale-a-bration ends in just 2 days! And when you purchase the products to create this card you can earn a Sale-a-bration item for FREE. So why not get yours today? Simply click on the visit my website banner below to get your order started. Or contact me directly by email at stampwithjini@gmail.com
Shop
at my Online Store and use Host Code G3TW9PEY
Click Here to learn more about using the Hostess Code If you order Online make sure your profile
information is up to date and you’ve allowed me to contact you (If you chose no
contact in the past you’ll need to call 1-800-Stamp Up to have them change your
profile for you.)
The Annual Catalog is right
around the corner and I won’t be able to mail you one if you have chosen no
contact.
Wow, can you believe it is almost the end of March? And that means there are just 4 days left to earn FREE Sale-a-bration items. So don’t miss out and place your order before the end of the day Sunday, March 31st.
The Hello Cupcake stamp set (Sale-a-bration 149714) is one of my favorites – big, bold and fun, it makes cards easy to create with endless options. For this card I used the colors that were in the How Sweet It Is Designer Series Paper to inspire me.
Here is a quick Video and PDF Tutorial for you. You can find the complete supply list below.
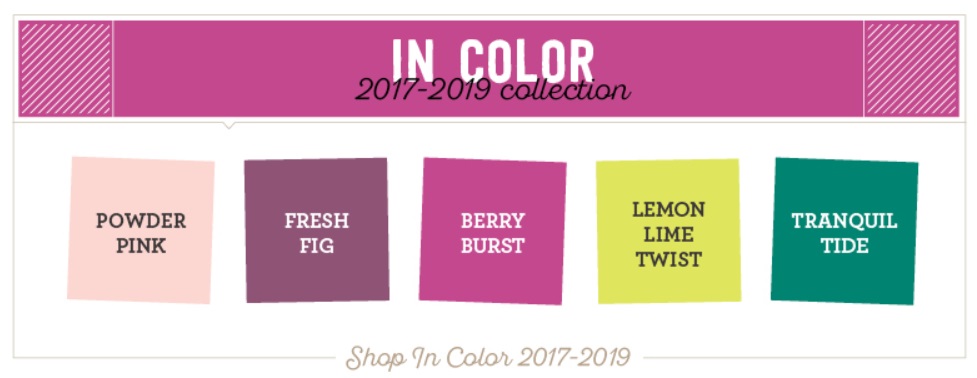
And don’t forget right now is a great time to get those 2017-2019 In Color products and complete your collections before the retirement list posts next month. Don’t get caught without your favorite reinkers and other accessories.
It’s also a great time to stock up on those adhesives (before it gets hot) and basic supplies while you can get FREE Sale-a-bration items.
And of course if you haven’t tried Paper Pumpkin yet, April is going to be great. Purchase a Prepaid Subscription and you can earn Sale-a-bration items too!
Shop
at my Online Store and use Host Code G3TW9PEY
Click Here to learn more about using the Hostess Code If you order Online make sure your profile
information is up to date and you’ve allowed me to contact you (If you chose no
contact in the past you’ll need to call 1-800-Stamp Up to have them change your
profile for you.)
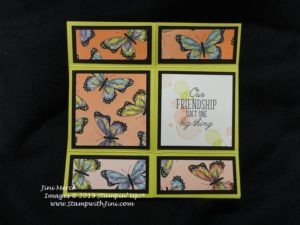
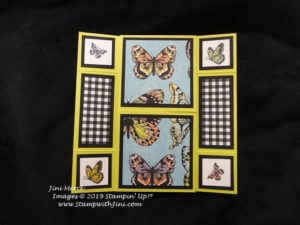
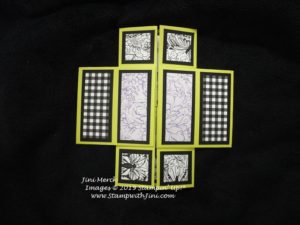
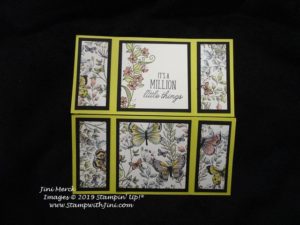
Today’s card is a fancy fold. This past month one of my team mates, Sue shared the way you can make this card with the rest of us. I couldn’t resist giving it a try with the Beauty Abounds stamp set and our lovely Botanical Butterfly Designer Series Paper that you can earn for FREE this month.
Here is what I came up with. There are 4 sides to this card so you have Never Ending options. LOL!
You can earn this Sale-a-bration product when you place a minimum purchase for the supplies I used to make this card, or for that matter and purchases. How great is that?
Here we go
Side one:
two:
three:
and four – which contains the final sentiment piece.
This card is sure to impress!
Want to see how I made it now? I’ve tweaked a few things that Sue showed us since I found it easier for me to put it together this way. So here is my video tutorial for you.
This card can seem pretty complex until you break it down one side at a time – and of course the more you “work it” by opening all four sides in order the easier it gets, since the card will kind of have a “memory” of its movement.
And it’s a special sized card, so it won’t fit in a standard envelope; so you can make your own envelope for it using the Botanical Butterfly Designer Series Paper and the Envelope Punch Board (133774). Making it extra special for that special person who receives it!
Just a tip: For a more complicated card like this I like to keep a “pattern” that I’ve made with scratch paper or card stock with the directions – so the next time I want to make one I have a reference to look at too.
Enjoy!
And stop back by tomorrow when I’ll be sharing some of the wonderful projects my team members brought to the March meeting to share.
Shop
at my Online Store and use Host Code 44SNJGKN
Click Here to learn more about using the Hostess Code If you order Online make sure your profile
information is up to date and you’ve allowed me to contact you (If you chose no
contact in the past you’ll need to call 1-800-Stamp Up to have them change your
profile for you.)
The Annual Catalog is right around the corner and I won’t be able to mail you one if you have chosen no contact.
It was almost 70 here in the North Georgia mountains and it was a wonderful breath of spring. Don’t you love that first sunny day, where you can shed your coat and bask in the rays? For me it’s all the shades of green now that I live in North Georgia. I’m surrounded by fields and love all the different shades of green. I’m lucky, yesterday I got to watch the calves frolicking in the new grass next to the house. Ah, spring….
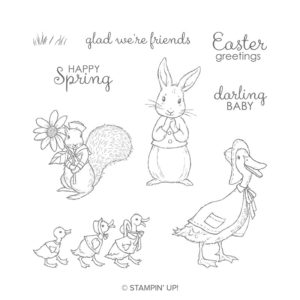
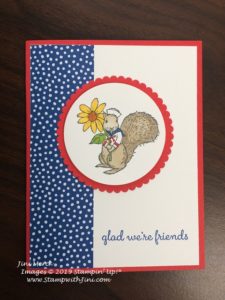
So today’s card is perfect for that spring feeling – Fable Friends can be found in the Occasions Catalog on page 30 and it’s filled with images perfect for spring!
How can you not love these little faces – ducks in particular hold a special place in my heart since as a child my dad bought me 4 baby mallards ducks at the 7 Mile Fair that I raised as pets.
Anyhow…. want to see the card?
I love this guys little sailor top so I knew exactly what I wanted to do with him – Poppy Parade and Blueberry Bushel make this sweet little squirrel pop. I’ve whipped up a tutorial for you so you can make some too. Why not check it out?
Enjoy! And then stop back by tomorrow when I’ll be sharing a fun 3d project with you that is perfect for your spring needs!
A Quick Note about supplies:
The Sale-a-bration products and Occasions Catalogs have been hugely popular and as you know our catalogs do state on the back that products are while supplies last. So if you don’t see something in the Online Store it is sold out, or has been removed until supplies are replenished (like with the Butterfly Duet and Cake Builder Punches that will be in our 2019 Annual Catalog).
Make sure you order the products on your Must Have Shopping List now to prevent disappointment and of course if you have questions please let me know. Keep in mind Stamps are typically available until after the retirement list posts since we produce these.
Here is what Stampin’ Up! told us yesterday:
Due to complications with our die supplier, we’ve run out of the Doily Builder Thinlits Dies (item 148553) in North America and they will not be available in the future
Here is a current list of Dies that are in low supply at this time and will sell out soon
If we sell out of these dies, they will no longer be available to order:
Wonderful Floral Framelits Dies (item 148529)
Rose Trellis Thinlits Dies (item 148549)
Detailed Birthday Edgelits Dies (item 148548)
And of course the Sale-a-bration Coordinations Dies have been extremely popular – the Call Me Cupcake and Hop Around Framelits Dies have already sold out.
As always please let me know if you have any questions.
Shop
at my Online Store and use Host Code 44SNJGKN
Click Here to learn more about using the Hostess Code If you order Online make sure your profile information is up to date and you’ve allowed me to contact you (If you chose no contact in the past you’ll need to call 1-800-Stamp Up to have them change your profile for you.)
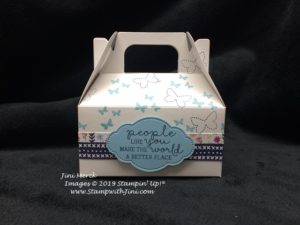
Today’s project is a quick and easy 3d treat item that you can whip up for your next event. It uses our Lustrous White Mini Gable Boxes and since they come in packs of 12 it’s easy to whip some up for a large group.
After all who doesn’t love butterflies and these dies that go with the Needle & Thread stamp set are a lot of fun to work with.
Here is a quick video tutorial for you.
Needle & Thread Mini Gable Box Video Tutorial
And of course a quick PDF Tutorial to go along with the video.
This is part of our Needlepoint Nook Suite of Products – so it’s got more coordinating products! You can find these products on page 38 & 39 of your Occasions Catalog.
Shop
at my Online Store and use Host Code 44SNJGKN
Click Here to learn more about using the Hostess Code If you order Online make sure your profile
information is up to date and you’ve allowed me to contact you (If you chose no
contact in the past you’ll need to call 1-800-Stamp Up to have them change your
profile for you.)
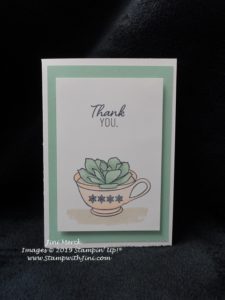
Today’s project is one that I created using the February Paper Pumpkin stamp set, Blooming with Kindness. I LOVE these kits it makes stamping so quick and easy since everything is in the kit it’s definitely #onestopstamping and perfect for taking with you or giving as a gift because everything you need is included including adhesive. It’s great for all ages too.
After putting my kit projects together I was itching to get started on this little note card.
I wanted to the cup to look delicate like china so I reached for my Petal Pink Stampin’ Blends since I like teaming this color up with Mint Macaron which I knew I wanted to use for the succulent. Petal Pink is soft and feminine too which was the look I was going for.
So what do you think? I really like the way this note card turned out and knew I could make a bunch more since the Note Cards come in sets of 20 AND the note cards include the envelopes too! A great budget friendly option at just $6.50.
If you haven’t already used them Stampin’ Blends are sooooo easy to work with check out my video to see just how easy they are! And I love building my collection of Blends by choosing my colors to work with the stamp set I’ve already have. I know that I’ll use them right away that way too.
Paper Pumpkin February 2019 Grown with Kindness Thank You Note Card Video Tutorial
And of course if you are lucky enough to have this kit you’ll want this PDF so you can make some note cards for your family and friends too
Paper Pumpkin Grown with Love Thank You Note Card Tutorial PDF
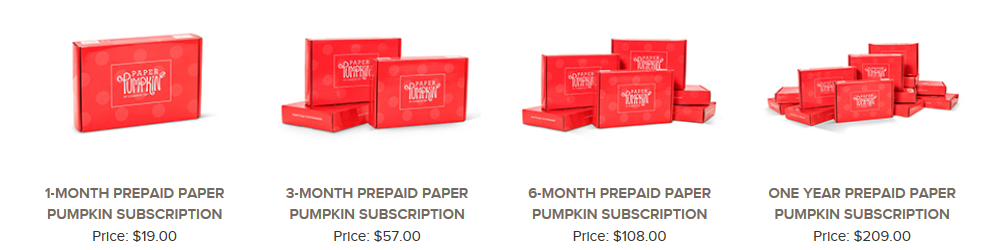
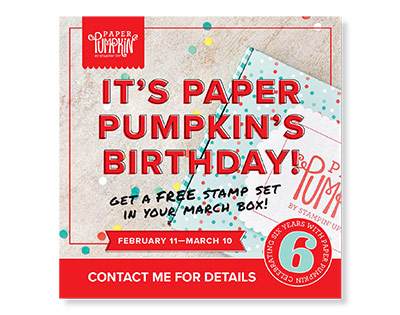
So what do you think? Do you love the fact that the Paper Pumpkin Kit is a great value? If you have never tried the Paper Pumpkin Subscription before or have in the past and want to try it again the March Kit is a great choice for you!
Not only will you receive a great card kit so that you can make 8 great birthday themed cards that will “pop” you’ll get an additional stamp set included in the box! Woohoo!! now that is a great value.
About the March Kit and the additional FREE stamp set
Stampin’ Up! won’t give away too much, but because it’s Paper Pumpkin’s birthday, they have decided to create a kit that is perfect for making birthday cards!
The March kit features eight full-sized, mailable cards
Coordinating colors are Basic Black, Bermuda Bay, Daffodil Delight, Flirty Flamingo, and Poppy Parade
This kit has an element that is sure to “pop”!
The
FREE stamp set is even bigger and better than your typical Paper
Pumpkin stamp set and can be used on a variety of crafting projects.
You have two options – but you’ll want to hurry since there are just 3 days left to get the March Kit and you won’t want to miss out!
You can CLICK HERE to subscribe and do your subscription on a month to month basis
And even better, there is no obligation – try the kit and if you like it continue on a month to month basis. Paper Pumpkin makes it easy!
or
You can CLICK HERE and purchase a Prepaid Paper Pumpkin Subscription in 1, 3, 6 or 12 month options AND EARN FREE Sale-a-bration projects!!! Yep, get even more for free!
You’ll just want to make sure that you get your subscription started by the end of the day March 10th so you’ll get the March Kit.
And if you live locally come join me for my Paper Pumpkin Craft Time, it’s the 4th Tuesday of every month. We gather, craft together and have fun. Check out my Calendar of Events to learn more about our Paper Pumpkin Craft Time.
Supplies:
Stamp Set: Grown with Kindness (February Paper Pumpkin Kit)
Shop at my Online Store and use Host Code 44SNJGKN
Click Here to learn more about using the Hostess Code If you order Online make sure your profile
information is up to date and you’ve allowed me to contact you (If you chose no
contact in the past you’ll need to call 1-800-Stamp Up to have them change your
profile for you.)
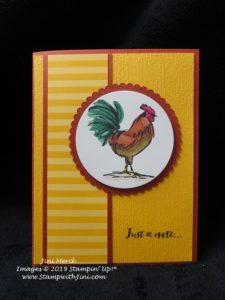
Today’s card uses another FREE Sale-a-bration stamp set that you can earn when placing a qualifying order. Home to roost has this image of a wonderful rooster – I couldn’t resist reaching for my Stampin’ Blends to create a bold image for today’s project.
If you haven’t tried our Stampin’ Blends yet, you’ll want to be sure to do so. They are so easy to use, weather doing some blending with the two shades or just coloring with the one tone you’ll end up feeling accomplished – and it is so easy. Check out my quick video tutorial for this card and you’ll see just how easy they are to use!
And make sure you have our Memento Tuxedo Black Ink Pad – you’ll need this pad when you uses our Stampin’ Blends since the StazOn won’t work with the Alcohol markers.
Home to Roost Card Video Tutorial
A funny story I had some help on this card during my last team craft time – it took 3 of us putting our heads together for the perfect rooster colors. LOL I’d was having so much fun making the roosters a bit different. Sue’s suggestion of the Subtle Embossing Folder background added just the right touch. She’s right it is a great folder. I love to craft with friends and share ideas, how about you?
Here is a PDF tutorial so you can have a printed version to go along with the video in case you’d like to make some of thee cards which will be mailed out today kicking off my March Thank You cards.
Don’t forget during Sale-a-bration it is easy to get this set for FREE. Simply place a qualifying order or an order for the products to create this card and you’ll be able to get yours too! There are lots of great Sale-a-bration products – if you’d like a brochure contact me with your name, address and phone number and I’ll be happy to mail you one. But don’t delay, because this special ends soon on March 31st!
Happy Stamping!
And don’t forget to stop by tomorrow when I’ll be sharing another card project with you highlighting our Stampin’ Blends.
I love sending birthday cards to family and friends and today’s card is my March birthday card that I’ve created using the NEW Sale-a-bration option, Painted Seasons. While this stamp set is bundled with a fantastic Designer Series Paper I wanted to create something with just the stamps for this project and here is what I came up with.
Bright and cheerful – it uses a favorite color of mine Berry Burst that has been teamed up with Granny Apple Green. And I used Basic Gray instead of black for the sentiment to give this card a “softer” feel.
This card uses our Rectangle Stitched Framelits Dies a must have if you love the stitch look that so on trend and it makes creating this card so easy. I’ve whipped up a quick video for you, so why not check it out?
And of course I love a printable PDF so I’ve got that for you too with all the measurements and supplies.
Did you know that you can sign up to receive notifications from me when I post a video? Simply click on my YouTube link here on my blog (side bar for PC or bottom for mobile) and subscribe to start getting them.
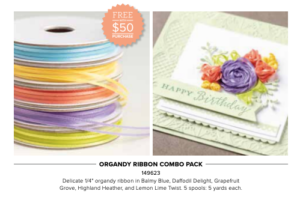
Quick Sale-a-bration update from Stampin’ Up!:
We’re happy to announce that our Sale-A-Bration Organdy Ribbon Combo Pack (item 149623) has arrived and is now available for redemption—while supplies last! Thanks for your patience and understanding.
This has been an extremely popular Sale-a-bration item – So order today and get yours before they’re gone!
Happy Stamping! And why not stop back by tomorrow when I’ll be sharing another tutorial with you for a card using another Sale-a-bration set.
Shop
at my Online Store and use Host Code BAMJPSMW
Click Here to learn more about using the Hostess Code If you order Online make sure your profile information is up to date and you’ve allowed me to contact you (If you chose no contact in the past you’ll need to call 1-800-Stamp Up to have them change your profile for you.)
Sign up HERE for my FREE Newsletter or Get my Blog Posts delivered right to your inbox HERE
Just 5 days left to sign up & get your special March Paper Pumpkin Kit!