This weekend my daughter wanted to make a couple of gifts for her college girlfriends, of course she informed me of this last minute so I needed something quick and easy.
Kaitlin decided to make them Pumpkin Spice Sugar Scrub and since I had one of our Festive Flurry Ornament Kits (item 135813) that seemed like a great place to start. So while Kaitlin mixed up the sugar scrub I got to work on the gift bags and jars.

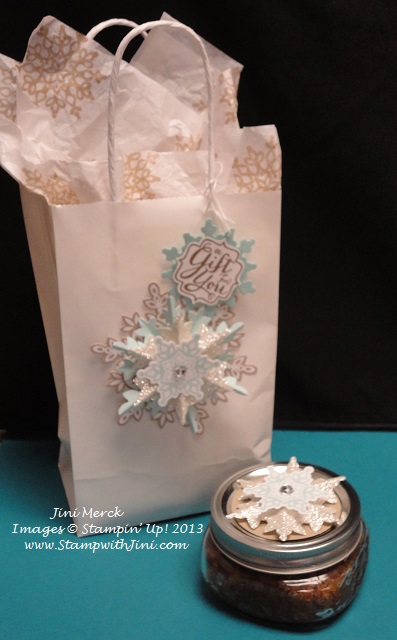
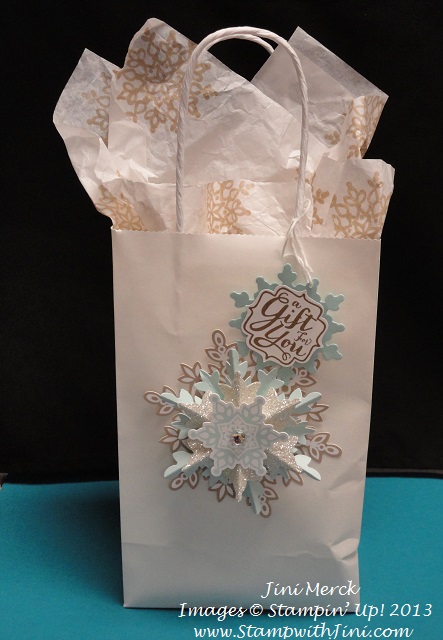
Here is what we came up with – In less than an hour the two of us had these great handmade gifts for her girlfriends that I think they will really enjoy.
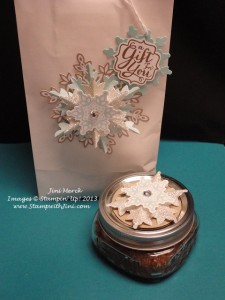
Here is a close up of the gift bag – What did I do to create this lovely gift bag?

I used the Festive Flurry Ornament Kit to create the focal point on my bag – It was quick and simple to do with just my glue gun needed, since everything else was in my kit. So all I had to do was punch the pieces out, score and then assemble.
I used the single stamp, A Gift for You (item 134765) that I stamped in Soft Suede onto Whisper White card stock and then punched out the sentiment with the matching Label Bracket Punch. I added a Pool Party snowflake that I cut out using the Festive Flurry Framelits Dies (item 132193) to create the little tag that I hung with Whisper White Baker’s Twine on the handle.
I didn’t have any tissue paper in the color I wanted and the white was kind of blah with the white gift bag – it needed a pop of color. So to create the coordinating tissue paper, I simply took some that I already had laying around and stamped it using one of the snowflakes from the Festive Flurry Stamp Set in Crumb Cake, Isn’t it cool how you can make your tissue paper match your gift bags?
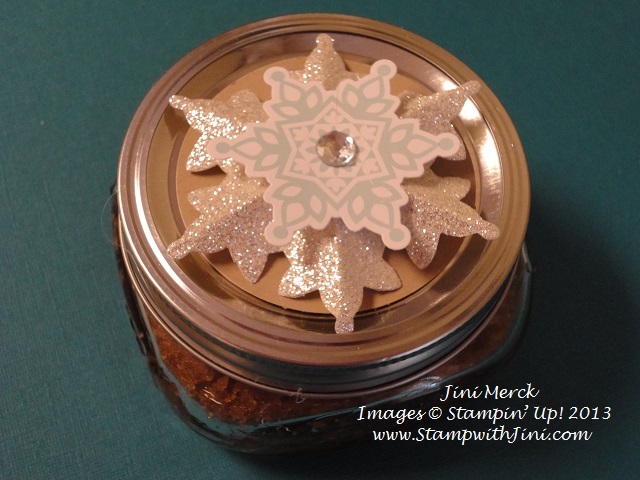
Ok so now the bag was finished and I wanted to decorate the little jars that hold the Pumpkin Spice Sugar Scrub, right?
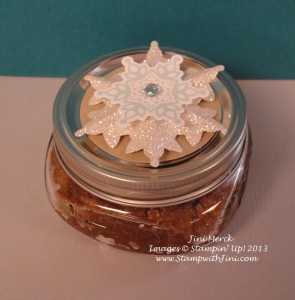
So I simply used the Festive Flurry Ornament Kit again – but this time I only used the two smaller snowflakes and punched a 2 1/2″ Circle from Crumb Cake as the base. Once I built my snowflake with the hot glue gun I added it to the lid using Glue Dots, of course you could also use Sticky Strip.

Sugar Scrubs are a lot of fun to make and are very popular right now. I love the fact that you can find everything in your kitchen to mix up a batch and it doesn’t have any preservatives in it – so they are great for those of us with sensitive skin. And this Pumpkin Spice Sugar Scrub is particularly yummy – when you use it you’re surrounded with the wonderful smell of pumpkin pie!
I love to use mine in the shower, since this recipe is gentle enough you can use it for both a hand scrub or body scrub. It is a wonderful way to moisturize during the winter. Even my hubby likes to use it on his dry hands in the winter.
Want the recipe? I figured you’d would so here it is:
Pumpkin Spice Sugar Scrub
2 c. Brown Sugar
1 c. Sugar
2 T. Pumpkin Pie Spice (reduce, if desired for less intense scent)
1 c. Sunflower Oil (you can also use Safflower or Vegetable oil)
Place ingredients into bowl. Mix until well blended. Store in a air tight container.
This recipe makes enough for a pint jar and can be used anywhere on your body. Just moisten your hands, scoop out a spoon full and rub in a circular motion on your moistened skin. Rinse and enjoy.
Be careful if you’re using this in the shower since the sunflower oil will make the floor slick. You’re going to love how soft this makes your skin feel! I use mine 2-3 times a week and the scrub should last for weeks and weeks if you are careful not to get water into it. You can add a cute little spoon to your gift for scooping if desired.
If you like this my Pumpkin Spice Sugar Scrub you may want to try my Peppermint Stick Sugar Scrub too. Click HERE for more on my Peppermint Stick Sugar Scrub.
Supplies:
Stamp Set: A Gift for You (item 134765), and Festive Flurry (131778/131781)
Inks: Soft Suede (126978) and Crumb Cake (126975)
Paper: Pool Party (122924), Crumb Cake (120953), and Whisper White (100730)
Accessories: Festive Flurry Ornament Kit (135813), Label Bracket Punch (132153), Big Shot (113439), Festive Flurry Framelits Dies (item 132193), Whisper White Baker’s Twine (124262), Glue Dots (103683), 2 1/2″ Circle Punch (120906), plain white gift bag and small mason jar
Click here to order your Stampin’ Up! Products online 24/7! (US only)
Use Hostess Code UHRUCJ9X and get a special Class from me for FREE!
Festive Flurry Ornament Kit (while supplies last)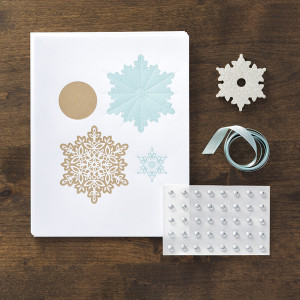
Clearance Rack Blitz (while supplies last) There was a glitch yesterday with the online store – so if you looked early yesterday at the items the pricing was incorrect – you may want to check it out again.
Weekly Deals (Special ends December 16, 2013 at 11:50 p.m. (MT)