Just Thinking Tutorial

Want to see what we did at my FREE Sale-a-bration Celebration Event? This past Sunday I was able to share the NEW Spring Catalog products and some of the things I brought back with me from Stampin’ Up! Leadership in Orlando.  What fun everyone had together – it’s one of my favorite parts of stamping.

First here are some pictures of my classroom and some of the displays.
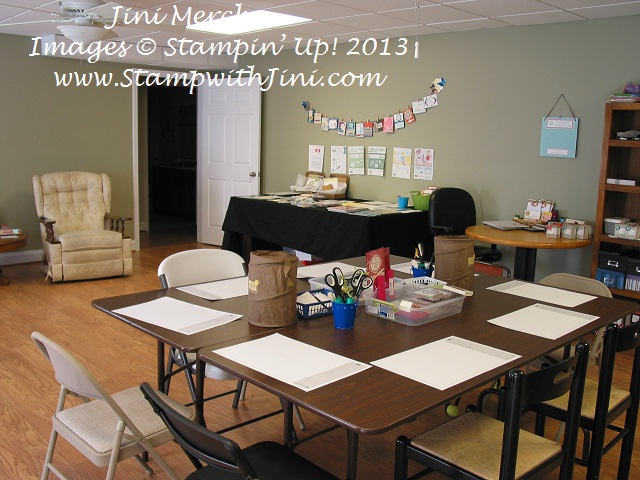
Sale-a-bration Celebration Event classroom

Sale-a-bration Celebration Event Display

Of course there has to be chocolate – after all what would be stamping without chocolate?
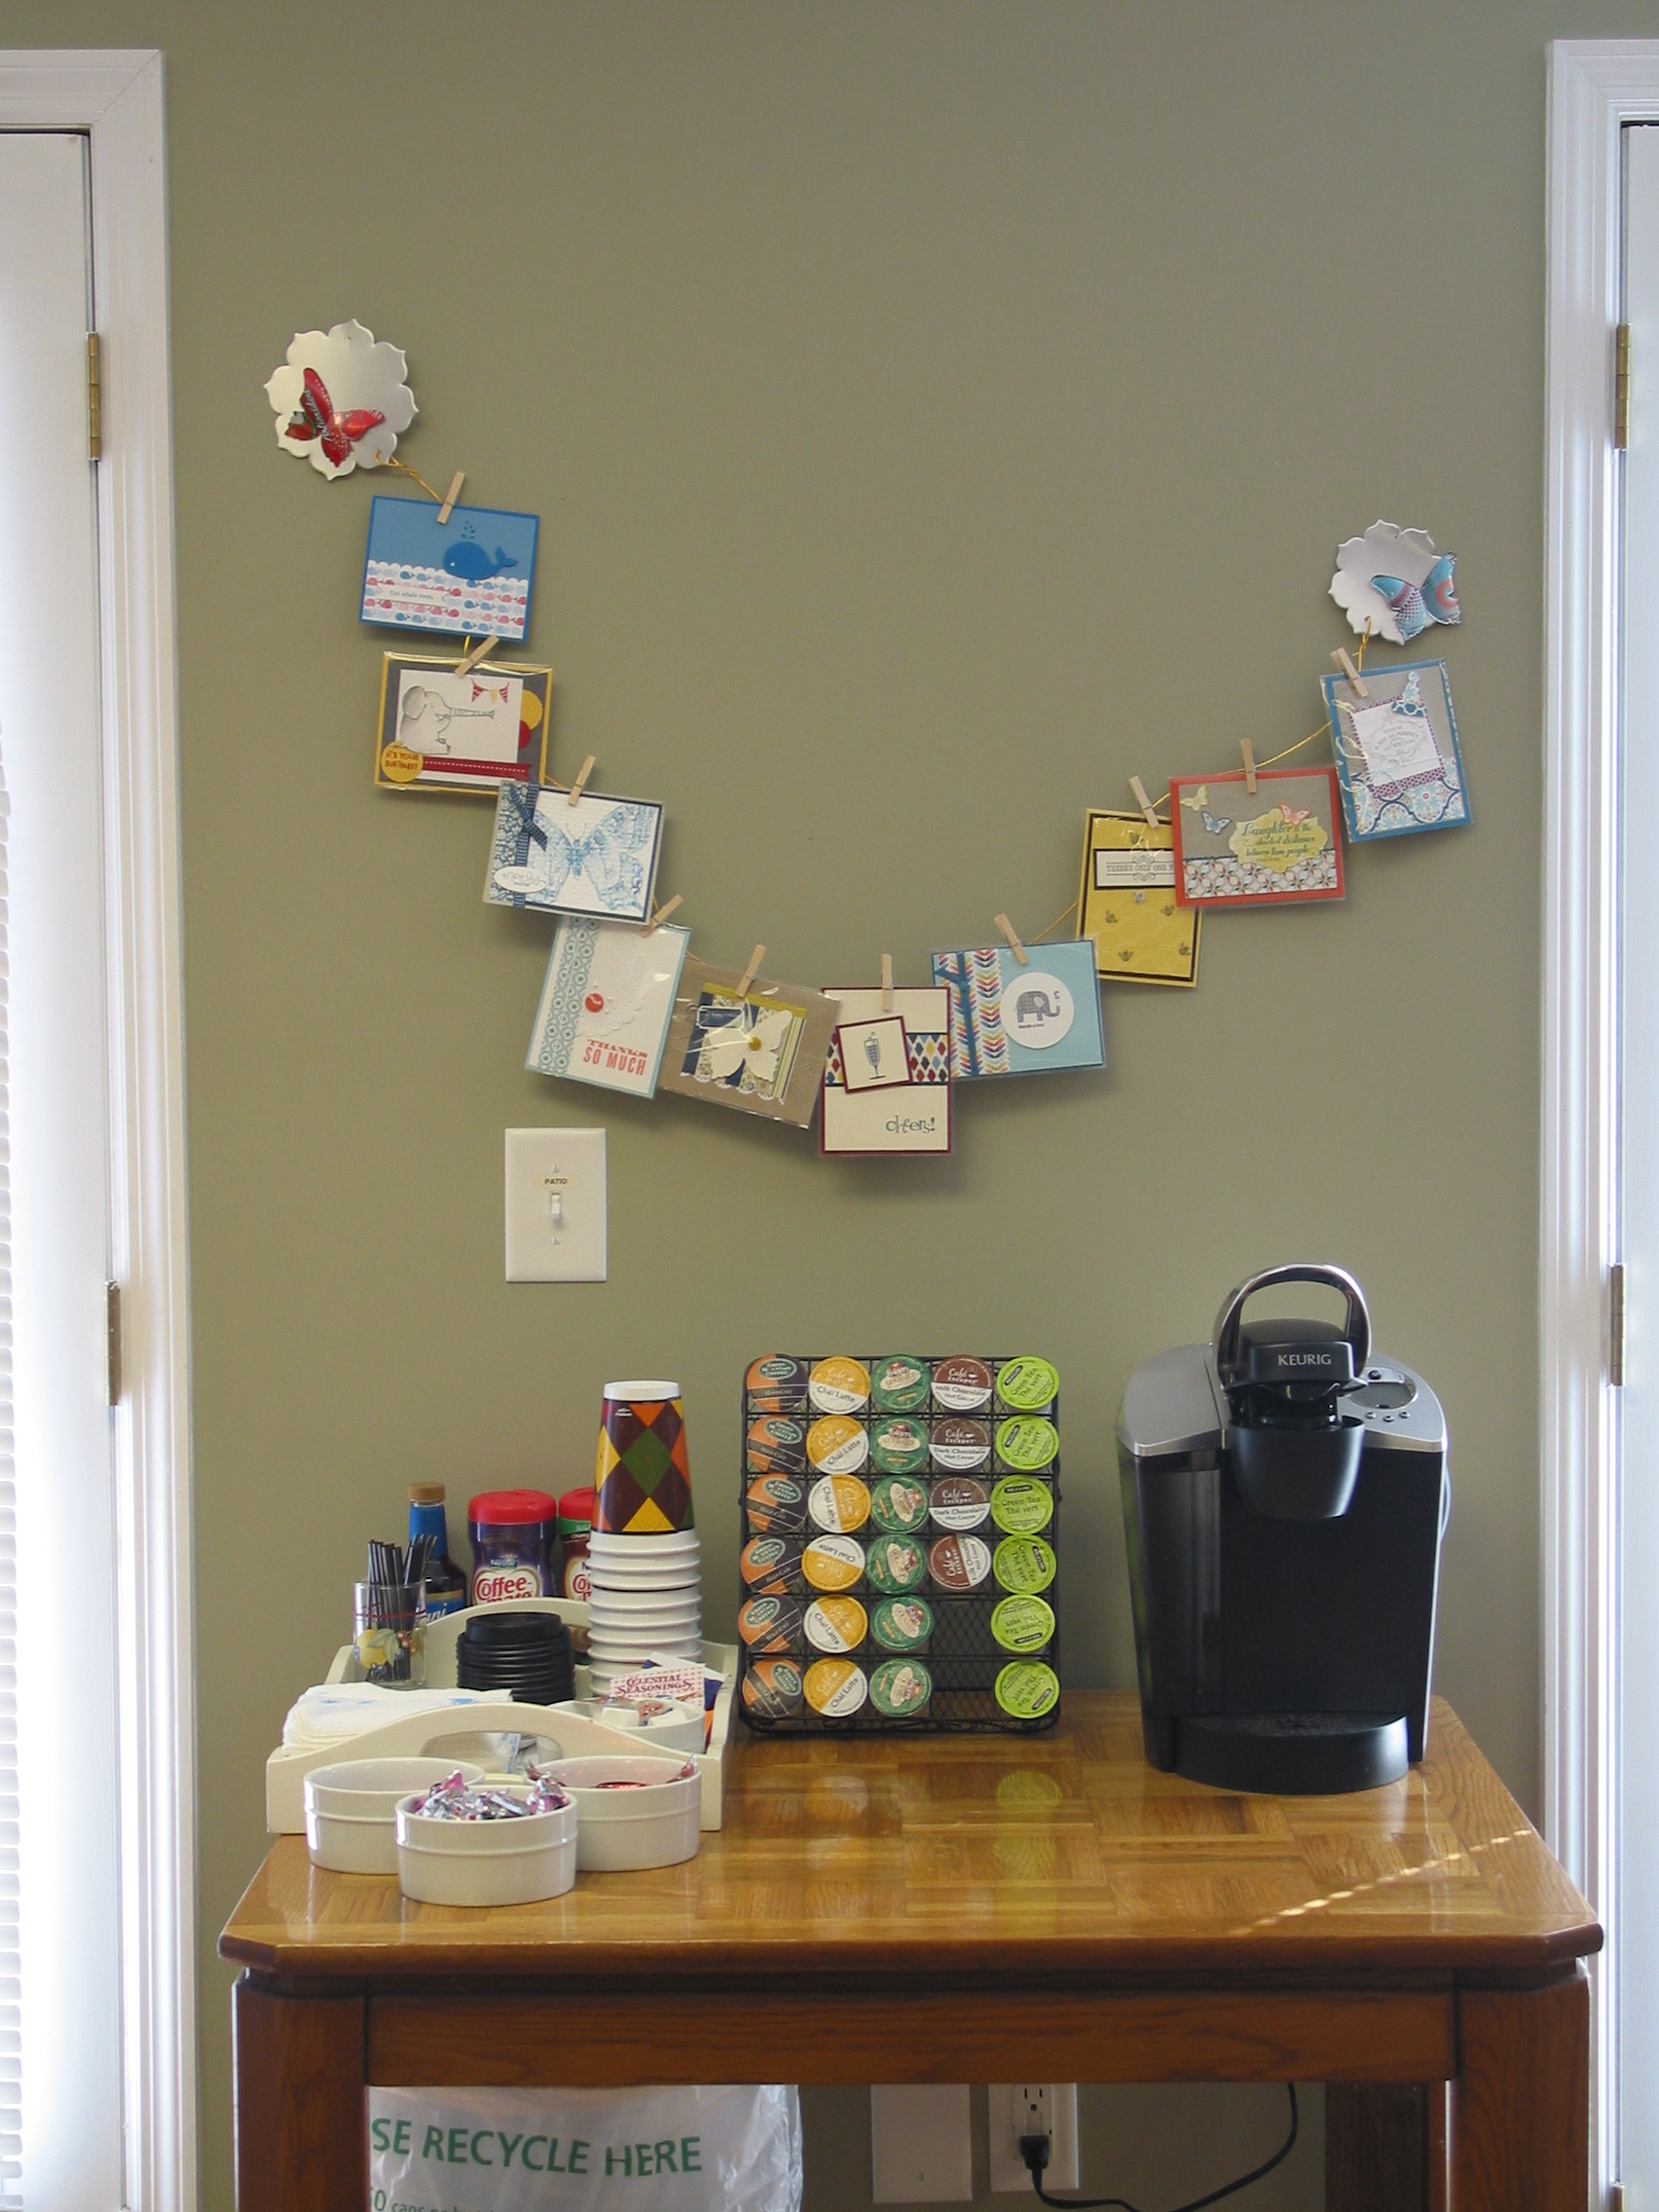
Sale-a-bration Celebration Event snack area

Everyone seemed to have a great time with the two cards they were able to make.
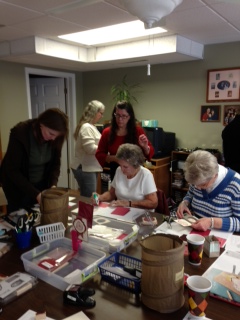
Sale-a-bration Celebration Event group

Sale-a-bration Celebration Event Big Shot

Here is my favorite card that I created for the event using the Just Thinking Stamp from the Spring Catalog. Just Thinking was one of the stamps I just knew I wanted when I saw the Spring Catalog the first time!
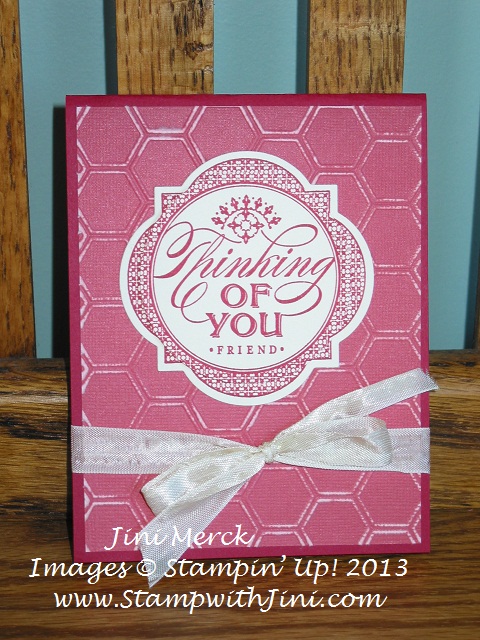
Just Thinking

Since not everyone was able to come I thought I would share with you a tutorial on how my Just Thinking card was made, along with my very first video tutorial showing you how to use our Core’dinations Card Stock. I just love the Core’dinations Card Stock and think you will too – it’s a lot of fun to work with and very versatile. Better yet you’ll find three Core’dination Card Stock color choices Pool Party (item 129321), Primrose Petals (item 129322), and Real Red (item 129320) in the Spring Catalog on page 12.

Just Thinking Tutorial

Just Thinking

Supplies:

Raspberry Ripple Card Stock (item 126842 $6.95): 4 ¼” x 11″; scored at 5 ½” and folded

Primrose Petals Core’dinations Card Stock (item 129322 $6.95): 4″ x 5 1/4″

Very Vanilla Card Stock (item 101650 $8.50): 8 1/2″ x 3 ½”

5/8″ Very Vanilla Seam Binding (item 120999 $6.96): 20″

Honeycomb Embossing Folder (item 129378 $7.95)

Stampin’ Sanding Block (item 129367 $3.95)

Window Frames Collection Framelits Dies (item 129021 $26.96)

2 ½” Circle Punch (item 120906 $16.95)

Multipurpose Liquid Adhesive (item 110755 $3.95)

Dimensionals (item 104430 $3.95)

Instructions:

1. Prepare your Core’dinations Card Stock Layer as shown in the video.

2. Adhere the Primrose Petals Core’dinations Card Stock to your card front using Multipurpose Liquid Adhesive. (I like to use this adhesive on anything that has a heavy texture.)

3. Stamp two images onto Very Vanilla Card Stock using Raspberry Ripple Classic Ink.Just Thinking Tutorial
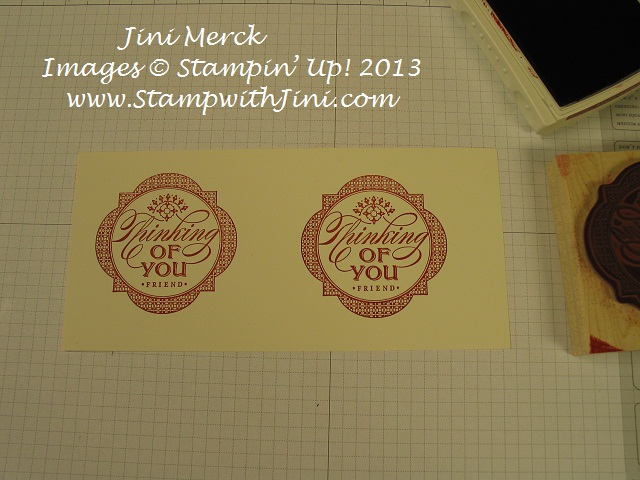
4.  Using the Window Frame Framelits Die and Big Shot cut out one of the images.
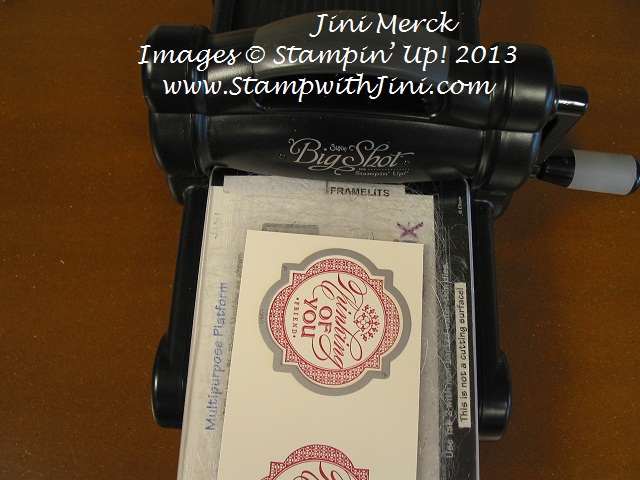
Just Thinking Tutorial

5. Adhere to the card front.

6. Punch the sentiment out of the second stamped image using the 2 ½” Circle Punch.
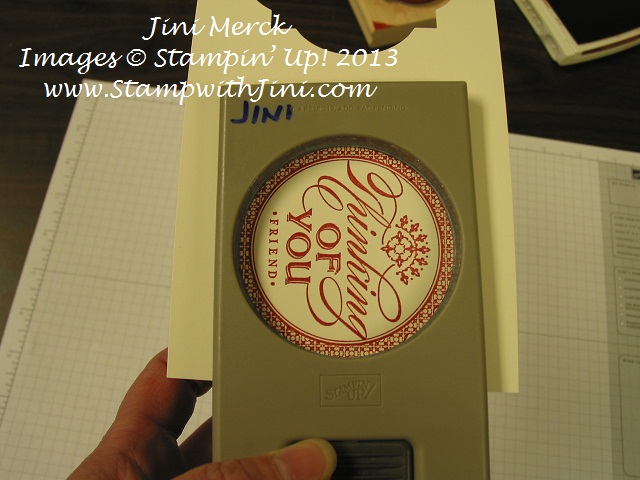
Just Thinking Tutorial

7. Adhere to the card front using Dimensionals.

8. Loop ribbon around the card front and tie into a bow. Trim ends.

That’s it – now you can send your card to someone you’re thinking about.

You can click here to download a PDF of my Justing Thinking Tutorial

Please leave me a comment and let me know what you think of today’s post. I’d love to know what you think of my first video so leave me a comment after you watch it. And don’t worry about the fact you need to use your email when you leave a comment – no one else will see it except me. My blog only asks for your name and email so it knows you’re a real person and not a robot spammer and I’ll only send you email if you have requested my Newsletter.

Click here to order your Stampin’ Up! Products online 24/7! (US only)
Last Minute Christmas Gifts

We’ll its busy around the house today getting ready for Christmas but I wanted to share with you a few things quickly.

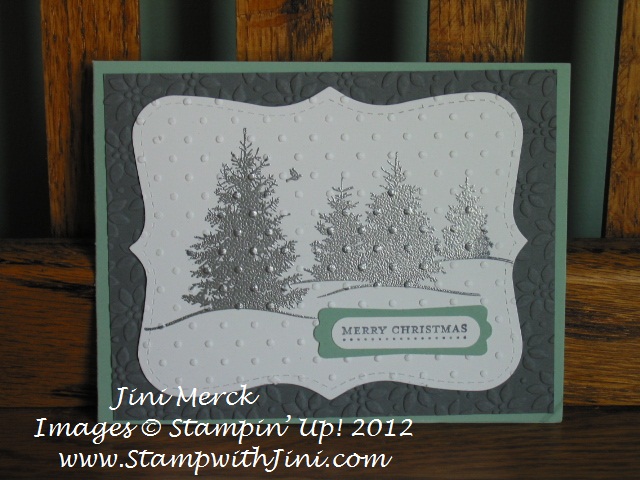
First I wanted to share a couple of the wonderful cards that my stamping friends have sent me. This first card is from Randy and uses one of our retired stamp sets Scenic Season which she embossed in Silver. Don’t you love the way that Stampin’ Up! items work together! It doesn’t matter if it has been retired for a while or brand new.

Scenic Season

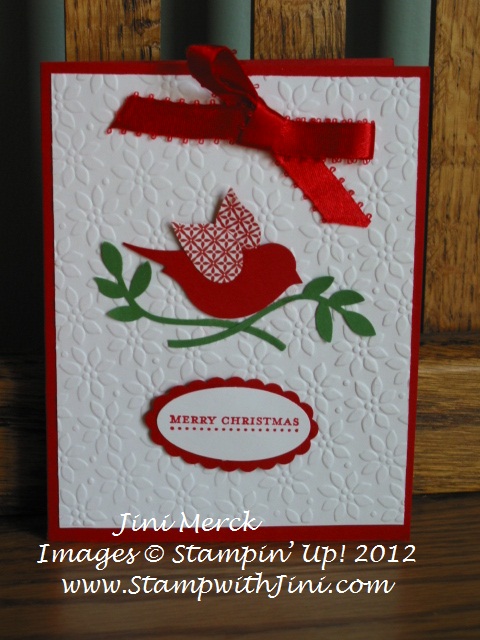
Mary made this card using the Bird Builder Punch

Bird Builder Punch

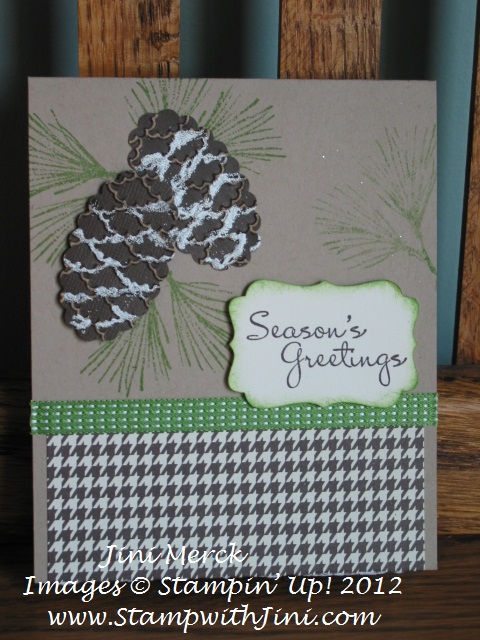
And this last card was made by Janie. I love the way that Janie used our Early Espresso Core’dinations paper from the Holiday Catalog. She ran the punched Scallop Oval pieces through the Big Shot first using the Fancy Fan Embossing Folder and then used our White Emboss Powder to add the “snow” on the cones. Isn’t it great a great technique?

Core'dination Pine Cones

All of them are so great that I’ve also posted some on my facebook page – so you can see more cards there. (Just type in Stamp with Jini and become my friend.)

And now for my gift items – Saturday I shared with you my Peppermint Stick Sugar Scrub gift item that I made for my family and friends. Today I thought I would share with you the matching bags I made to go along with them. I really like the way they turned out and using our wonderful Designer Rosette Die made the rosettes so quick and easy! If you missed my Peppermint Stick Sugar Scrub post you can click HERE to read more about it.


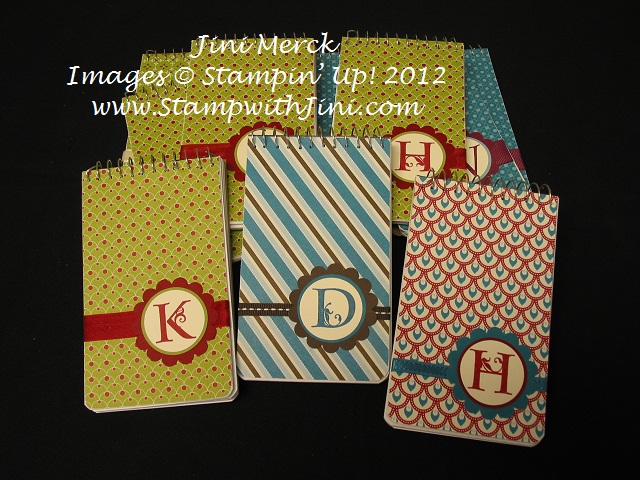
And last but not least my husband saw all the goodies I was making and decided that he wanted to give some to his co workers too. Of course I made chocolate tents for the guys and the ladies will receive these cute notepads.

Festival of Prints notepads

I used our Festival of Prints DSP Stack from the Holiday Catalog to cover them and then used our punches for focal point which includes their initial. I hope the ladies will enjoy them. Here’s a close up.

Festival of Prints notepad closeup

Did you notice something special about this little notepad? It contains a sneak peek of one of our FREE Sale-a-bration items! You’re going to love this ribbon from our Sycamore Street Ribbon and Button Pack!

Festive Holiday Treat Kit Tutorial

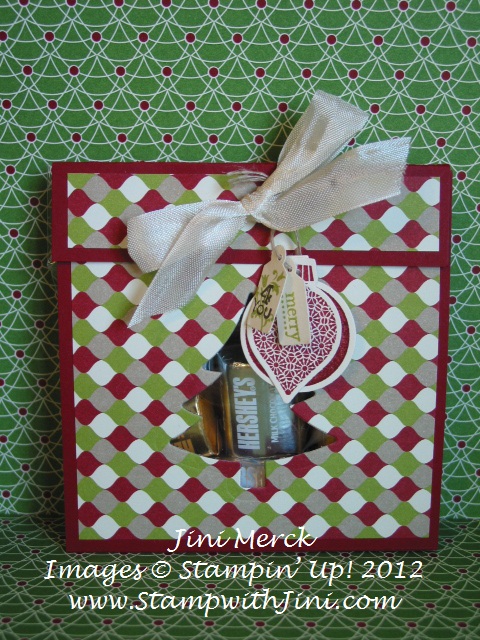
Festive Holiday Treat Kit

As I mentioned in Wednesday’s post in honor of Black Friday and Cyber Monday I’m offering you my Festive Holiday Treat Kit when you place an order with me! (Click HERE to see post and details on how to earn your free kits!)  Don’t forget that my Online Extravaganza items are up to 50% off and can be included in your order too! (My Black Friday and Cyber Monday Promotion ends Monday at Midnight.)

Want Worry free shopping?  Place your order directly with me by phone (706 754-7124) or email (stampwithjini@gmail.com) as soon as you finalize your list and I’ll take care of the details for you to make sure you get the best deals! But hurry and get it to me as soon as you can so you don’t miss the Online Extravaganza door busters!

Here is the Festive Holiday Treat Kit Tutorial that I promised on Wednesday so you can see just how fun these are to make.


Festive Holiday Treat Tutorial

Gather the following Supplies:

Simply Scored Tool

Festive Collection Framelits

Tiny Tags Stamp Set

Jewelry Tag

Ornament Keepsakes Stamp Set

Holiday Ornaments Framelits

Cherry Cobbler Classic Ink

Early Espresso Classic Ink

Lucky Limeade Classic ink

1/16″ Handheld Circle Punch

Crop-a-Dile

Candy of your choice


Here’s the Dimensions:

Cherry Cobbler CS: 4″ x 10″

Very Vanilla CS:  3″ x 4″

Festival of Prints DSP: 3 ¾” x 3 ¾” and 3 ¾” x ¾”

Very Vanilla ½” Seam Binding Ribbon: 12″

Linen Thread: 6″

4″ x 6″ Cello Bag


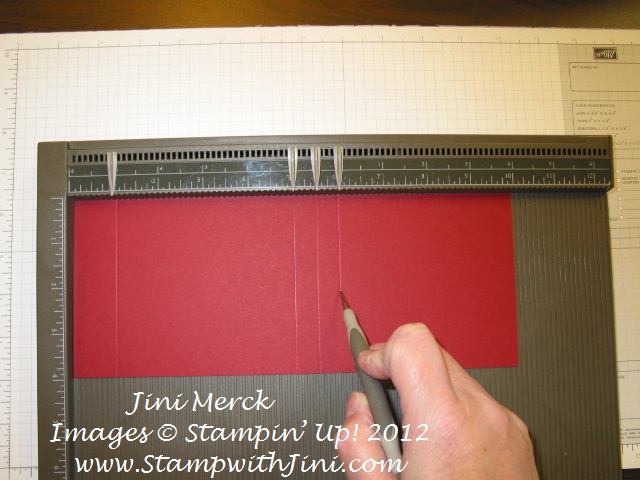
1. Lay the longest edge of the card stock against the top of your Simply Scored Tool and score at the 1″, 5″, 5 ½”, and 6″ marks. Fold on the score lines. (Use the 3 score lines to create a W shape.)

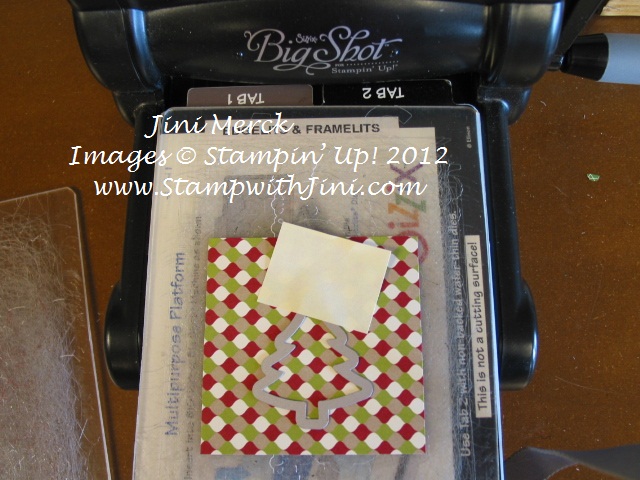
2. Take your Holiday Collection Framelits and center it about ½” up from the bottom of the DSP.  You can use a Post-it Note® to hold it in place. Run it though the Big Shot. Festive Holiday Treat Kit Tutorial

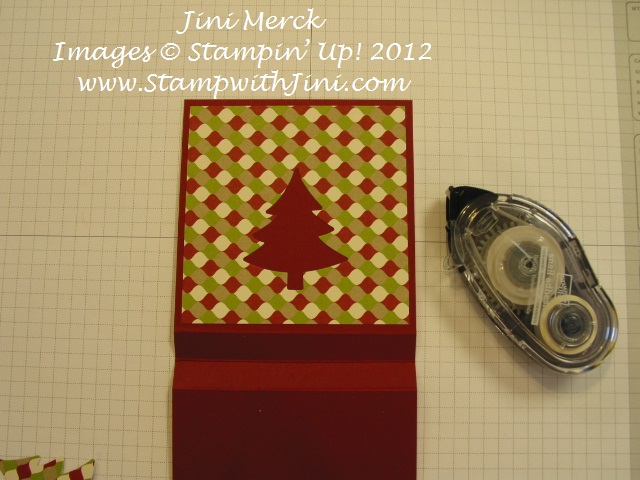
3. Attach the DSP to the CS with Snail. Festive Holiday Treat Kit Tutorial

4. Place the Holiday Collection Framelits back in the same place and run it through the Big Shot to cut the CS. Festive Holiday Treat Kit Tutorial

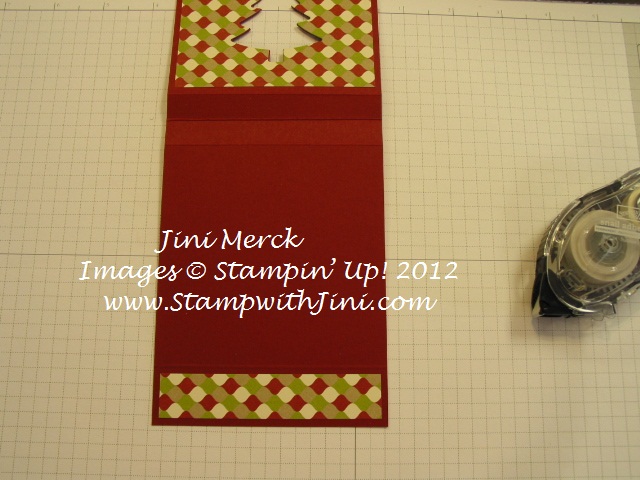
5. Attach the small piece of DSP to the CS to create the top flap. Festive Holiday Treat Kit Tutorial

6. Take a small Cello Bag and trim it down to 4 ½”  using your Personal Paper Trimmer.

7. Place your treat into the Cello Bag. (I used 6 nuggets in mine. Your favoite candy is great. Of course it’s always a good idea to make sure it tastes good, right?)

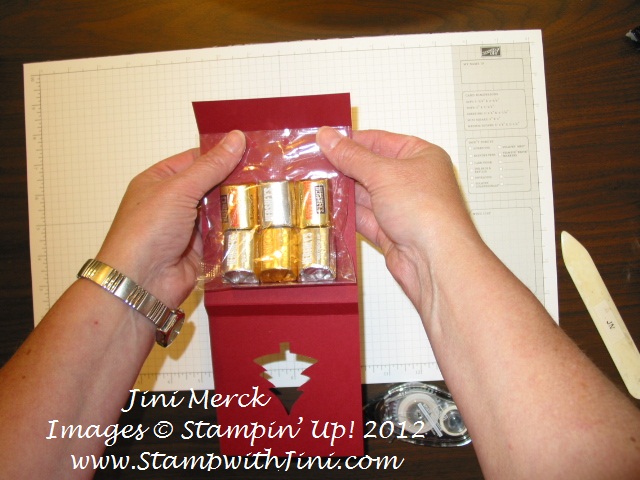
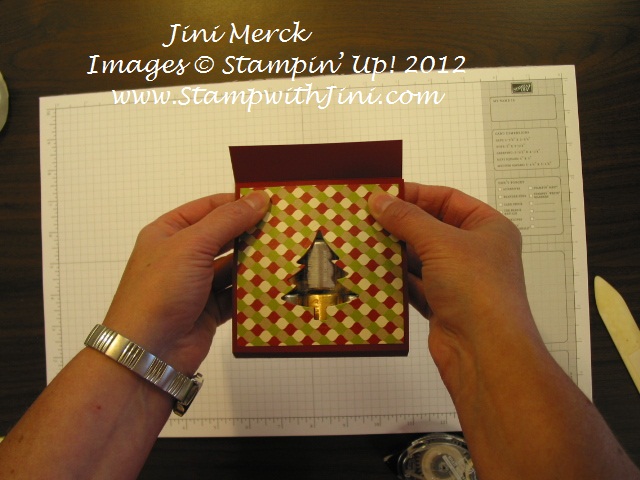
8. Place the Cello Bag into your treat holder as shown lining the top of the Cello Bag right below the 1″ score line. Festive Holiday Treat Kit Tutorial

9. Bring the front up to cover the Cello Bag. Festive Holiday Treat Kit Tutorial

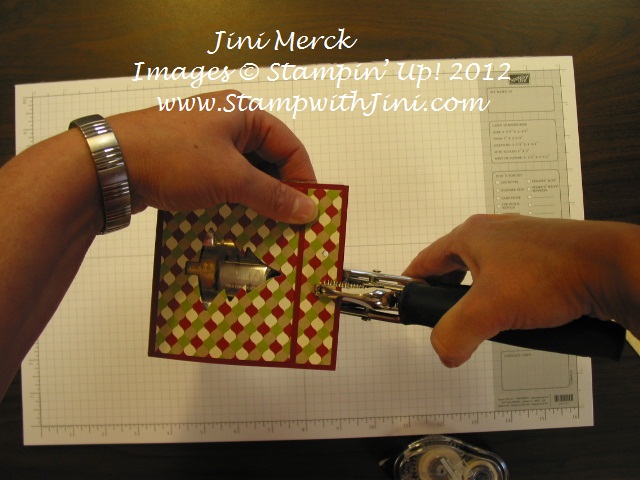
10. Fold the top down and using the Crop-a-dile punch two holes about 1″ apart and about 1 ½” from each side. Festive Holiday Treat Kit Tutorial

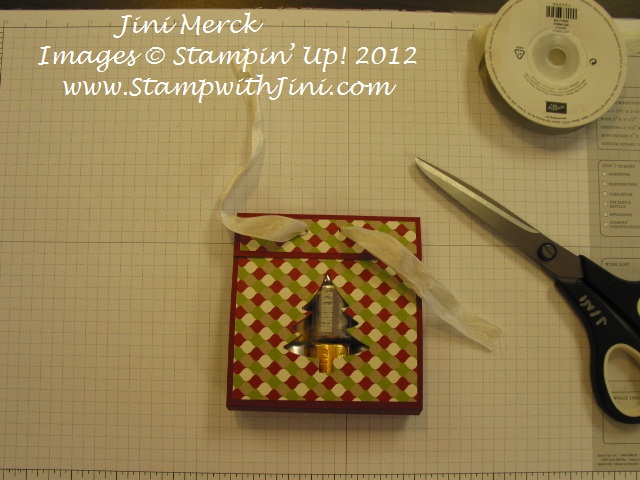
11. Thread 12″ of Ribbon through the two holes to hold everything together.  Set aside.

Festive Holiday Treat Kit Tutorial

12. Create your tags by stamping small images from the Ornament Keepsakes stamp set onto Very Vanilla CS (I used Cherry Cobbler) and cut them out using the coordinating Ornament Framelits.

13. Stamp tags using Tiny Tags stamp set (I used Lucky Limeade and Early Espresso) and punch out using TJewlery Tag Punch.

14. Punch holes in tags and ornament using 1/16″ Circle Punch.

15. Thread the Linen Thread through holes and tie ends into a knot.

16. Place finished tags onto ribbon and finish by tying ribbon into a bow.

You’re finished!

Your Festive Holiday Treat Kit will contain all the items that you will need to create this great little holiday gift along with a special Tutorial you’ll receive by email.

Your Festive Holiday Treat Kit includes:

  • Card Stock
  • Designer Series Paper
  • 4″ x 6″ Cello Bag
  • 12” Ribbon
  • 6” Linen Thread
  • Kits do not include candy
  • (*Kit colors and supplies may vary)

Remember Kits will be included with your order or if you live out of the area they will be mailed by USPS starting on December 5th.


Click here to order your Stampin’ Up! Products online 24/7! (US only)
Nugget Turkey

Hi everyone today I thought I would share a fun project with you… a Nugget Turkey. I think they are so stinking cute! And they’re are so much fun to make with a few simple supplies. Of course anything with chocolate around my house is a hit – how about yours?

Nugget Turkey

To bring a Thanksgiving smile to your loved ones faces you’ll need to gather the following supplies to make your Nugget Turkey.

More Mustard DSP (I used the polka dot print from the Regals DSP Stack: 1″ x 3″ and some for punching

Chocolate Chip and Pumpkin Pie CS: for punching

Pumpkin Pie CS: 3/8″ x 3/8″

1 3/4″ Scallop Circle Punch

1″ Circle Punch

Googlies (from the Holiday Catalog – they are self stick! Isnt that great!)

Glue Dots

Multipurpose Liquid Glue

Paper Snips

Hershey’s Nuggets (which ever type floats your boat – not sure? Taste test them after all Thanksgiving is calorie free, right?)

Here’s how you do it –

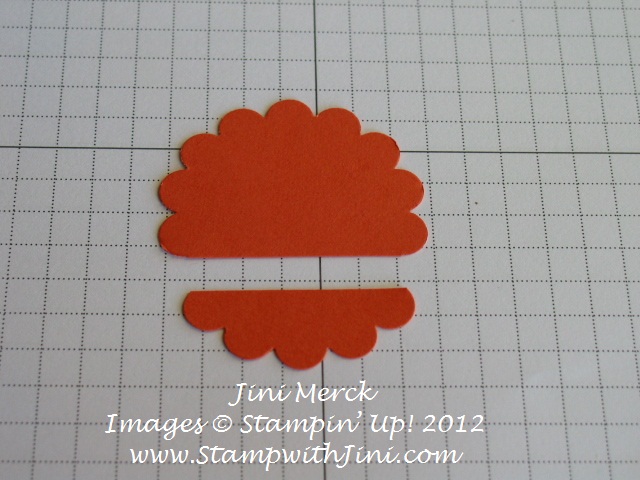
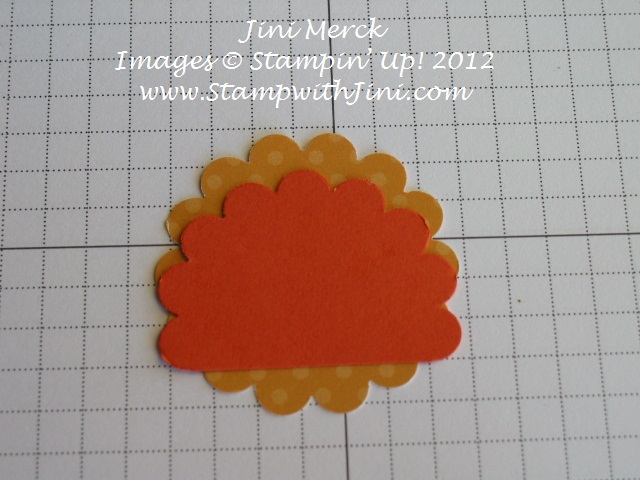
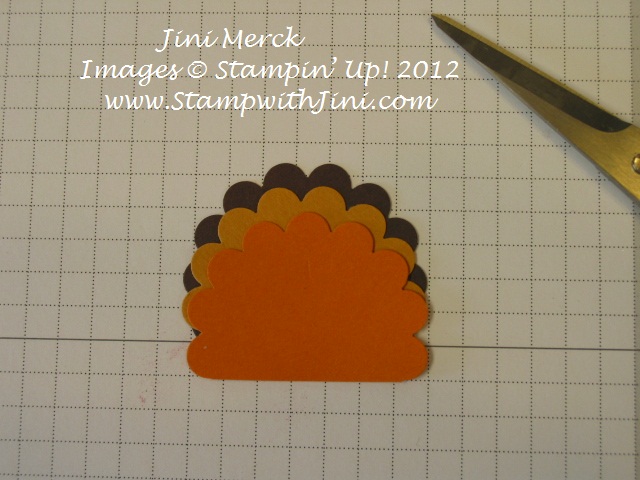
1. Punch out 3 coordinating tail feathers from you More Mustard DSP and Chocolate Chip and Pumpkin Pie CS using the 1 3/4″ Scallop Circle Punch.
2. Punch 1″ Circle from Chocolate Chip CS. You should have the following pieces and are ready to assemble.

3. Wrap the 1″ x 3″ strip of DSP around your Nugget, and stick the end down using a Glue Dot. (Taste a piece of chocolate to make sure it’s good.)

4. Trim away the bottom 5 scallops from the first tail feather using your Paper Snips.

Nugget Turkey

6. Line up and adhere the first feather on top of the More Mustard DSP feather and trim away 4 scallops. (Why not try and different flavor Nugget, you want to make sure you’re using the right one, right?)

6. Line up and adhere the two layers of feathers on top of the Chocolate Chip CS feather and trim anything off the bottom that shows. (Hmm… Did you say Chocolate Chip – maybe you should check out those Nuggest again?)

turkey nugget

7. Attach feathers to the back of the Nugget using a Glue Dot or two.

8. Fold the 3/8″ x 3/8″ piece of Pumpkin Pie CS in half to create the beak and attach this to the 1″ Chocolate Chip Circle using Multipurpose Liquid Glue. Allow to dry.

9. Attach your Googlies to give the little guy eyes – after all aren’t they too cute wiggling around like that? (Oops.. better try another one of those nuggets before you’re done. Want to make sure you tried all the flavors right?)

10. Attach your head of your turkey to the front of your Nugget using a Glue Dot and you’re finished.

Isn’t he cute? Why not make another one – after all there is still chocolate left right?

I hope you enjoyed this little tutorial for my little Nugget Turkey.

Click here to order your Stampin’ Up! Products online 24/7! (US only)
FREE Project Tutorial with November Orders

I had such a great response to my FREE Project Tutorial for the month of October that I will be extending it for the month of November. This FREE Project Tutorial is a part of a simple rewards program I’m trying. When you place an order for $50 or more in merchandise, (tax and shipping are not included) through me, you will receive a FREE Project Tutorial by email.

You will receive this link within 48 hours of placing your order! (All order types qualify.) Click HERE to see my original blog post on my FREE October Project Tutorial.

Love the project and want more fall tutorials? Why not check out my Festive Fall Fun Tutorial you can purchase from my Tutorial Store. So now if you’re someone who doesn’t live in my area, or maybe you live close by but weren’t able to attend my class, you can still enjoy my Festive Fall Fun Tutorial!

Here are the details – For just $12.95 you will get a my Festive Fall Fun Tutorial loaded with step by step photos in a PDF format to work on in your leisure! Click my Tutorial Store tab above to get yours!

Also, please be sure to sign up for my FREE Monthly Newsletters to receive stamping tips, ideas and updates on what is happening with Stamp with Jini. You’ll receive a FREE Multiple Clear-Mount Images Tutorial when you do!

PS…. And as an added bonus right now I’m sending out my 12 Weeks of Christmas Newsletters. (Only my Newsletter Subscribers receive this special Newsletter.)

Yep, there are 6 more weeks of fun projects for this holiday season left to come!

Click here to order your Stampin’ Up! Products online 24/7! (US only)
Save

Why not try one of my Fall themedTutorials?

I just held my last Festive Fall Fun Stamp Camp yesterday and everyone had such a great time making their projects that I wanted to remind you that this class is also offered as a Tutorial you can purchase from my Tutorial Store. So now if you’re someone who doesn’t live in my area, or maybe you live close by but weren’t able to attend, you can still enjoy my Festive Fall Fun Tutorial!

Here are the details – For just $12.95 you will get a my Festive Fall Fun Tutorial loaded with step by step photos in a PDF format to work on in your leisure! Click my Tutorial Store tab above to get yours!

Love tutorials? Don’t forget my new FREE Project Tutorial this month that uses the French Foliage stamp set. This FREE Project Tutorial is a part of a simple rewards program I’m trying. When you place an order for $50 or more in merchandise, (tax and shipping are not included) through me, you will receive a FREE Project Tutorial by email.

You will receive this link within 48 hours of placing your order! (All order types qualify.) Click HERE to see my original blog post on my FREE October Project Tutorial.

Also, please be sure to sign up for my FREE Monthly Newsletters to receive stamping tips, ideas and updates on what is happening with Stamp with Jini. You’ll receive a FREE How to Stamp Multiple Clear Mount Images Tutorial when you do!

PS…. And as an added bonus right now I’m sending out my 12 Weeks of Christmas Newsletters. (Only my Newsletter Subscribers receive this special Newsletter.) Yep, and there are 8 more weeks of fun projects for this holiday season left to come!

Click here to order your Stampin’ Up! Products online 24/7! (US only)

FREE Project Tutorial

I’m really excited to offer you a FREE Project Tutorial this month that uses the French Foliage stamp set. This FREE Project Tutorial is a part of a simple rewards program I’m trying. When you place an order for $50 or more in merchandise, (tax and shipping are not included) through me, you will receive a FREE Project Tutorial by email. You will receive this link within 48 hours of placing your order! (All order types qualify.)

Unlike my traditional or Virtual Club, there are no time commitments in terms of months. (Typically my clubs run for 6 months.) FREE Project Tutorials will typically change monthly, so all orders placed during the month will receive the same tutorial.

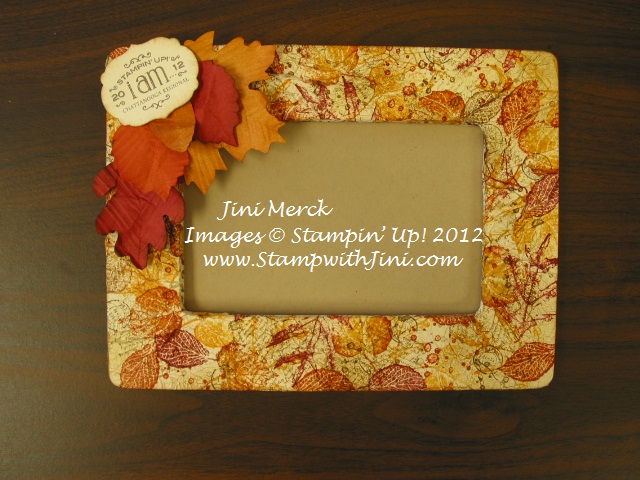
For the month of October I will be offering the French Foliage Technique Frame Tutorial. I created this gift recently for my TEAM members when we went to the Chattanooga Regional. They thought it was such a great gift that I thought you might enjoy making them too!

Here is a photo of the project – of course this one was made for my TEAM and so it has my Regional design on it – yours will be a little different.

The tutorial will include full color photos and detailed instructions for the project above along with some alternate suggestions. Also included is a detailed list of materials needed for the project.

Within 48 hours of placing your order with me, I will send your FREE tutorial by email from my StampwithJini@gmail address and it will come with an attached PDF file for you to download or print.

I’m looking forward to sharing these FREE Project tutorials with you! Please post a comment or email me if you have any questions.

Also, please be sure to sign up for my FREE Monthly Newsletters to receive stamping tips, ideas and updates on what is happening with Stamp with Jini. You’ll receive a FREE Pinwheel Tutorial when you do – And as an added bonus right now I’m sending out my 12 Weeks of Christmas Newsletters. (Only my Newsletter Subscribers receive this special Newsletter.)

Click here to order your Stampin’ Up! Products online 24/7! (US only)
Festive Fall Fun Stamp Camp Tutorial Option Being Offered

I’m excited to be offering for the first time the option of one of my stamp camps in a Tutorial form. So now if you’re someone who doesn’t live in my area, or maybe you live close by but aren’t able to attend, you can still enjoy my Festive Fall Fun Stamp Camp!

For just $12.95 you will get a my Festive Fall Fun Stamp Camp Tutorial loaded with step by step photos in a PDF format to work on in your leisure! Click on my Tutorial Store tab above to all the details about my Tutorials and other items for sale.

Live  in my neck of the woods? Why not go the traditional route and join me in my studio. There are three dates being offered.

Sunday, October 21st at 2 p.m.

Tuesday, October 23rd at 6:30 p.m.

Wednesday, October 24th at 1 p.m.

Class Fee $33 or RSVP and Prepay by October 7th and pay just $28

Click HERE to see Flyer

I’m offering a new way to make your Class payments. Don’t want to mail a check? Click on the button to pay for your class fee and select your choice of day and time.


Class Fee
Choose a Class Date & Time


Punch Art Scarecrow Tutorial

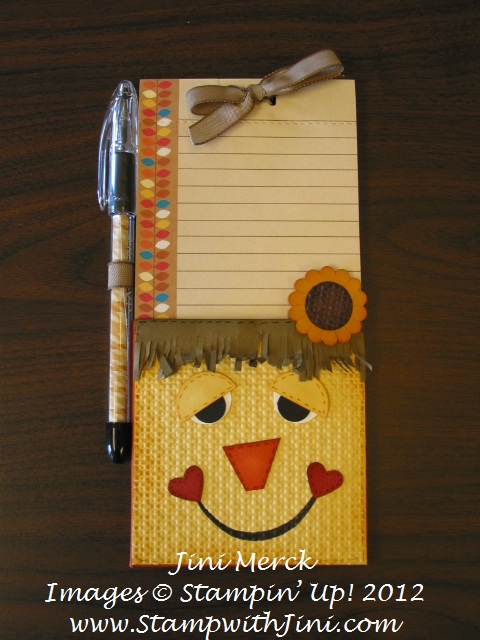
Wednesday I had my TEAM meeting and we made this little Punch Art Scarecrow Notepad together.

As I mentioned yesterday I received this scarecrow punch art swap at the Chattanooga Regional which was the inspiration for this project and I just tweaked the idea a bit to suit my style. You can click HERE to see my earlier post.

I loved the way this little guy turned out and so did my TEAM members. We had a lot of fun putting these Punch Art Scarecrow Notepads together. I like to make little gifts like this and thought this made a great project to give someone this fall who may not celebrate Halloween.

What do you think? Why not leave me a comment and let me know what you think. I love receiving feedback from you and it makes my day to know you’ve read my post. Sometimes I wonder if I’m the only one out there. Ever feel like that? I’ll try and respond to you when you leave comments too.

So……without further ado…. here is the promised tutorial for my Punch Art Scarecrow.

 Scarecrow Punch Art Tutorial

Supplies:

So Saffron card stock

Soft Suede card stock

Riding Hood Red card stock

Tangerine Tango card stock

Whisper White card stock

Basic Black card stock and Stampin’ Write Marker

More Mustard Classic Ink and Stampin’ Write Marker

Cherry Cobbler Classic Ink and Stampin’ Write Marker

Cajun Craze Classic Ink and Stampin’ Write Marker

Early Espresso Classic Ink and Stampin’ Write Marker

Stampin’ Sponges or Sponge Daubers

Small Heart Punch

½” Circle Punch

¾” Circle Punch

1″ Circle Punch

Big Shot

Square Lattice Embossing Folder

Paper Snips

Bone Folder

Multipurpose Liquid Glue

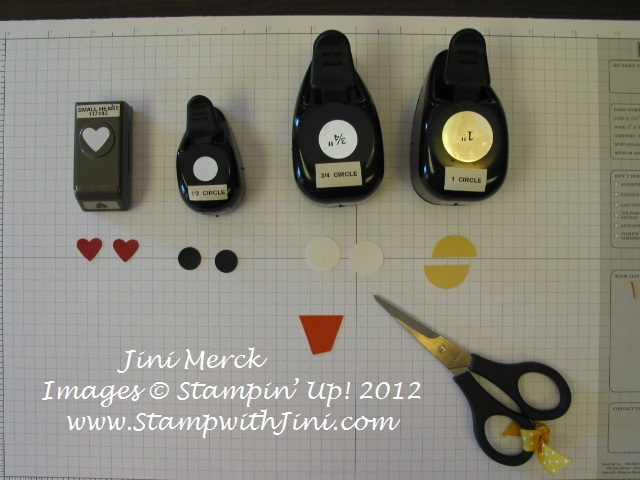
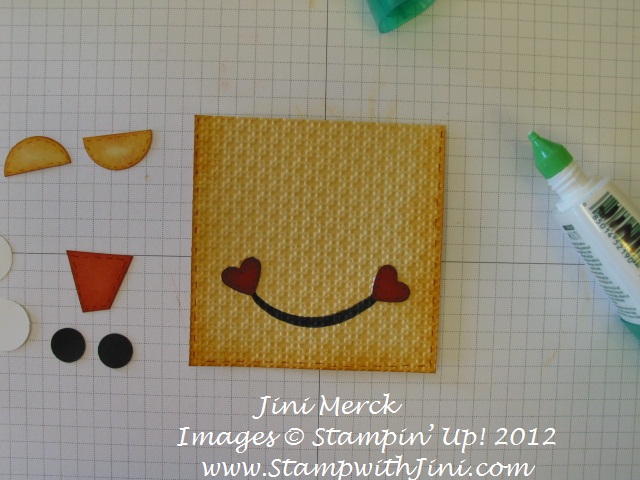
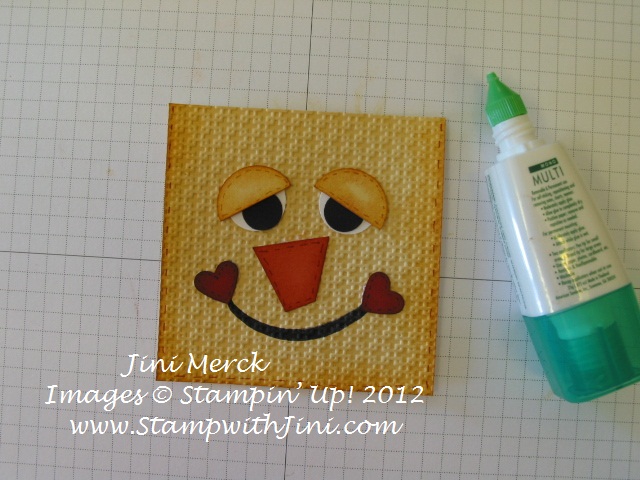
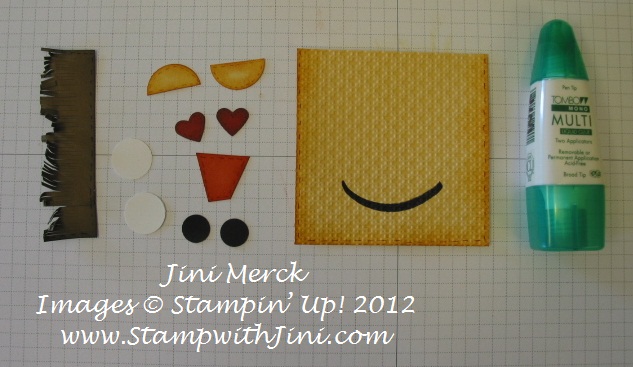
Start by punching out the following pieces –

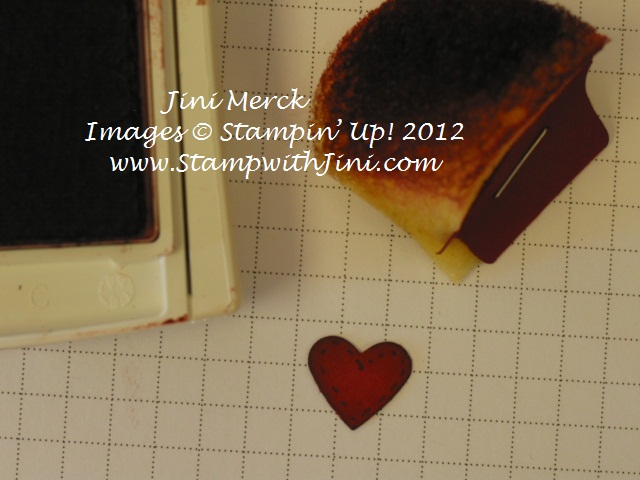
Riding Hood Red CS and the Small Heart Punch – 2 hearts

Basic Black CS and the ½” Circle Punch – 2 circles

Whisper White CS and the ¾” Circle Punch – 2 circles

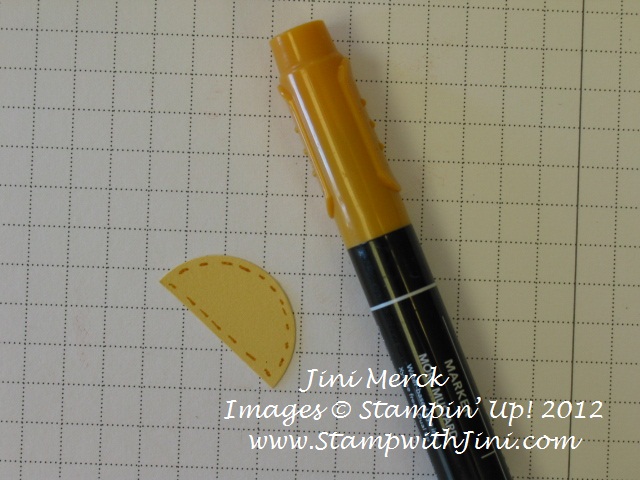
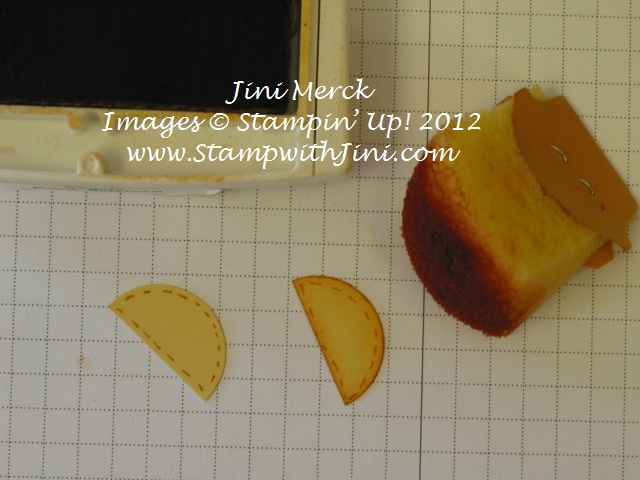
So Saffron CS and the 1″ Circle Punch – 1 circle, cut in half with the Paper Snips

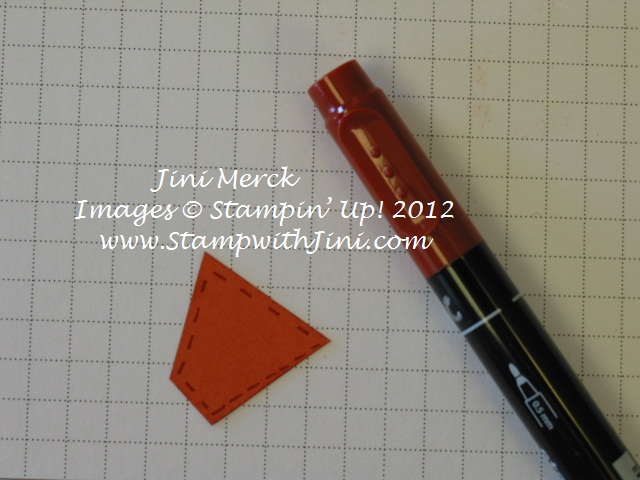
Then take a piece of Tangerine Tango CS that is 1″ wide and cut a triangle shape, Cut off the one pointed end to create the nose.

You should now have what looks like this and you are ready to begin. 

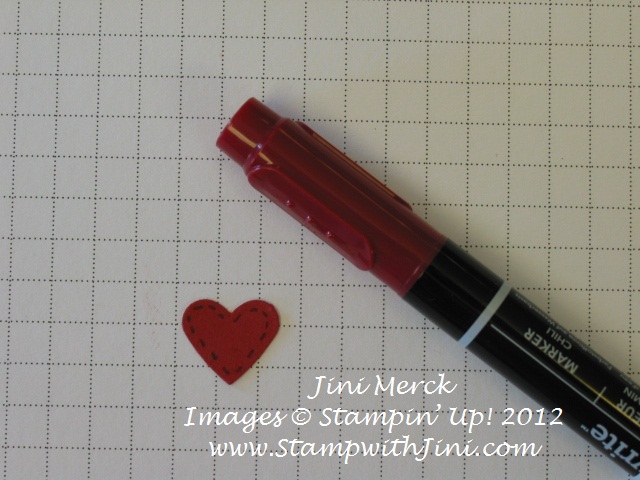
Using the Cherry Cobbler Marker Add Faux Stitching around the outside of both hearts.

Then sponge both of the hearts with Cherry Cobbler Classic Ink. Set aside for later.

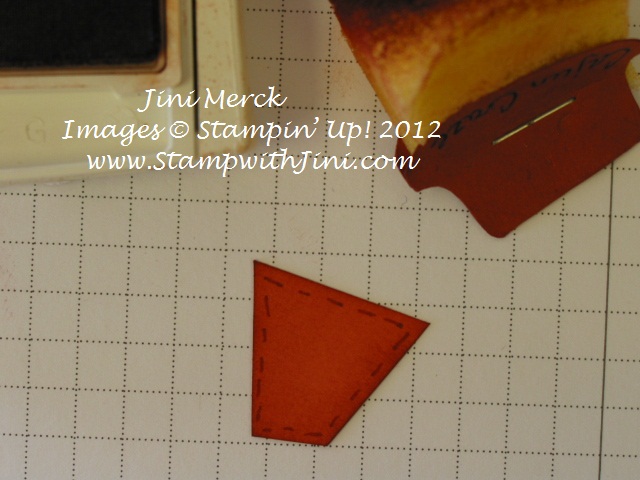
Next add Faux Stitching to your Tangerine Tango triangle with a Cajun Craze Stampin’ Write Marker. 

And Sponge the edges using Cajun Craze Classic Ink and set aside for later.

Create more Faux Stitching on the two half circles with the More Mustard Stampin’ Write Marker, 

Sponge the outside edges using More Mustard Classic Ink and set aside for later. 

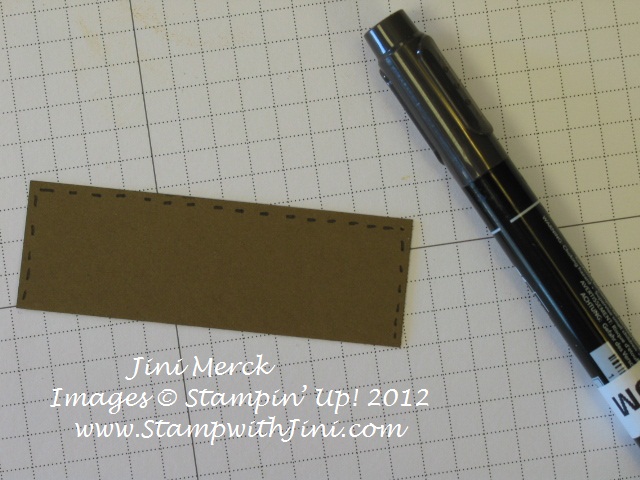
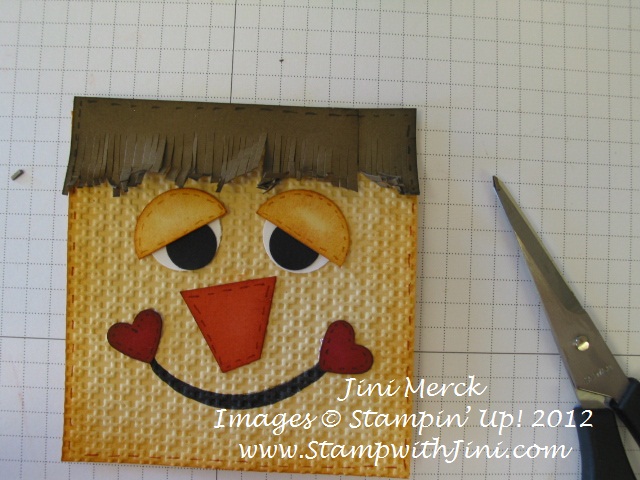
Now take a 3 ½” x 1″ piece of Soft Suede CS and add Faux Stitch using an Early Espresso Stampin’ Write Marker on both short sides and one of the long sides. 

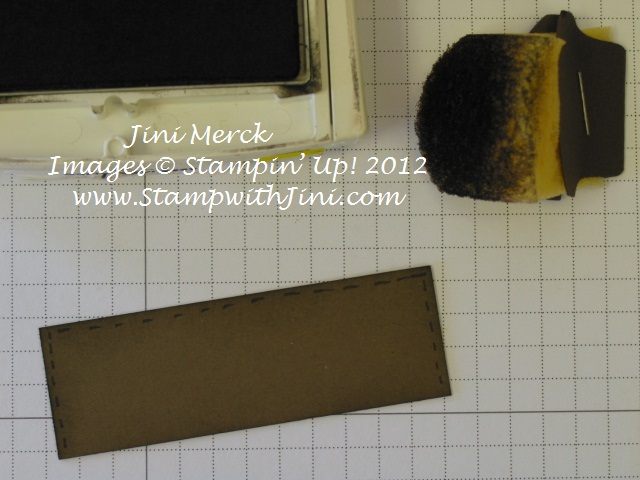
Sponge all four sides on the front and then flip it over and sponge the bottom long edge on the back. 

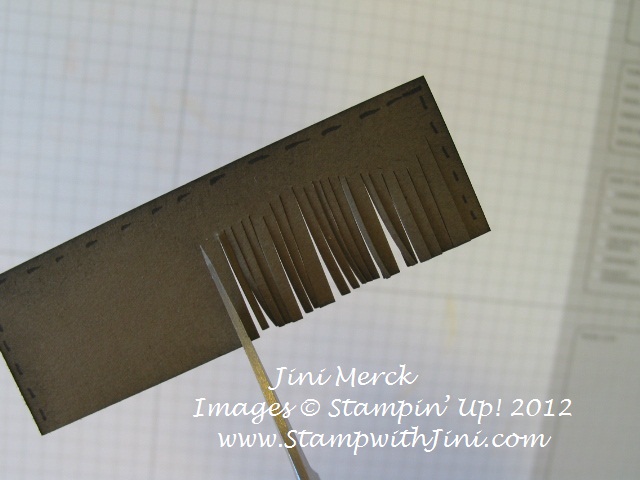
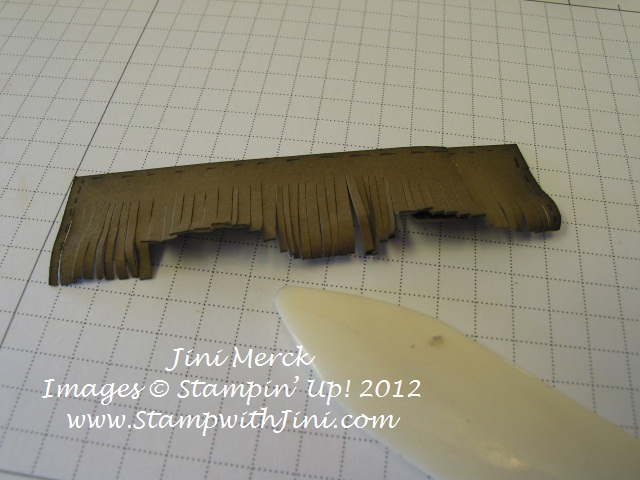
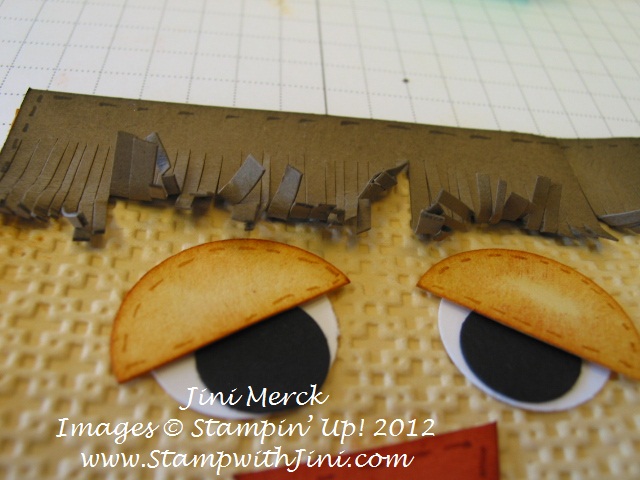
Next take your Paper Snips and cut a fringe on the bottom edge of your Soft Suede CS piece.

Next add some texture by curling the fringe you just created with your Bone Folder, alternating front and back curls. 

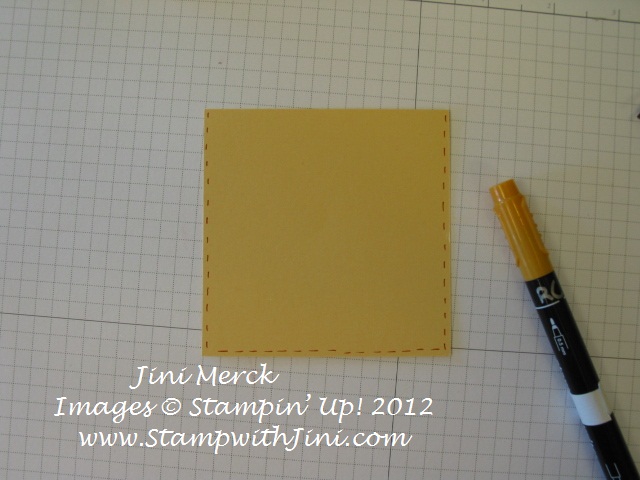
Using a More Mustard Stampin’ Write Marker create Faux Stitching around 3 sides of your 3 ½” x 3 ½” So Saffron piece of CS. 

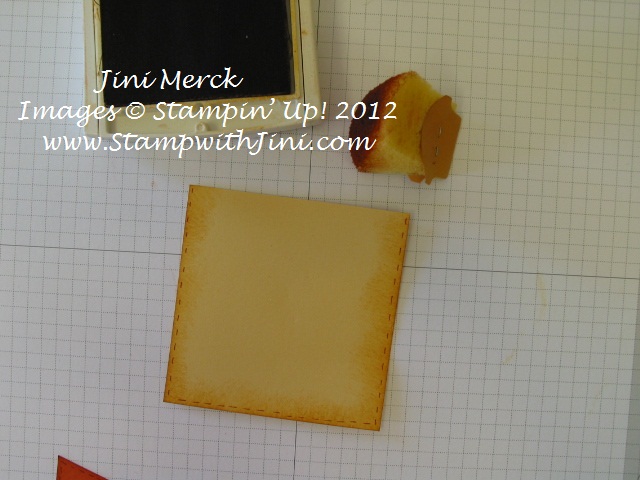
Sponge the edges on the same three sides using More Mustard Classic Ink.

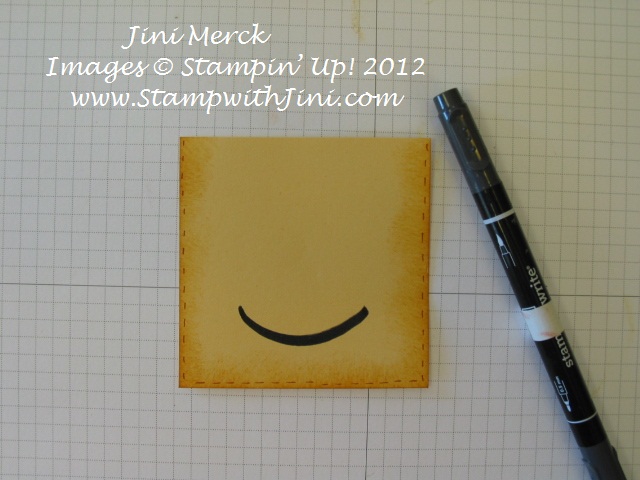
Next give your little guy a smile with a Basic Black Stampin’ Write Marker. I used the flare tip end. (Here is a Tip – Not comfortable free handing this part? Use the edge of a glass or any round shaped item as a guide.) Look you can see his little face already starting to take shape. 

Run this piece through the Big Shot using your Square Lattice Embossing Folder.

Now you’re ready to assemble and you should have what looks like the photo below.

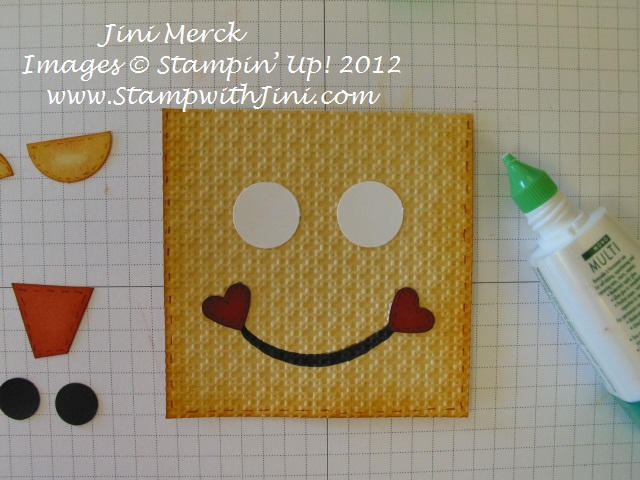
Add a smile to this little guys face by adhering the 2 small hearts to either side of the smile you drew. 

Next add the ¾” Whisper White circles. 

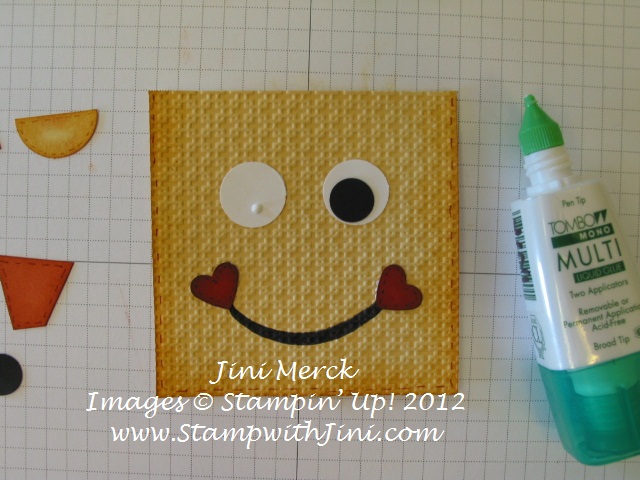
(Just a tip – when using Multipurpose Liquid Adhesive I like to place the glue on the bigger piece of card stock versus the smaller piece that I am gluing on. It is easy to reposition the piece once it is placed onto the project and I seem to stay a little cleaner too!)

And then the ½” Basic Black circle – look mom I can see! 

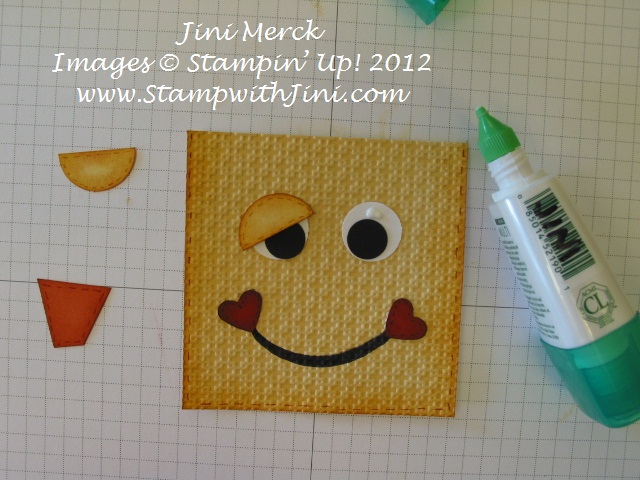
Next add his little Eye lids to make him look a little sleepy and give him some personality. After all guarding those sunflowers is hard work! 

And finally add his little nose so he can smell the sunflowers.

Attach the piece of fringed Soft Suede CS and Voila’ hair!  Here’s your little guy – you’re almost done. 

Finally take your Paper Snips and cut at different angles chunks out of his hair. That sponging on the back of the piece earlier is now starting to show a bit. Its ok you’re adding to his personality.  You can also fold, bend and crumple it a bit to add a little height and disarray to his do – After all whose hair looks great after standing in the field all day? 

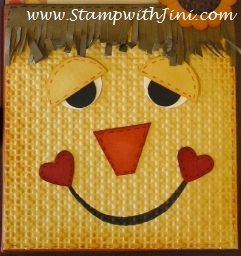
Voila’ you’re finished and isn’t this little guy adorable?  Go ahead and attach his little face onto your project!

Click here to order your Stampin’ Up! Products online 24/7! (US only)
Holiday Keepsakes Ornament Class Updated

A New Bundle Offer for this class is being offered due to the new Bundle Promotion that began October 1st.

Now you really can have it all. Get your Ornament Keepsakes Stamp Set (wood or clear), Holiday Ornament Framelits, our NEW Silicone Craft Sheet, Candlelight Christmas Specialty DSP and a FREE Festive Paper-Piercing Pack in addition to learning how to make these wonderful ornaments during my class! You can even add the fabulous Snow Flurry Die to your class bundle and get a FREE Tutorial for the 2 ornaments above!

There are two days to choose from.

  •  Sunday, November 4th at 2 p.m.
  • Tuesday, November 6th at 6 p.m.

Sound interesting? Want to know the details?

  • First choose which Ornament Keepsakes Stamp bundle you want; Wood or Clear Stamps.
  • Wood Stamp Set Option & DSP $85
  • Clear Stamp Set Option & DSP $77
  • Wood Stamp Set, DSP & Snow Flurry Die Option $112
  • Clear Stamp Set, DSP & Snow Flurry Die Option $103


  • Then email at StampwithJini@gmail, or call me at (706) 754-7124 to pay for your Class order before Monday, October 15th at 8 p.m. so that I can have your bundle here and ready for you at class.
  •  Make sure to let me know which Class time works best for you so I can hold your spot.

That’s it – yes it’s that easy, so why not sign up for the Holiday Keepsakes Ornament Class today!

You can click HERE to see my Calendar of Events with details or click HERE  to see my original Class Post with updates and all the details and Bundle information for this class. If you have any questions please feel free to contact me.