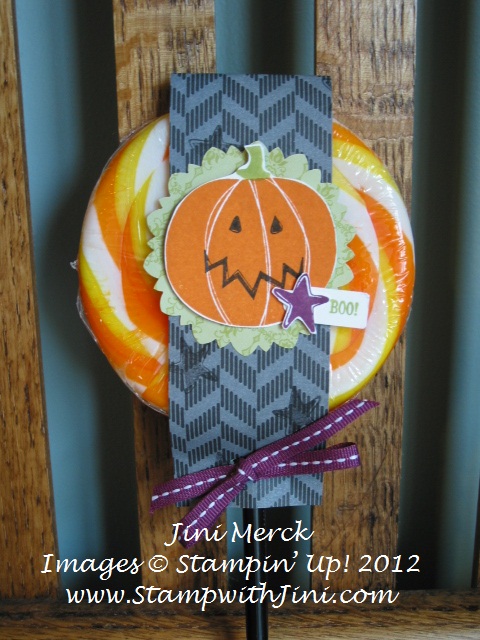
Jack of All Trades Lolly

Do you need a great stamp set for both Halloween and fall? How about the Jack of All Trades stamp set? It’s such a great set that can be used in so many wonderful ways. It is one of my favorites to use for so many things, and with that cute little Harry Potter “feeling”  hat I really couldn’t resist putting it on my shopping list.

I found these wonderful lollies at my local dollar store recently and their just in time for Halloween goodie giving.  So, I grabbed my Jack of All Trades stamp set and got to work. My TEAM enjoyed making one of their own lollies, during our TEAM meeting this past Thursday evening.

How about you? Do you have someone who would enjoy this Jack of All Trades Lolly?

Supplies:

Stamp Set: Jack of All Trades and Tiny Tags

Inks: Rich Razzleberry, Basic Black, Lucky Limeade and Pumpkin Pie

Paper: Howlstooth & Scaringbone DSP, Whisper White, 2011-2013 In Color Designer Series Paper Stack, and Whisper White

Accessories: Rich Razzleberry ¼” Stitched Grosgrain Ribbon, Paper Snips, 2 3/8″ Scallop Circle Punch, and Jewelry Tag Punch

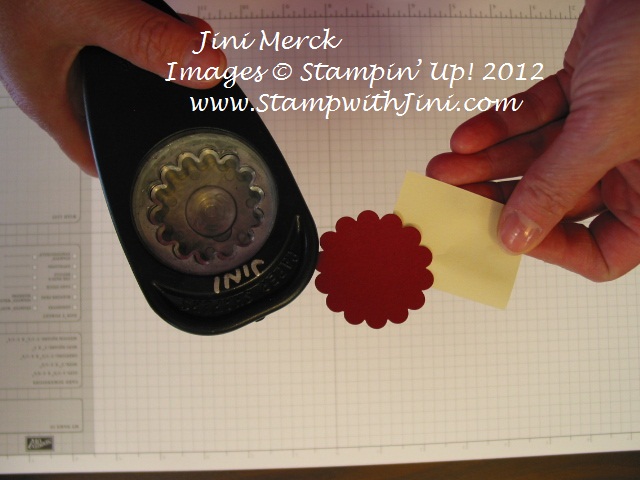
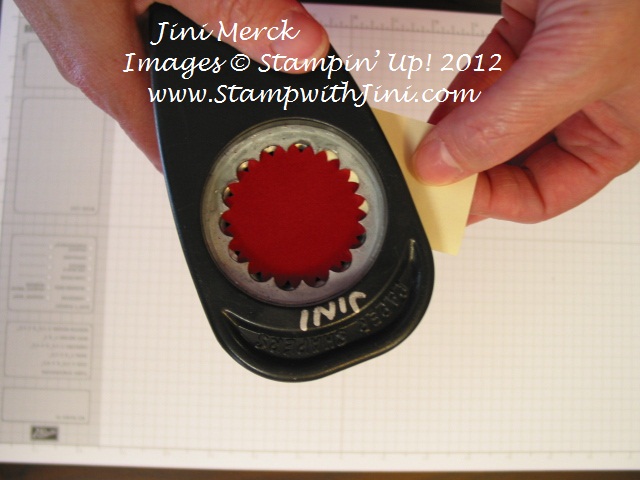
Wondering which punch I used for the medallion? Would you believe it is our Scallop Circle punch? Well here is a quick tutorial on how I did it.

Scallop Circle Medallion Tutorial

First punch out you scallop circle.

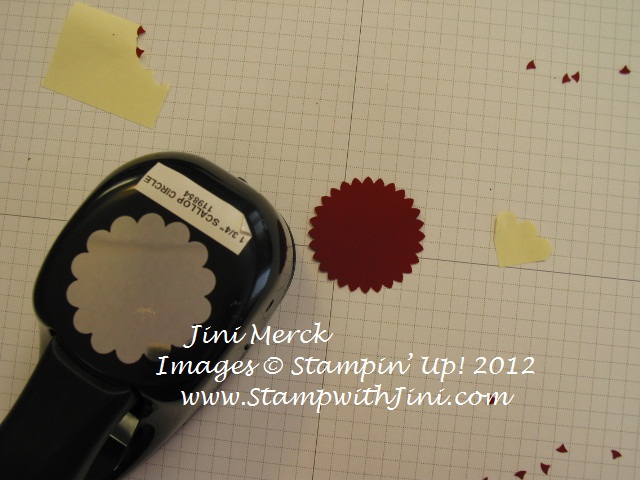
Next using a sticky note as a handle, slip the scallop circle back into your punch. And off set the scallops as shown.

Punch again and you have your scallop circle medallion.  It’s as easy as that!

Do you like learning new tips and techniques why not check out my Calendar of Events by clicking HERE to see what NEW classes are coming up soon. Classes aren’t convenient you say; why not join my Virtual Club. Click HERE for more details.

Click here to order your Stampin’ Up! Products online 24/7! (US only)

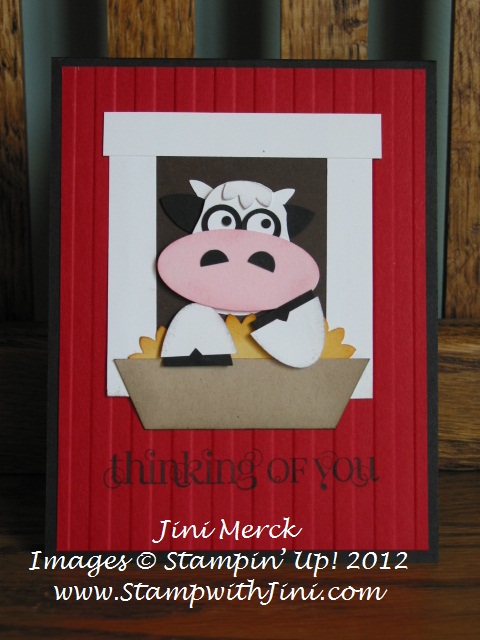
Got Milk? Cow Punch Art

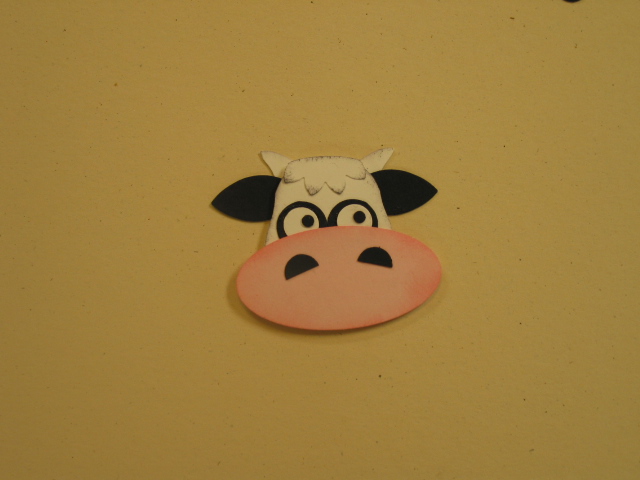
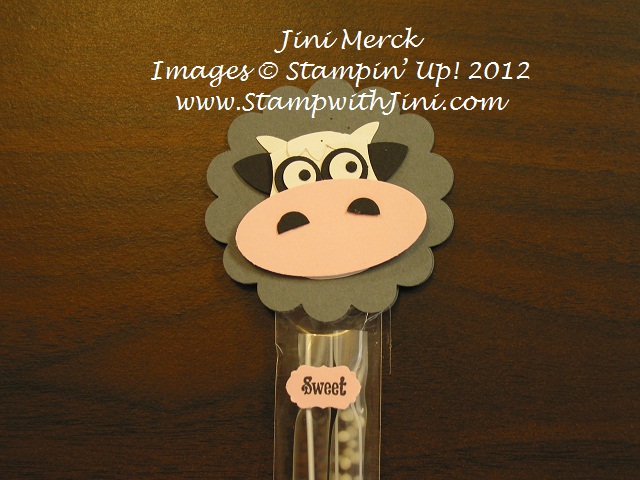
As promised yesterday when I showed you my Got Milk? swap from my friend Cindy, I worked on a tutorial for this cute little guy. If you want to see the whole project you can click HERE to see yesterday’s post.
I had the best time yesterday putting together this Cow Punch Art Tutorial for you that even my daughter enjoyed watching the process. As I was putting my little guys together with my fingers covered in my Multipurpose Liquid Glue, I could envision this little feller in one of those great big red barns from my youth.  (No, you’re not alone; I’m not the neatest at gluing tiny pieces together either. Especially since I forgot my “sticky stick” Tip! More later about my Sticky Stick and how to make your own.)

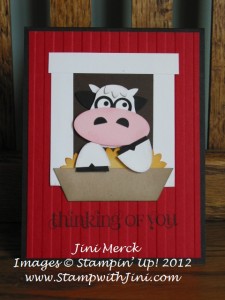
So, I was inspired to create this Cow Punch Art card. My son, Johnathan, when he saw the card said “barns are brown Mom, not red”. I guess he’s right whether it is because we live in Georgia or they just don’t build barns like that any more. The ones I remember from my childhood in Wisconsin were red.

What do you think of my card? I think next time I would make the inside window color Basic Grey not Early Espresso that might make my Cow Punch Art pop a bit more, what do you think? Would you leave me a comment and let me know? I’d love to hear from you – and it would make my day to know that someone out there is looking at my new blog…..
Supplies:

Stamp Set: Curley Cute

Inks: Basic Black, Pretty in Pink, More Mustard, and Basic Grey

Paper: Basic Black, Real Red, Crumb Cake, So Saffron, Pink Pirouette, Early Espresso

Accessories: Big Shot, Stripes Embossing Folder, Paper Snips, Owl Builder, Boho Blossoms, Blossom Petals Builder, and Large Oval Punches, Stampin’ Sponges and Multipurpose Liquid Glue

If you love these little guys too – here is my FREE Cow Punch Art Tutorial on how to make them.

Cow Punch Art Tutorial

Supplies:

Whisper White card stock

Basic Black card stock

Pink Pirouette card stock

Basic Grey card stock

Basic Grey Classic Ink

Pretty in Pink Classic Ink

Stampin’ Sponges or Sponge Daubers

Owl Builder Punch

Boho Blossoms Punch

Blossom Petals Builder Punch

Large Oval Punch

2 3/8″ Scallop Circle Punch

Multipurpose Liquid Glue

Dimensionals

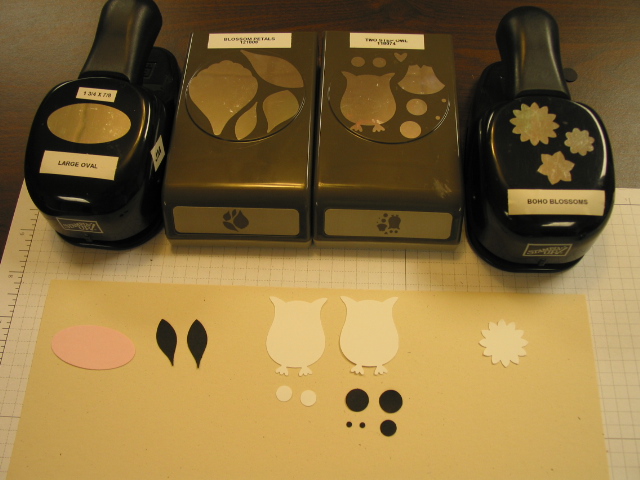
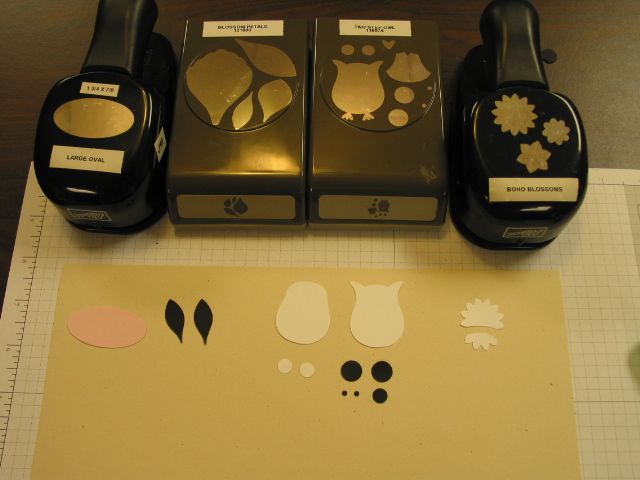
Punch out the following pieces –

Using the Owl Builder Punch and Whisper White card stock, punch 2 bodies and 2 medium circles. Then punch 2 large circles, 1 medium circle, and 2 small circles in Basic Black.

Punch one large flower out of Whisper White card stock using the Boho Blossoms Punch.

Punch 1 Large Oval from the Pink Pirouette card stock.

Finally punch out two of the smallest petals in Basic Black using the Blossom Petals Builder Punch.

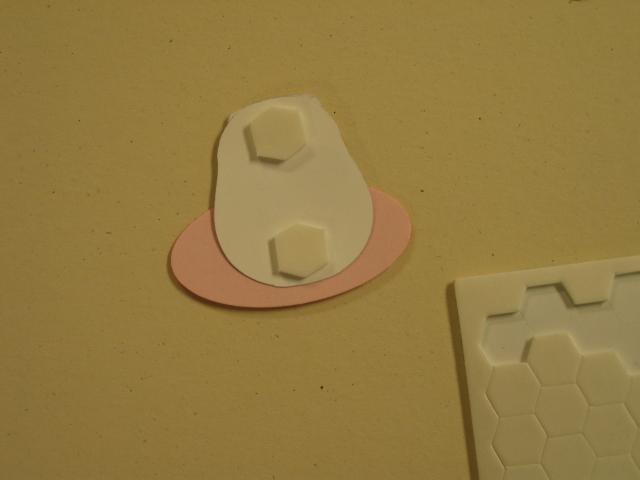
You should now have punched out what looks like this:
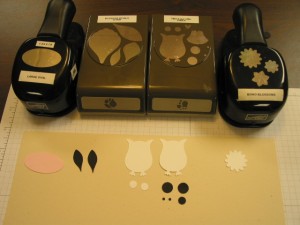
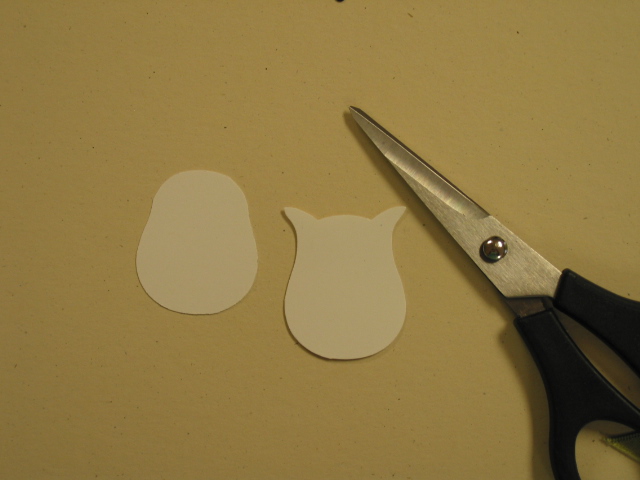
Using the owl pieces trim off the ears from one owl. Then trim off both sets of feet. You can just follow the curve when doing this.
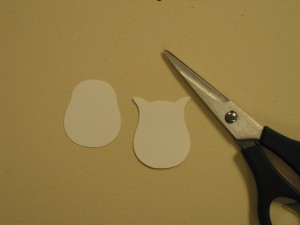
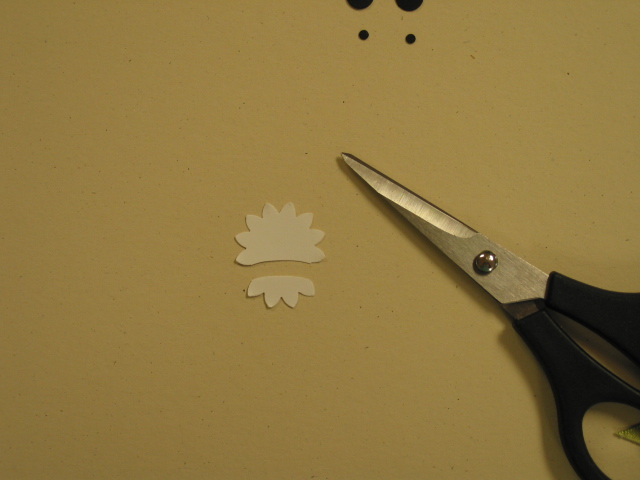
Next take the Boho Blossom and cut off 4 petals. Cut using a slight curve to match the top of the owl’s body.
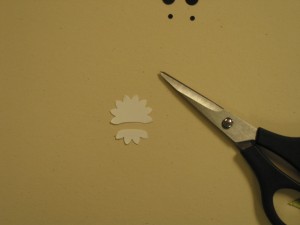
You should now have what looks like this:
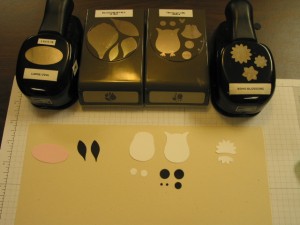
and now you are ready to start assembly on your adorable little feller.

Using the owl body that still has its ears, attach the two Basic Black petals just below the ears on either side. Look mom ears!
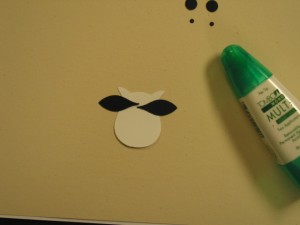
 

Set this aside to dry.

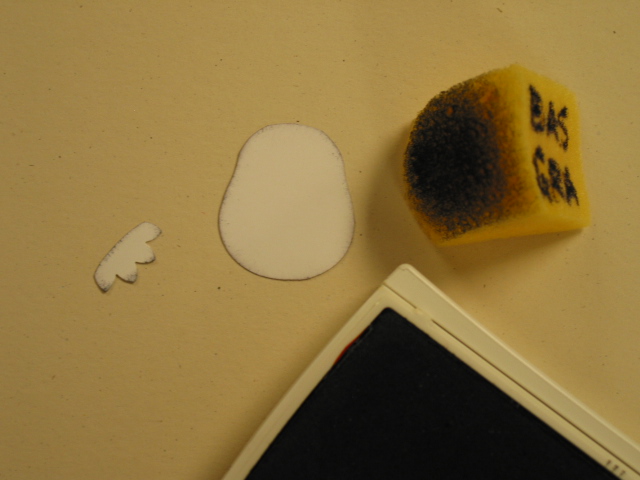
Next, sponge the edge of the cow’s face and Boho Blossom petals using Basic Grey and a Stampin’ Sponge.
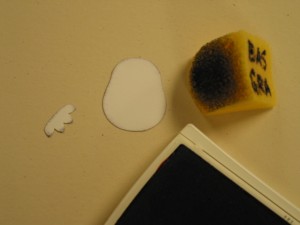
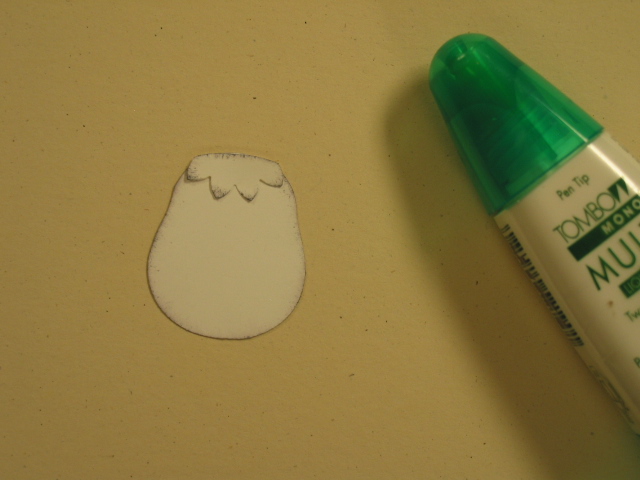
Attach Boho Blossom petals to the top of cow’s head.
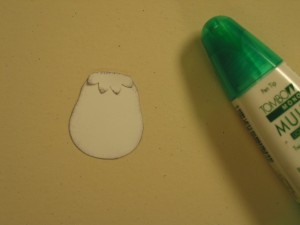
Voila hair!

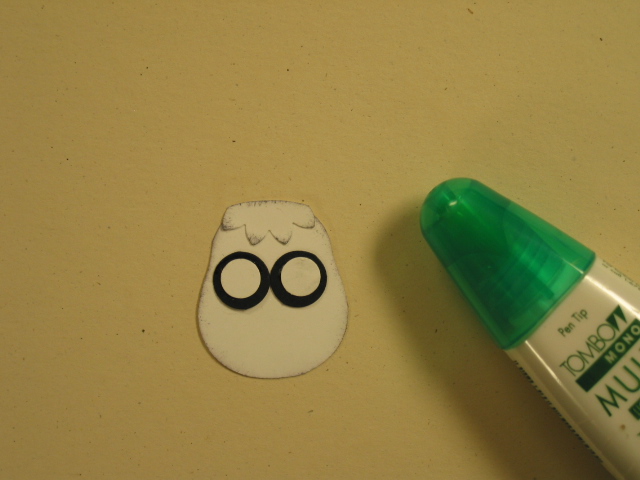
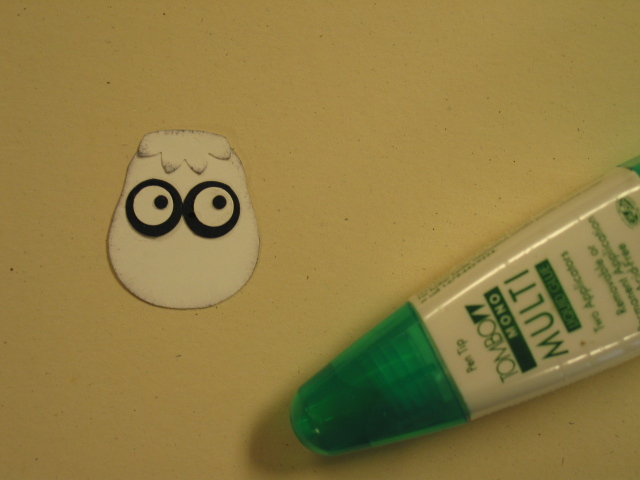
Then attach the large black circles so they touch,
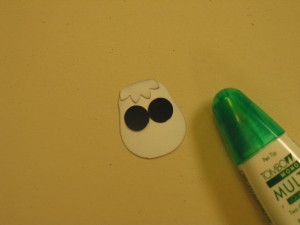
Attach the medium white circles next,
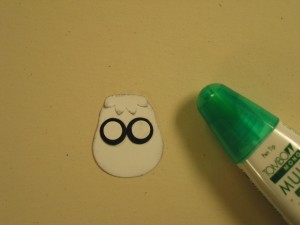
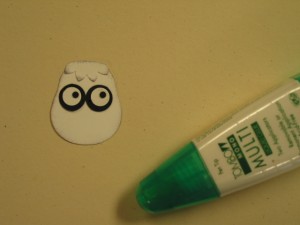
And finally the small Basic Black circles to complete your eyes. Finally the little guy can see!
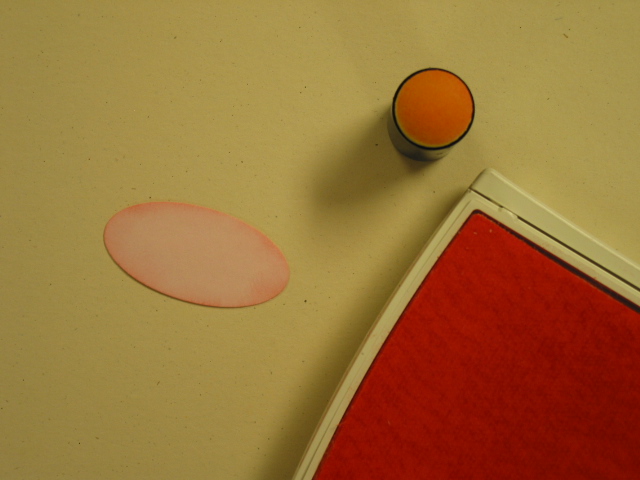
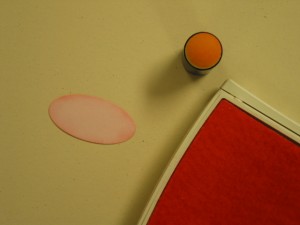
Now for his nose – Sponge the edges of the Pink Pirouette Large Oval piece using Pretty in Pink Ink.
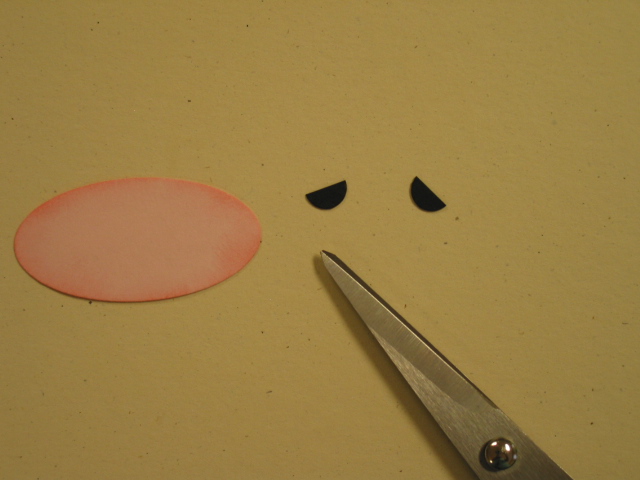
Take the medium Basic Black circle and cut it in half.
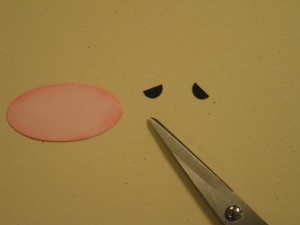
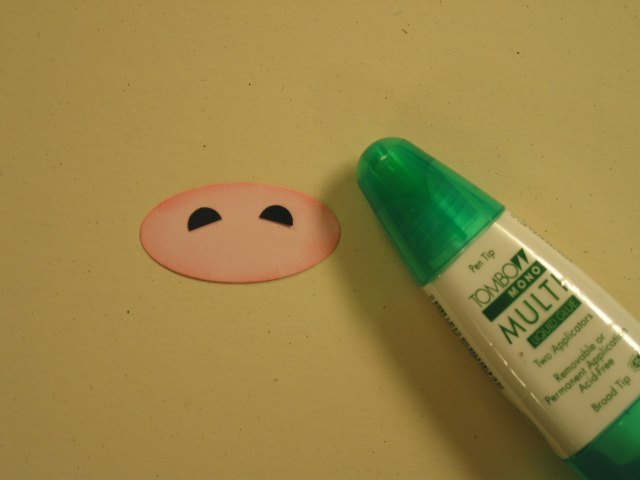
Attach the pieces to the nose.
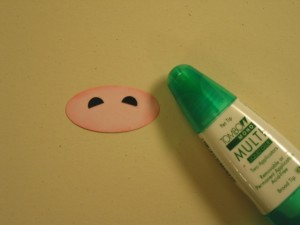
Attach the finished nose to your cow’s face.
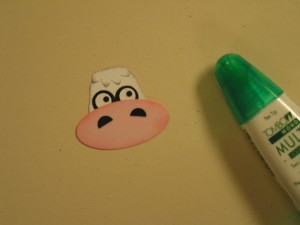
Ahhh, take a deep breath. You’re almost done.

Allow this to dry if needed. Flip the finished piece over and attach 2 Dimensionals to the back.
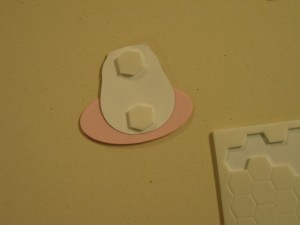
Then attach this to the top of the piece with the ears – and voila’! You have an adorable little guy to use on your next project.
By the way, here’s a little helpful hint to make things a little less sticky along the way.  Make your own “sticky stick”. All you need is a little bit of Multipurpose Liquid Glue, your Silicone Craft Sheet and a tooth pick. Put a little drop of glue on to your Silicone Craft sheet. Roll your tooth pick in it and allow it to dry. Voila’ your very own “sticky stick”.

By the way, in case you didn’t know, our Multipurpose Liquid Glue is a great deal because it is a 2-way glue. When applied wet it adheres with a very strong bond. When allowed to dry first, it acts like a repositioning adhesive. How cool is that?

Did you enjoy this Cow Punch Art Tutorial? Why not join me in my Virtual Club and get exclusive Tutorials every month just for you. Click HERE for more information.

Got to go – it’s almost lunch time. Anyone Got Milk?

Click here to order your Stampin’ Up! Products online 24/7! (US only)
Holiday Keepsakes Ornament Class

Do you love the ornament on the front of the Holiday Catalog as much as I do? Would you like to learn how to make them for yourself? Did you answer YES to either of these questions? If so I’ve got a special Class just for you.

When you sign up and pay for this class not only will you get to learn how to make these wonderful ornaments, but you’ll get to take home the Ornament Keepsakes Stamp set in your choice of either wood or clear, The Holiday Ornaments Framelits and our NEW Silicone Craft Sheet.

But wait, it gets better. Do you love the NEW Snow Flurry Die? It’s a must have in my book. I was drooling over it as soon as I saw it.

When you add the Snow Flurry Die to your class I’ll give you a FREE tutorial for the (small and medium) Ornaments on page 3 of the Holiday Catalog!

Sound interesting? Want to know the details?

First choose which Ornament KeepsakesStamp bundle you want; Wood or Clear Stamps.

  •  Wood Stamp Set Option $73
  •  Clear Stamp Set Option $65
  •  Wood Stamp Set with Snow Flurry Die Option $91
  •  Clear Stamp Set with Snow Flurry Die Option $99
  • Then email me at StampwithJini@gmail, or call me at (706) 754-7124 to pay for your Class before Monday, October 15th at 8 p.m. so that I can have your bundle here and ready for you at class time.
  • Make sure to let me know which Class time works best for you so I can hold your spot.

A New Bundle Offer for this class  is being offered due to the new Bundle Promotion that began October 1st.

Now you really can have it all. Get your Ornament Keepsakes Stamp Set (wood or clear), Holiday Ornament Framelits, our NEW Silicone Craft Sheet, Candlelight Christmas Specialty DSP and a FREE Festive Paper-Piercing Pack in addition to learning how to make these wonderful ornaments during my class!

  • Wood Stamp Set Option & DSP $85
  • Clear Stamp Set Option & DSP $77
  • Wood Stamp Set, DSP & Snow Flurry Die Option $112
  • Clear Stamp Set, DSP & Snow Flurry Die Option $103

There are two days to choose from.

  •  Sunday, November 4th at 2 p.m.
  •  Tuesday, November 6th at 6 p.m.

That’s it – yes it’s that easy, so why not sign up for the Holiday Keepsakes Ornament Class today!

Patio Party Pinwheel

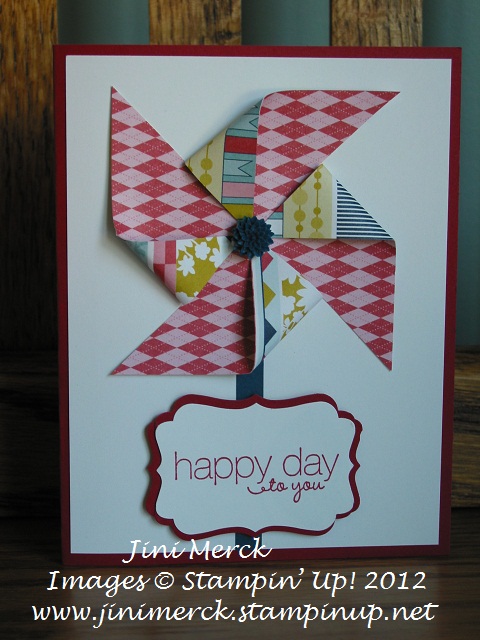
Wow, the last couple of weeks have been crazy around here with band camp. I’m the secretary of the boosters club so there is a lot of startup stuff that happens. But I’m back now and school doesn’t start for a few days.

Pinwheel Today I wanted to share with you this little Pinwheel card I made recently. Isn’t it cute? Pinwheels are all the rage right now it seems. I made this card for my last TEAM meeting. Everyone loved the NEW In Color Dahlias that we used for the centers of our pinwheels. The girls had so much fun making them that I thought I would offer the FREE Pinwheel tutorial to you – just for signing up for my email list! (That’s a $9.95 value for FREE) Interested? Click on my link below to sign up today.

Click HERE to sign up for my email list

and receive your FREE Pinwheel tutorial

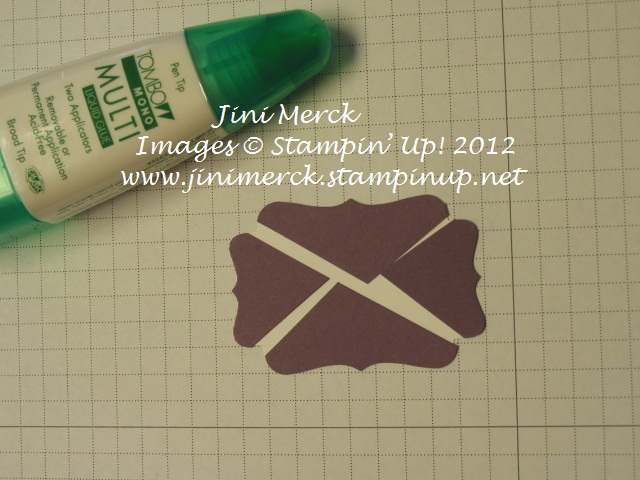
Wonder how I made the sentiment with the Decorative Label Punch? Here is quick shot of the punched piece after I cut it. 

And then adhere it to the back of the already stamped and punched sentiment piece. I like to use our Multipurpose Adhesive to do this since I can move it around after I turn it over and get the pieces right where I want them. 

How quick and easy is that! Do you like to learn new tips and techniques? Why not join my Virtual Club. You can click HERE for more information.

Come back tomorrow, I’ll be posting some of the cards that I received during swaps at convention.

Supplies:

Stamp Set: Friendly Phrases

Inks: Raspberry Ripple

Paper: Patio Party Designer Series Paper, Raspberry Ripple, Midnight Muse and Whisper White

Accessories: In Color Dahlias, Decorative Label Punch

Click here to order your Stampin’ Up! Products online 24/7! (US only)
My Virtual Club is Forming Now

Been stamping awhile or just want to learn new techniques and ideas for your stamping and scrapbook projects? Want to have fun learning new techniques? I’d love to show you how to add a new twist to your stamping!

You can sign up NOW for my new Virtual Club that starts in September that will do just that.

Click here to get more information about my Virtual Club.

Are you asking yourself what is Virtual Club and is this for me?

Do you love Stampin’ Up! products – Our wonderful stamps, family of colors, papers, and accessories?

Do you like to get freebies?

Would you like to get all the Stampin’ Up! Catalogs sent directly to your mailbox three times a year?

Do you like to learn the latest stamping techniques?

Are you new to stamping or just want to learn new things or new twists on your old favorites??

Do you like to be creatively inspired? Or need a creative jump start?

Would you like to order your favorite Stampin’ Up! items a little bit at a time AND get a FREE monthly class?

If you answered any of these questions with a YES my Virtual Club is for you!

Not sure if a Club is for you? Give me a call or drop me an email and I’ll be happy to answer any questions you may have.

Sign up for my Virtual Club by Clicking HERE.

Preregister before August 31st and get a FREE Tutorial (valued at $9.95) when you register.

Click HERE to sign up for my Monthly Newsletter now and receive a FREE Pinwheel Tutorial (that’s a value of $9.95 for FREE!)

Click here to order your Stampin’ Up! Products online 24/7! (US only)
Double Fold Gate Card

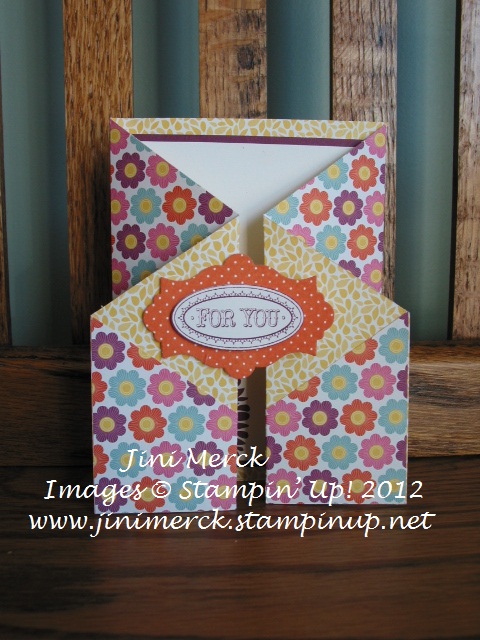
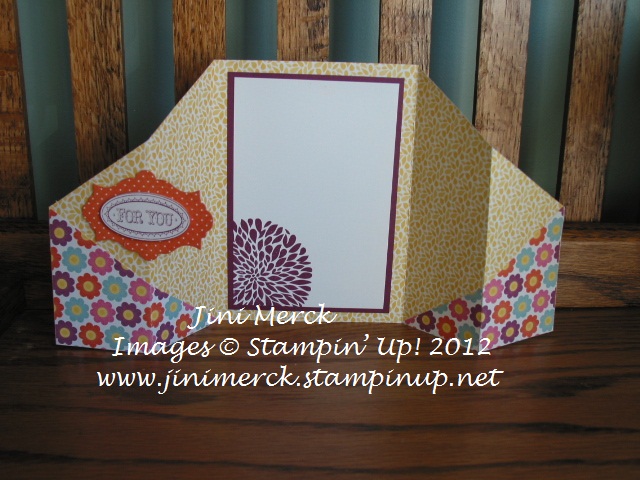
I love to try new things and so recently fell in love with making these cards using the Double Fold Gate technique and the Layered Labels stamp set. It’s a lot of fun to see all the different combinations that you can come up with.

This card in particular that I’m showing you today uses one of my favorite NEW stamps sets from the 2012-2013 Catalog, Layered Labels. First I love it because of the sentiments and secondly because of the fact it has a matching set of Framelits Dies that coordinate with it making it quick and easy to use. After all who doesn’t love their Big Shot? And with all the new goodies in the 2012-2013 Catalog the Big Shot options are endless!

Double Fold Card Tutorial front

I’ve used the Floral District Designer Series Paper for this Double Fold Gate card. The Floral Districts DSP seems to be a DSP that I reach for most often right now– so much so I need to order my 3rd package of it already! I really like the bold, fun colors and patterns it contains.

I think these Double Fold Gate Cards are so much fun to make that I wanted to share with you the Double Fold Gate Card tutorial that I made for it. Grab your favorite pack of Designer Series Paper and see what combinations you can come up with – warning these can become addictive!

Double Fold Gate Card Tutorial

Supplies:

Simply Scored Scoring Tool

Stampin Trimmer

Bone Folder

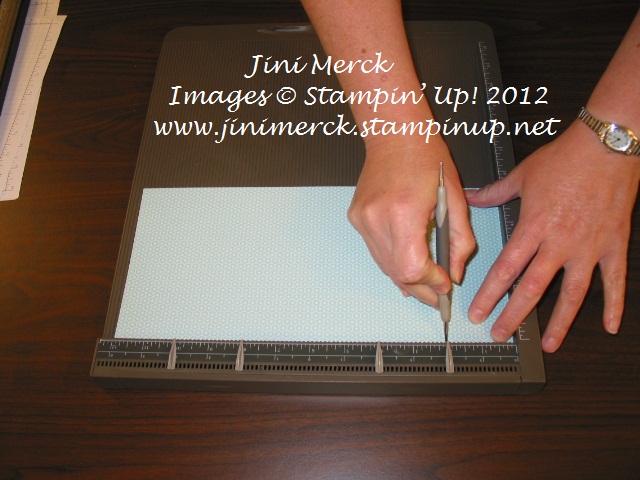
Lay a 12″ x 5 ½” piece of Designer Series Paper on the Simply Scored Board with longest edge at the top. (I used our new Floral District Designer Series Paper.)

Double Fold Card Tutorial step 1

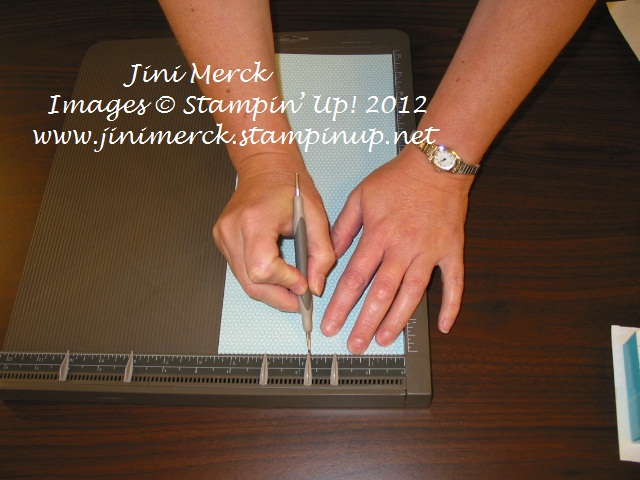
Score at 2″, 4″, 8″ and 10″ marks

Double Fold Card Tutorial step 2

Turn Designer Series Paper and make a small mark each short end at the 2 ¾” mark

Double Fold Card Tutorial step 3Use the bone folder and fold in the two ends on the 4″ and 8″ score lines. (This allows you to see your score lines easier for when you line up your DSP to cut.)

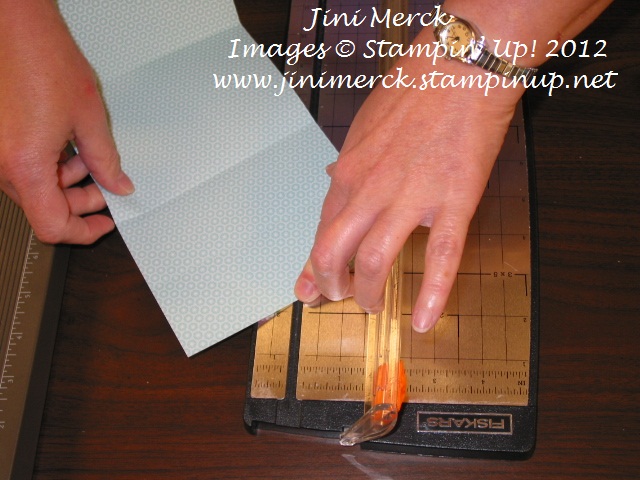
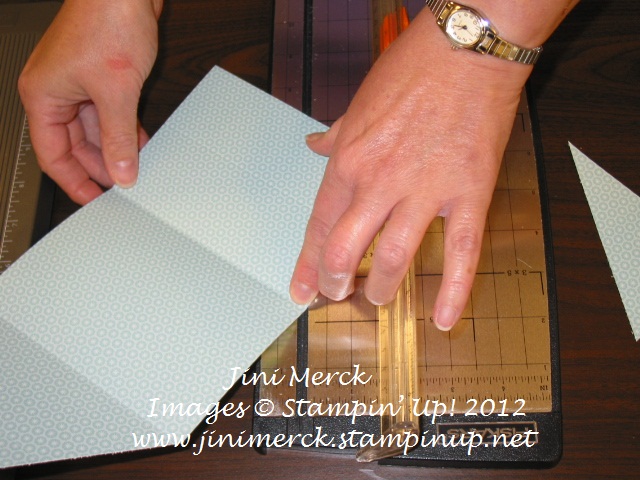
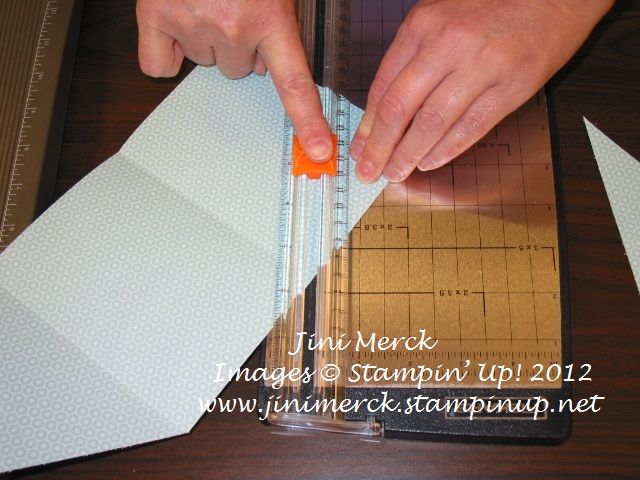
Decide which side is the top of your card and then using the Stampin’ Trimmer to cut a diagonal line on each side. Line up the 2 ¾” mark on the grove where your blade travels. You can hold this in place with your index finger if you would like.

Double Fold Card Tutorial step 4

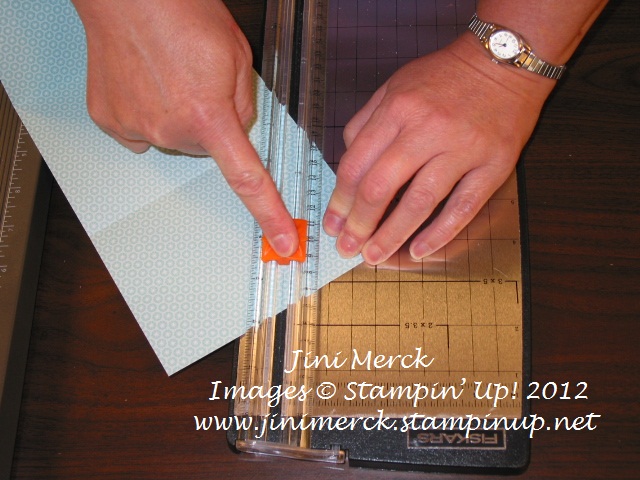
Then “swing” the top edge of your 4″ score line on the DSP until it is lined up on the grove too.

Cut.

Double Fold Card Tutorial step 5

Repeat on the other side Lining up the 8″ score line and your

2 ¾” mark.

Double Fold Card Tutorial step 6

Double Fold Card Tutorial 7

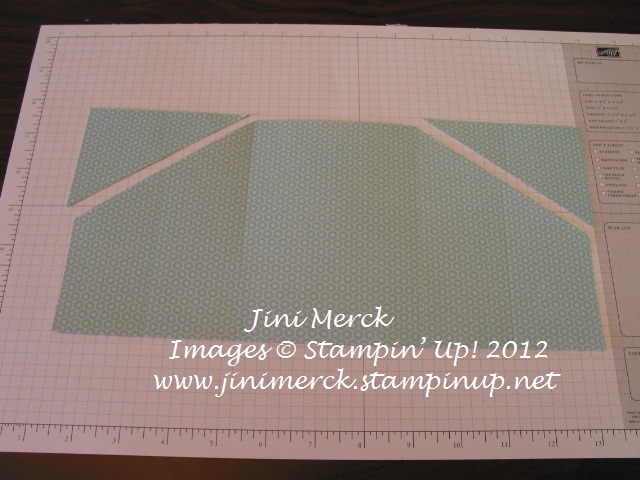
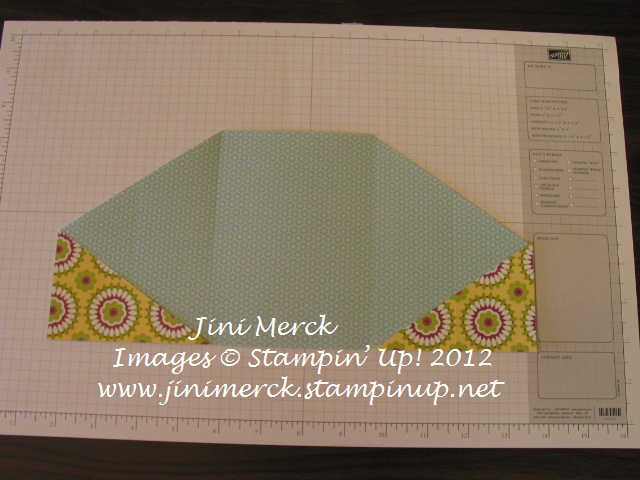
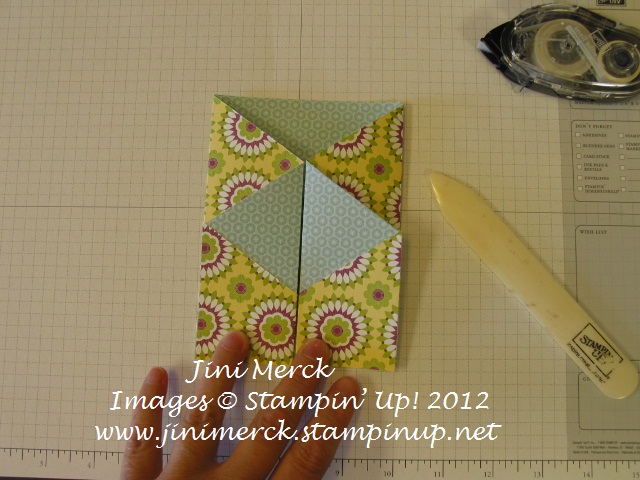
You should have three pieces that look like this.

Double Fold Card Tutorial step 8

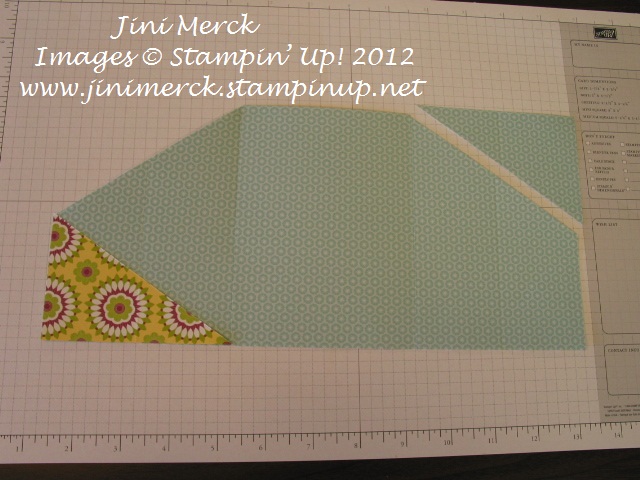
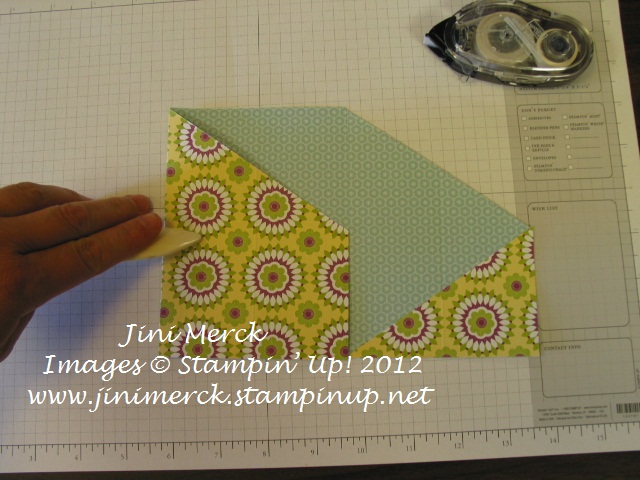
Flip over the piece and adhere to the bottom of card as shown. Repeat on the other side.

Double Fold Card Tutorial step 9

Double Fold Card Tutorial step 10

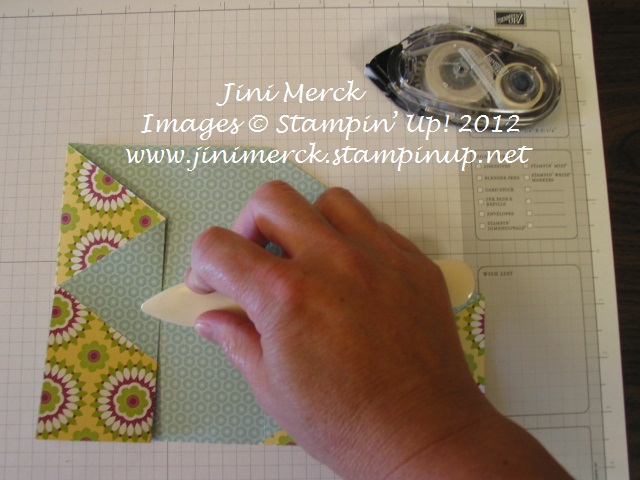
Using the bone folder you can fold the card on the 4″ and 8″ score lines (if you didn’t fold and score before cutting off the corners.)

Double Fold card Tutorial step 11

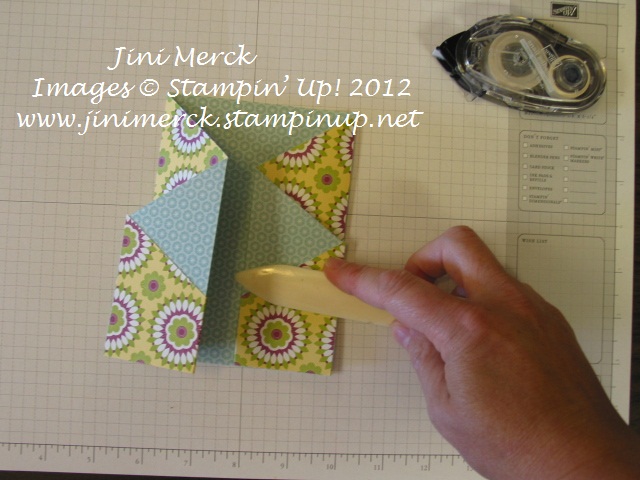
Using Bone Folder, fold on the 2″ score line in the opposite direction to create Z fold.

Double Fold Card Tutorial step 12

Repeat on the other side Using Bone Folder, fold on the 10″ score line folding in the opposite direction to create Z fold.

Double Fold Card Tutorial step 13

Your card should like this.

Double Fold Card Tutorial step 14

Adhere pieces of card stock to the inside and decorate front as desired. I used a piece of 3 ½” x 5″ Rich Razzleberry card stock with a layer of 3 ¼” x 4 ¾” Whisper White card stock. I used the Betsy’s Blossoms stamp set and stamped the flower image in Rich Razzleberry.

Double Fold Card Tutorial step 15

For the outside image I used our NEW Layered Labels stamp set and the coordinating Apothecary Accents Framelits Dies – Adhering the image only on the one side so that the card opens easily.

And here is the finished card.

Double Fold Card Tutorial front

Did you enjoy this tutorial? Do you like to learn new things?  Would you like to get exclusive tutorials for 2 projects that are just for you every month? Why not join my Virtual Stamp Club?

Watch for more information coming soon – meanwhile why not sign up and become part of my Mailing list NOW. Not only will you receive my Monthly Newsletter, which includes special promotions, tips and helpful hints (in addition to information about my events and my Virtual Club that starts in September), but you’ll also receive a FREE tutorial just for you!

Sign up for my monthly newsletter Click HERE

Click here to order your Stampin’ Up! Products online 24/7! (US only)
 

Happy Father’s Day with Comfort Café DSP

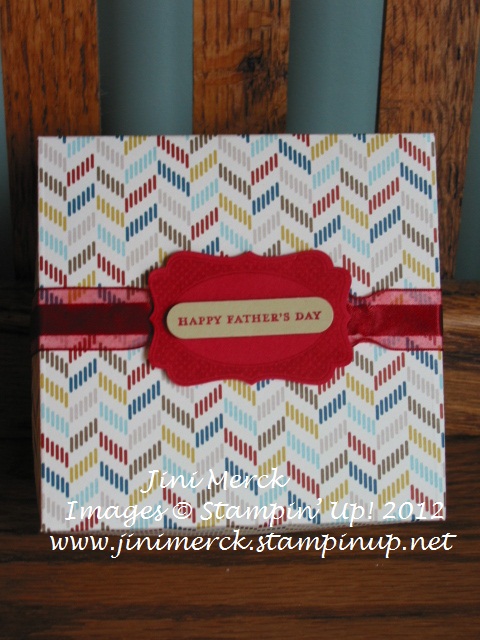
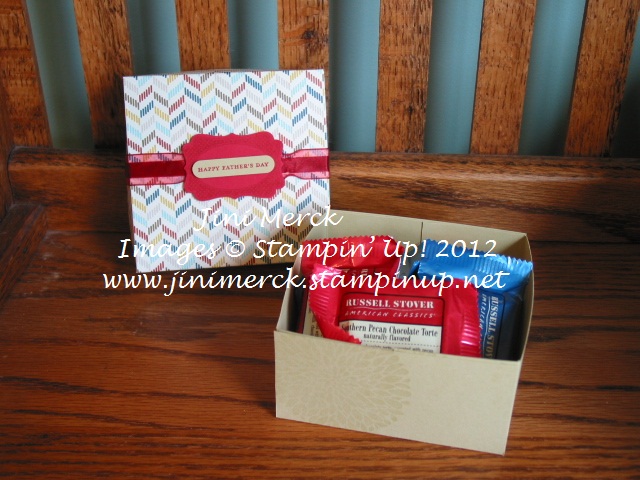
Comfort Café is one of the new Designer Series Paper in the 2012-2013 Catalog. (If you haven’t gotten yours yet – let me know and I’ll be happy to get one to you.) It is such a great package of Paper and with the 6 different designs it’s very versatile. Here Janie designed a masculine box for our TEAM meeting using the Comfort Café Designer Series Paper. Isn’t it great!

I love the way you can dye our ribbon any color you want to! You can learn this and many other techniques during my Club meetings. Interested in finding out more about becoming part of one of my Clubs? I’ll be happy to tell you more about joining one of my Clubs – just email me or call me today.

I’m filling my box with chocolates – a sure hit with my husband!


Supplies:

Stamp Set: Teeny Tiny Wishes, Four Frames, and Betsy’s Blossoms

Inks: Cajun Craze and Versa Mark

Paper: Comfort Café Designer Series Paper, River Rock and Cajun Craze

Accessories: Sponge Dauber, 5/8″ White Organza Ribbon, Simply Scoring Tool, Decorative Label and Word Window Punches


Layered Labels

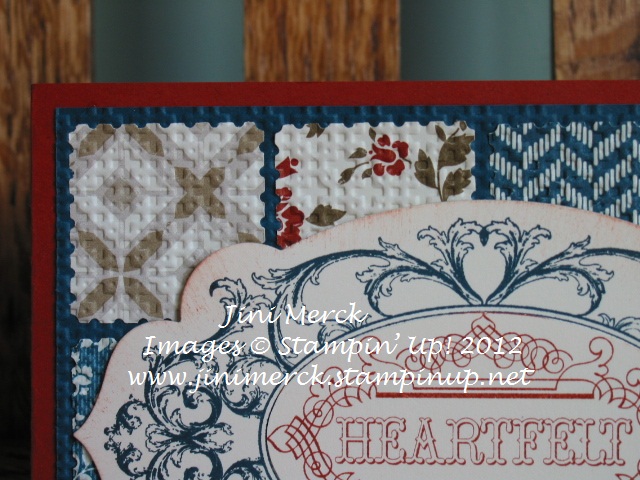
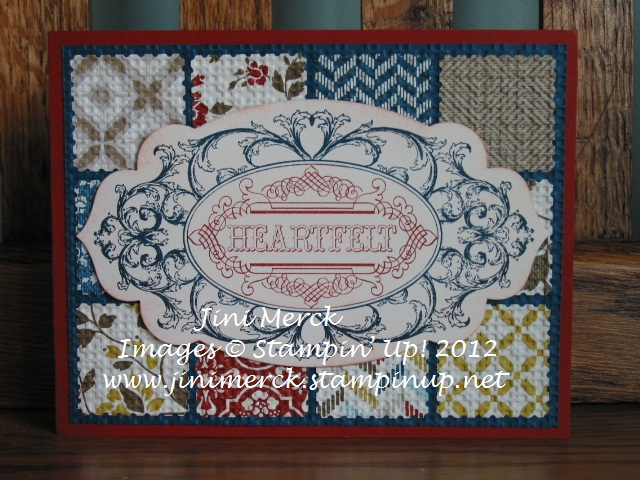
Here is a card that I made recently using the NEW Layered Labels stamp set and the Comfort Café Designer Series Paper from the 2012-2013 Catalog. I’ve used the embedded embossing technique to add texture and make it look “quilted”.

Have you had a chance to see all the new goodies yet in the NEW 2012-2013 Catalog? Some wonderful new products have just been introduced and this card shows you a number of the NEW items. The Layered Labels stamp set coordinates with our NEW Apothecary Accents Framelits. I just love how easy it is to use the Framelits don’t you? You stamp first and just line up the frame over the image the way you want. The combinations are endless. I’m so glad that Stampin’ Up! has introduced several new Framelits and Edgelits in the NEW 2012-2013 Catalog!


Getting together with my stamping friends is soo… much fun and so I’m sorry to say I won’t be able to join them this month. I did however make this swap to share for when they get together today. My husband, Larry is being sweet enough to take them for me while I’m gone so I’ll look forward to seeing what they have made when I return home from my visit with my sister. I’ll try and share some of them when I can.


Supplies:

Stamp Set: Layered Labels

Inks: Cajun Craze and Midnight Muse

Paper: Comfort Café Designer Series Paper, Cajun Craze and Midnight Muse

Accessories: Big Shot, Apothecary Accents Framelits, Square Lattice Folder and Postage Stamp Punch


Click here to order your Stampin’ Up! Products online 24/7! (US only)


Petals-a-Plenty

Today I thought I would share with you the card that I mentioned in my December 2nd blog post HERE that we did for my technique club in November. It uses the Wax Paper Resist Technique and the Petals-a-Plenty Embossing Folder. Which one do you like better?

Petals a Plenty

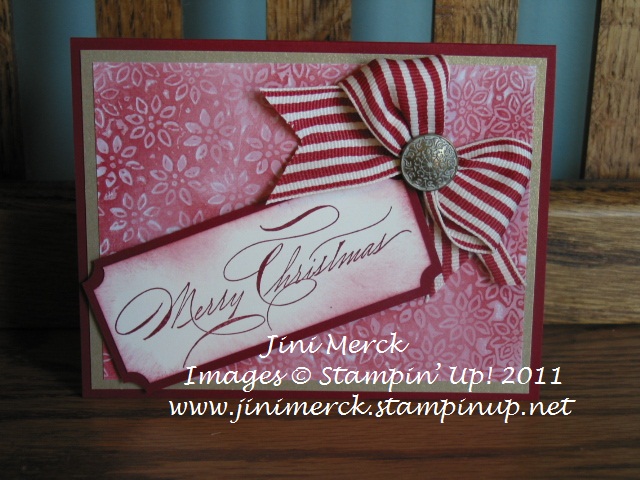
This next card I created using the Hand-Penned Holidays stamp set from the Holiday Mini Catalog and the Petals-a-Plenty Embossing Folder using the same technique. I will miss this set with its elegant script and it is sooo forgiving if you don’t get it lined up perfectly. Remember you only have until January 3rd to order those items you love from the Holiday Mini Catalog and why not check out the Clearance Rack at the same time – there are some wonderful deals going on right now.

Petals a Plenty

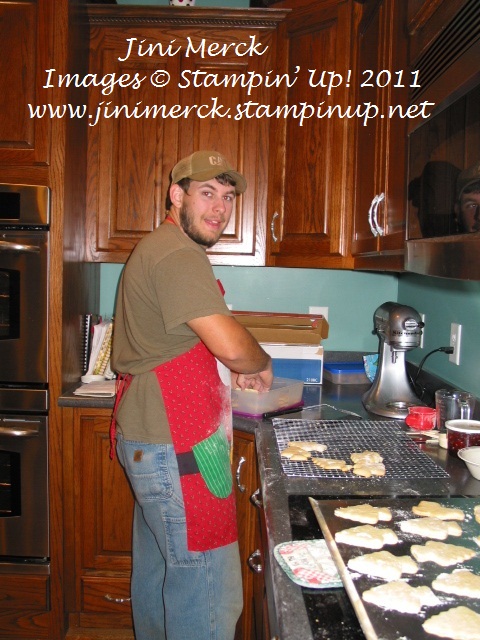
I hope everyone is enjoying this holiday season with family and friends. I love this time of year and now that both my children are out for their school breaks we are working around the house getting ready for Christmas. I finished all of my baking yesterday with the help of my oldest son, Johnathan. He loves to help me bake the Christmas cookies so he can snitch some and is sure he is getting his favorites too! It makes me feel good that he enjoys the holiday traditions we’ve built as a family over the years.

Johnathan


Click here to order your Stampin’ Up! Products online 24/7! (US only)
Season of Joy

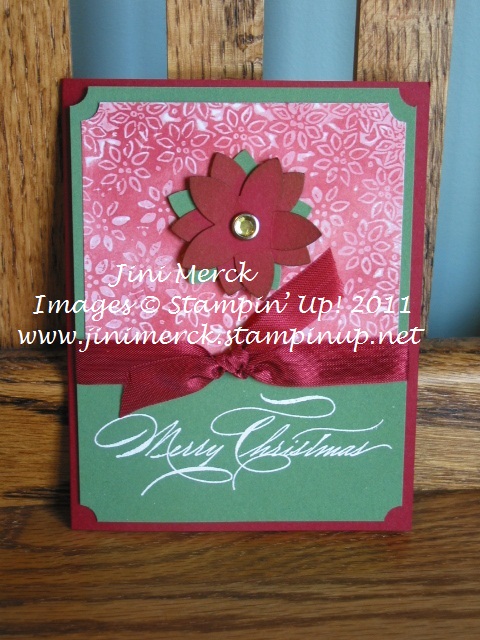
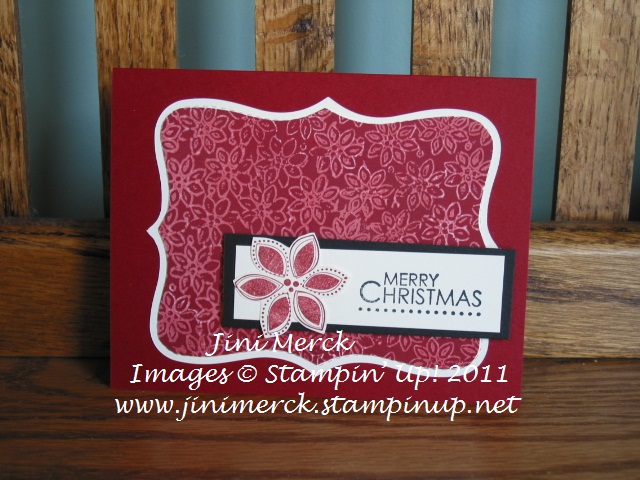
It’s the Season of Joy, that special time of year when we celebrate Christ. Here is a card that I designed using the Wax Paper Resist technique that we did in November’s Stamp Club meeting.

I used the Season of Joy stamp set since it coordinated with our Petals-a-Plenty Embossing Folder for the Big Shot.  After all, you see poinsettias everywhere this time of year. My son grew some in his green house class last year and brought one home that was beautiful. He was full of interesting facts about them that I wasn’t aware of, but then I have a brown thumb.

I love the way this card turned out, my family however liked my other design better. I’ll try and post the one I ended up using later so you can see which one you like better.

Petals-a-Plenty

Supplies:

Stamp Set: Season of Joy

Inks: Cherry Cobbler

Paper: Cherry Cobbler, Very Vanilla, Basic Black and Glossy White

Accessories: Big Shot, Top Note Die, Petals-a-Plenty Embossing Folder and Paper Snips


Click here to order your Stampin’ Up! Products online 24/7! (US only)