Luau Sea Glass Jar Tutorial

Have you ever had one of those days? Well yesterday was one for me that started with a flat tire and ended with finding out my husband took my camera that contained all the items I wanted to share with you this week to work. So although I didn’t share my Luau Sea Glass Jar Tutorial with you yesterday I’m happy to say I recreated it and that I’m able to today.

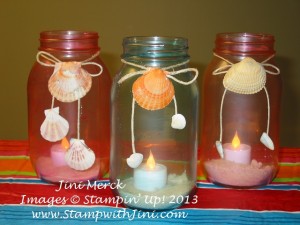
Luau Sea Glass Jar

I made these cute little Luau Sea Glass Jars for my daughters Luau Graduation Party on Saturday. I set them around the food table as decorations filled with sand and flickering tea lights for a touch of ambiance.

They seemed to be a hit with the kids and they are sooo easy to make, you’re going to love it! The choices are endless –I’m already seeing cascading flowers made with our punches too, hmm. I think I need to make some more in a new In Colors that will be available tomorrow– lol.

I’m sure that you’ll find your own fun ways to use them. I’d love to hear about it when you do, so come back and share your creations with me. Leave me a comment when you make your own Luau Sea Glass Jars and tell me all about it and what you’ve used them for!

Supplies:

Inks: Pacific Point Classic Stampin’ Ink Refill (item 111840), Melon Mambo Classic Stampin’ Ink Refill (item 115662)

Other supplies: Elmer’s Glue (I used the washable school glue), foam paint brush, bowl, water, measuring spoons, Hemp (67m), sea shells, hot glue gun and glue sticks

Click here to order your Stampin’ Up! Products online 24/7! (US only)

Mystery Hostess Code

Mystery Hostess Code

Did you know that tomorrow, Friday, May 31st,  is the last day to order from the Spring Catalog and it is also the first day that you’ll be able to order from the NEW 2013-2014 Catalog – are you excited? I know I am. Online ordering will be down  May 31st at 2 a.m. Eastern Time until 2 p.m. Eastern Time as Stampin’ Up! loads and updates the new catalog items in the system– so if you don’t want to worry about all the details you’re welcome to call me or email me your order and I’ll be happy to place it for you as soon as the system comes up.

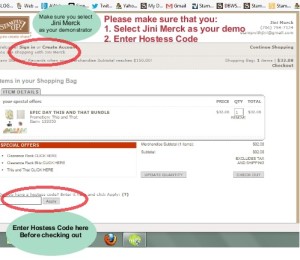
Or if you prefer you can use my Hostess Code 7DPXDX7R  and place your own order after 2 p.m. on Friday, May 31st. When you do your name will be entered into my Mystery Hostess Drawing. This Hostess Code will be good through Friday, June 7th. The number of hostess will depend on the total sales and I’ll be drawing a hostess for every $150 in sales.

OL Hostess Code screen image

*Please remember that if you are ordering $150 or more yourself that you will earn your own Hostess Benefits and do not want to use this hostess code.

**fine print orders placed during the Mystery Hostess Drawing using this code do not qualify for my 50/50 Board.

Click here to order your Stampin’ Up! Products online 24/7! (US only)
NEW CLASS BEING OFFERED

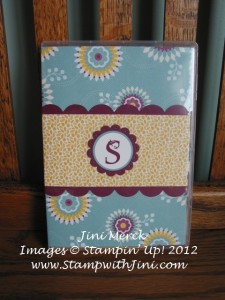
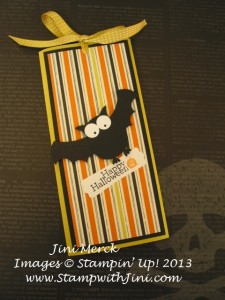
Personalized Notepad Holder Class

Have fun learning how to make these Personalized Notepad Holders. You’ll create two of these during the class and have supplies to make more to take home!

Personalized Notepad HolderThursday, May 16th at 10 a.m. or 7 p.m.

Class Fee is $30; Prepay by April 23rd to hold your spot

Bring a friend not already on my mailing list and get a free gift!

Click HERE for flyer

Click HERE for my Calendar of Events and more details

 Don’t want to mail a check? Click on the button to pay for your class fee and select your choice of day and time.

Choose a Class Time


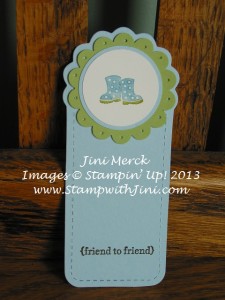
Spring Sampler Bookmarks

I love to make things to give and this week I want to try making some quick bookmarks for spring. The Spring Sampler stamp set (item 125510/125512) from the Spring Catalog is one of my favorites and since it has such a great variety of images I started there. And of course my Big Shot dies make things quick when I want to do a large number of items so I pulled out my trusty Two Tags Die – love it right!?!

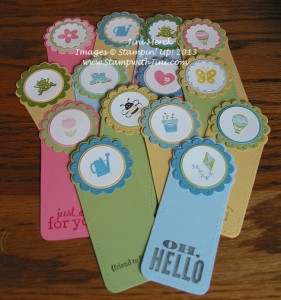
Here is what I came up with – I think my Spring Sampler Bookmarks will be a hit when I hand them out.

IMG_3620Once I got started I was having so much fun with the images from the Spring Sampler set I didn’t want to stop – lol IMG_3615

I used a variety of sentiments for the Spring Sampler Bookmarks too as you can see in my group photo.

Supplies:

Stamp Set: Spring Sampler

Inks: Early Espresso

Paper: Subtles Collection and Whisper White card stock

Accessories: 1 1/4″ and 1 3/4″ Scallop Circle, 1 1/4″ and 1 3/8″ Circle Punches, Stampin’ Write Markers

Click here to order your Stampin’ Up! Products online 24/7! (US only)
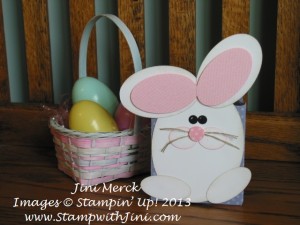
Framelits Bunny Fancy Favor

I thought I would share one last bunny project since Easter is tomorrow. This project is super quick and easy because the base of it is the Fancy Favor Die – Great for holding all kinds of chocolate treats that my family loves. Shhhh…don’t tell them, but they’ll be finding theirs tomorrow at their spot when we sit down for our Easter dinner.

Framelits Bunny Fancy Favor

My little bunny’s body was created using our Oval Collection Framelits Die. I used several of our punches to finish the little guy; you’ll find them listed below on the supply list.

Add a little sponging on the edges, some Multipurpose Adhesive and voila’ – The cutest little bunny around.

I hope that you’ll all have a wonderful Easter with your family. I’m really looking forward to spending the day with mine, my husband will even be home – yippee, so it will be wonderful to spend the day together celebrating Easter.

FabricFrenzy_March25-31_NA

Just a reminder- Sunday, March 31st is the last day to order your Designer Fabric at 50% Off. You can place your order online before the end of the day Sunday.

sale-a-bration join banner

Also, Sunday ends our Special Promotion for Joining my Team. You’ll get your kit for just $99 when you join before the end of the day Sunday, but you’ll get $156.50 in merchandise of your choice! It’s a great deal. You can click HERE to learn more about my team.

Supplies:

Inks: Sahara Sand

Paper: Subtles Designer Series Paper Stack (item 117152), Whisper White and Basic Black card stock

Accessories: Linen Thread, Fancy Favor Die (item 115965), Ovals Collection Framelits Dies (item 129381), 1/2″ Circle Punch (item 119869), Itty Bitty Shapes Punch Pack (item 118309), Small (item 120908) and Large Oval (item119855) Punches, Stampin’ Sponges (item101610) and Signo White Gel Pen (item105021)

Click here to order your Stampin’ Up! Products online 24/7! (US only)

Fun & Flirty Paper Doily Skirts

Have you seen the NEW Pop ‘n Cuts die in the Spring Catalog? Well if you loved to play dress up when you were little or if you played with paper dolls you’re going to love this group of coordinating products!

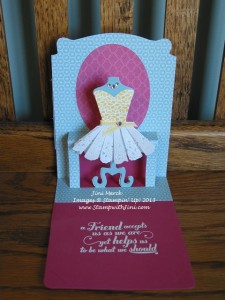
Here is a card I made for my Team Meeting using the Pop ‘n Cuts Die (item 130099) and Dress Form (item 130100). I used our Full Heart Punch for the bodice and would you believe I used one of our Paper Doilies (item 129399) to create the skirt? Well I did!

Fun & Flirty Doily Skirt (1)

I had such a great time creating this project that I thought I would share how I created this skirt with you too. After a lot of trial an error here is what I finally came up with.

So here is my latest video – The Fun & Flirty Doily Skirt Tutorial

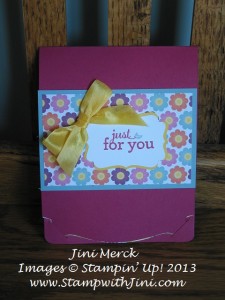
And if you were wondering how I decorated the outside – here is a photo of the outside of the card. Don’t you love the way that the NEW Pop ‘n Cuts die is designed so that it “seals” itself?

Fun & Flirty Doily Skirt (2)

Would you like to learn about my videos as I post them? Why not sign up for my YouTube Channel? You can click HERE

Supplies:

Stamp Set: Feel Goods (item 129681/129684)

Inks: Versa Mark

Paper: Floral District Designer Series Paper (item 126919), Daffodil Delight, Rose Red and Baja Breeze, Whisper White Card Stock

Accessories: Full Heart Punch (119883), Stampin’ Write Markers, Decorative Label Punch (item 120907), Pop Up Posies Designer Kit (item 131395), Rhinestone Basic Jewels (item 119246), Paper Doilies (item 129399), Daffodil Delight Seam Binding (item 125583) and 1/8″ Taffeta Ribbon (item 119254), Big Shot, Card Base Pop ‘n Cuts (item 130099), Dress Form Pop ‘n Cuts (item 130100) and Dress Up Framelits Die (item 130101)

Click here to order your Stampin’ Up! Products online 24/7! (US only)

Spring Sampler Treat Box Tutorial

I made this cute little treat box using the Spring Sampler Stamp Set (item 125510/125512). I knew when I saw this set in the Spring Catalog I just had to have it – it’s so me. I could picture making quick and easy treats for all kinds of occasions.

Spring Sampler Treat boxI think the images in the Spring Sampler Stamp Set are just too cute! How about you?

Here is the Treat Box we made as a project during my March Blue Mountain Stampers meeting. We had a lot of fun thinking of different things (mostly chocolate) that we could put in the box. This time  we filled them with these yummy eggs (They come in all kinds of flavors and remind me of those I got as a child.) Shhh… don’t tell my family. They’ll be finding theirs in their rooms Easter morning. I think my hubby will love the cookie dough egg I picked out for him!

Spring Sampler Box with Chocolate

We had so much fun making these quick and easy Treat boxes I thought you’d enjoy making them too for your friends and family. So why not check out my new video below – Spring Sampler Treat Box.


You can Click HERE to print or download your copy of my

FREE Spring Sampler Treat Box Tutorial PDF

Want to see my Valentine Treat Boxes? Click HERE to see my earlier post. You can also click HERE to see the treats I made using the Spring Sampler set recently using the Petite Pocket Die.

Leave me a comment and let me know if you are enjoying my videos and tutorials. Would you like to see them more than every other week? Maybe once a week would be better? I’d love to hear what you think.

Click here to order your Stampin’ Up! Products online 24/7! (US only)
Spring Sampler Easter Treat

Easter is right around the corner and will be here before we know it. So I’ve been creating some little treats for family and friends filled with these cute little chocolate covered bunnies I found at the local Dollar Store. I just love using the Spring Sampler Stamp Set (item 125510/125512) from the Spring Catalog. I knew it was a must have set for me since it makes a quick and easy focal point for any project. And since the Spring Sampler Stamp Set has 24 images you can use it for all kinds of occasions!

Spring Sampler Easter Treat

I gave this little treat out for my swap at my monthly Blue Mountain Stampers meeting last night. They were so quick and simple to make since I used our Petite Pocket Die (item 123131). Do you recognize the Designer Series Paper? Well it’s Parkers Patterns (item 131021) from the Spring Catalog, and it’s not just for guy cards. These fun bold geometric patterns are great for a variety of projects like this Easter project!

Supplies:

Stamp Set: Spring Sampler, Teeny Tiny Wishes

Inks: Basic Black

Paper: Parkers Patterns Designer Series Paper, Tempting Turquoise, Regal Rose and Whisper White

Accessories: Big Shot, Petite Pocket Die, 1 ¼” and 1 ¾” Scallop Circle Punches, 1 3/8″ Circle Punch, and Paper Piercing Tool and Mat

Click here to order your Stampin’ Up! Products online 24/7! (US only)
Spring Sampler

I made these quick and easy mints a couple of days ago for Easter using the Spring Sampler Stamp Set (item 125510/125512) from the Spring Catalog.

I love sets like this because they are so versatile to use, and this set is a great addition for anyone since it covers all kinds of occasions not just Easter!

Spring Sampler Mints (1)

As you can see I was having so much fun using the different images in the  Spring Sampler Stamp Set I made quite a few!

Supplies:

Stamp Set: Spring Sampler (item 125510/125512)

Accessories: 1 ¼” and 13/4″ Scallop Circle Punches and 1 3/8″ Circle Punch

Click here to order your Stampin’ Up! Products online 24/7! (US only)

Fancy Favor for Hostess Appreciation

Yesterday I told you would share the little gifts I made for my Hostess Appreciation Brunch – I like the way they turned out and seemed to be a hit with everyone. What can I say chocolate is always a hit!Hostess Appreciation Fancy Favor Box

It’s a cute little Fancy Favor Box I made using our FREE Sycamore Street Designer Series Paper filled with chocolate and coordinating card stock basket shreds.  Of course, when you use the Big Shot and our Fancy Favor Die (item 115965) it’s quick and easy to make a batch of these up for any occasion.

Did you know you can make your own basket shreds to coordinate with your projects? It’s easy all you need is some card stock and your paper shredder! It’s a tip I picked up during Leadership Conference – What a great way to use those smaller pieces of card stock you have sitting around.

Supplies:

Stamp Set: Friendly Phrases (item 126149/126151)

Paper: Sycamore Street Designer Series Paper, Tangerine Tango, Island Indigo, Baja Breeze, and Whisper White

Accessories: Big Shot, Fancy Favor Die (item 115965), 7/8″ and 1 ¼” Scallop Circle (item 129404/127811) Punches, Bitty Buttons (item 118761), Whisper White Baker’s Twine, Tangerine Tango, and Island Indigo Stampin’ Write Markers

Click here to order your Stampin’ Up! Products online 24/7! (US only)
Hearts a Flutter Valentine Treat Boxes

Earlier today I mentioned I would share with you the Valentine Treat Boxes I made for all my Valentines today. I love these cute little boxes they are so quick and easy to make and they can be filled with an assortment of things. Today of course they are filled with chocolate!

Valentine Treat Box group

I found these Russell Stover chocolates at my local drugstore and thought they sounded yummy – as luck would have it they were just the right size too for my Valentine Treat Boxes!

I think it is safe now to share these with you since I don’t think my kids will be looking at my blog today and I’ve already given my husband his. Here are some close up shots of each of the boxes.

I’ve used the Hearts a Flutter stamp (item 129249/129252) from the Spring Catalog set to create the focal point on each of these little boxes. The Hearts a Flutter is such a fun stamp set to use I find myself reaching for it for all kinds of projects. This first box is my husbands and he got his as he headed out the door for work. (Somehow I don’t think the treat will make it all the way to Lawrenceville.)

This second box is for my son, Johnathan. Although I made this box using more masculine colors I couldn’t resist putting a little “bling” on it. So I used my sharpie to color one of our Basic Rhinestone Jewels (item 119247).

Valentine Treat Box for Johnathan

And this final box is for my daughter, Kaitlin – so I made it using softer colors.  I just love the Primrose Petals 3/8″ Stitched Satin Ribbon (item 126844), it’s so great to work I find myself reaching for it quite often.

Valentine Treat Box for Kaitlin

I really can’t decide which box is my favorite. Which one do you like the best? Why not leave me a comment below and let me know.

Would you like to see more Valentine’s Day projects? I’ve posted more projects on my face book page Stamp with Jini?

Click here to order your Stampin’ Up! Products online 24/7! (US only)