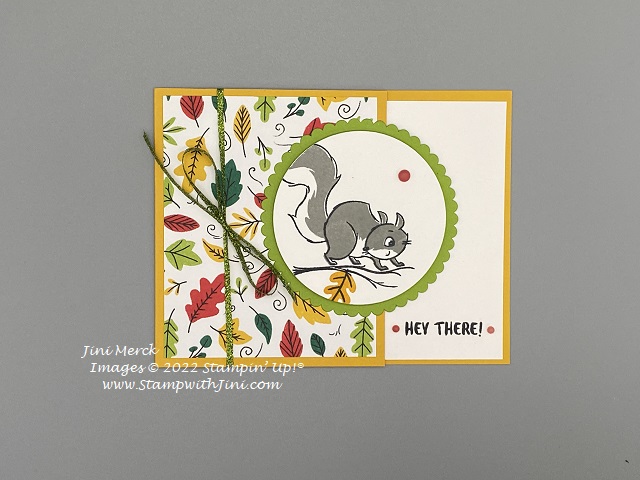
Need a quick and easy fun fold card to say hi to someone this fall? How about this one using the Nuts About Squirrels stamp set (156475) from the Annual Catalog?
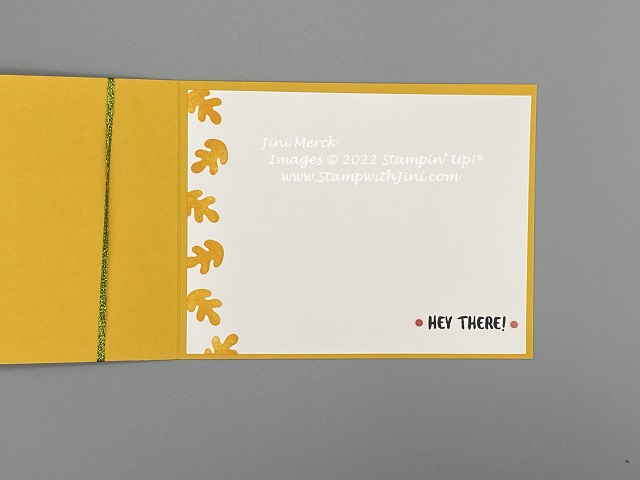
This card highlights the adorable little squirrel and fun pack of Celebrate Everything (Host 159913) that you can earn for free with a qualifying order or party. This pack of paper works for all kinds of projects, but today I’ll be highlighting the lovely falling leaves pattern in my video tutorial. And don’t forget the inside and envelope too!
A little bit of stamping goes along way to bring your project all together and make it special.
So what do you think of my fun card using the Nuts About Squirrels stamp set? Why not leave me a comment and let me know. Then stop back by tomorrow for my last tutorial of the week.
Shop at my Online Store and use Host Code3QFXNM3Eand receive a FREE Gift
Click Here to learn more about using the Hostess Code If you order Online make sure your profile information is up to date and you’ve allowed me to send you your free gift.
Sign up HERE for my FREE Newsletter and Class Schedule or Get my Blog Posts delivered right to your inbox HERE and receive my FREE Cup of Tea Note Card Class
Love quick and easy treats? If so our Ombre Gift Bags might be just the think you are looking for since they make creating a treat quick and easy. I was inspired to create my own little gift bag by a swap that I received (you can see it HERE).
Make them up ahead and simply slide your goodie inside when you’re ready.
Bags are 4 3/4″ x 7″ so they’ll hold quite a bit too. This batch I whipped up for a little Team gift for our Meeting, I filled them with a sweet little treat for my along with a little something I picked up on the Maui Incentive Trip in May.
They were a hit for sure.
Want to see how I made them? I’ve got a quick little video tutorial and PDF for you.
Timeless Tropical Ombre Gift Bag Video Tutorial
And here is the PDF for you – you can print this off. It includes the video link too so you can easily find it again when you want to.
Shop at my Online Store and use Host Code 62NDFPPQ
Click Here to learn more about using the Hostess Code If you order Online make sure your profile information is up to date and you’ve allowed me to send you your free gift.
If your Online order is $150 or more make sure not to use the host code so that you can take advantage of the Host Benefits yourself – No worries, I’ll still send you your free gift. It’s my way of saying thank you for choosing me as your demonstrator!
LAST DAY TO RSVP & HOLD YOUR SPOT IN MY JULY CARD CLASS
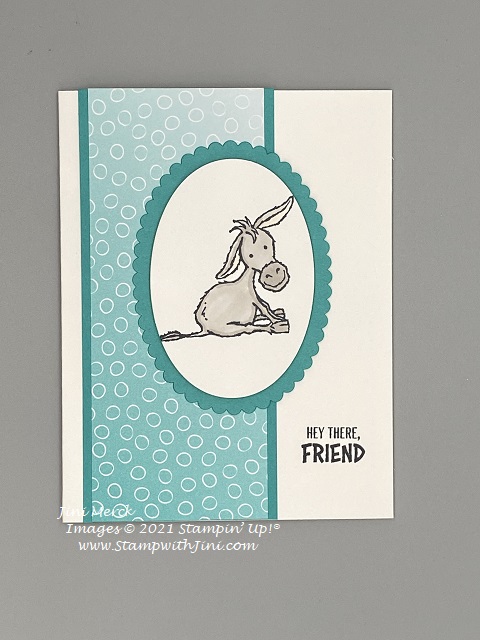
Today I’m sharing another card made with the Darling Donkeys stamp set from the Sale-a-bration Brochure. I’ve just fallen in love with these little guys and their sweet faces. They are so quick and easy to color with our Stampin’ Blends – and I find coloring with our Stampin’ Blends quite relaxing too.
This time I’ve team the image up with our bright and cheerful Bermuda Bay pattern from the Oh So Ombre 6×6 Designer Series Paper that you can also find in the Sale-a-bration offerings.
This card is quick and easy to stamp and when the image is teamed up with this bold sentiment it is perfect to send to a friend to brighten their day. Want to see how quick and easy this was to stamp? Why not check out my video tutorial?
Whew! The week is flying by and tonight starts the Stampin’ Up! OnStage@Home event. I’m excited about this opportunity to gather with my fellow demonstrators from around the world. It’s sure to be a jam packed 3 days as always and while it is not a live event in Salt Lake as planned originally I’m just happy that I’m able to participate this way from home. Stampin’ Up! never disappoints at these events.
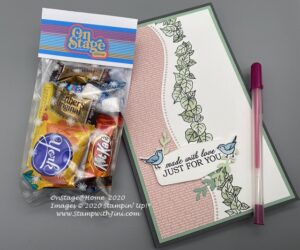
I didn’t want to spoil the surprise earlier this week, but by now everyone should have received their little goodies in the mail. So….. today I thought I’d share with you a fun project that I made as a gift for my team members that will be joining me for the OnStage@Home event. I just love the Quite Curvy Bundle so I started there.
I just couldn’t resist these sweet little birds and the fact that the sentiments curve along the die cut edges! So want to see what I made?
Here you go this soft and sweet note pad holders
I’m really pleased with the way they turned out and I had some sticky notes and flags that I thought went perfectly with this project too!
So what do you think? Want to learn how to make your own? While you may not have the same little flags and sticky notes I’m sure you can find some similar sized for your projects. Or how about a sticky note and mini calendar? The options are endless and I find that one of the fun things about creating a gift like this.
I’ve put together a video tutorial for you. It’s a bit longer than my normal videos, but it shows you the how to from start to finish. And as always I’ve given you a printable PDF with a complete supply list and step by step instructions.
Quite Curvy Note Pad Holder Video Tutorial
I’ve also got this great tip for cutting out your stamped images with our dies. Do you ever miss cut? I really hate that and this quick little tip REALLY helps!
How to Cut Die Cut Images Consistently Video Tutorial
So what do you think? Helpful? Why not give it a try and then leave a comment to let me know if you like doing it this way. Either way I hope this little tip helps you with your crafting too!
And now without further delay here is that printable PDF I told you about with the complete supply list.
To go along with the note book I created a little treat bag to celebrate the event using our fun 3×9 Gusseted Cellophane Bags (151312) filled with a variety of items.
After all who doesn’t appreciate a little treat bag too?
Enjoy!
Stop back by tomorrow when I’ll be sharing some more OnStage@Home fun with you!
Shop at my Online Store and use Host Code WUJKQ9XP
Click Here to learn more about using the Hostess Code If you order Online make sure your profile information is up to date and you’ve allowed me to send you your free gift, a FREE Class using the Poinsettia Place Suite of Products found in the Mini Catalog.
If your Online order is $150 or more make sure not to use the host code so that you can take advantage of the Host Benefits yourself – No worries, I’ll still send you your free gift. It’s my way of saying thank you for choosing me as your demonstrator!
Need a get well card that is bright and cheerful? How about this one using the new 2020-2020 In Color, Magenta Madness – it’s a color that makes you smile when you see it! I teamed this color up with our So Sentimental Bundle (151691) to create a quick and easy card for you today.
Why not take a peek at my video tutorial and see what you think?
Magenta Madness Get Well Card Video Tutorial
.
And of course, another PDF with measurements and a complete supply list for your crafting pleasure.
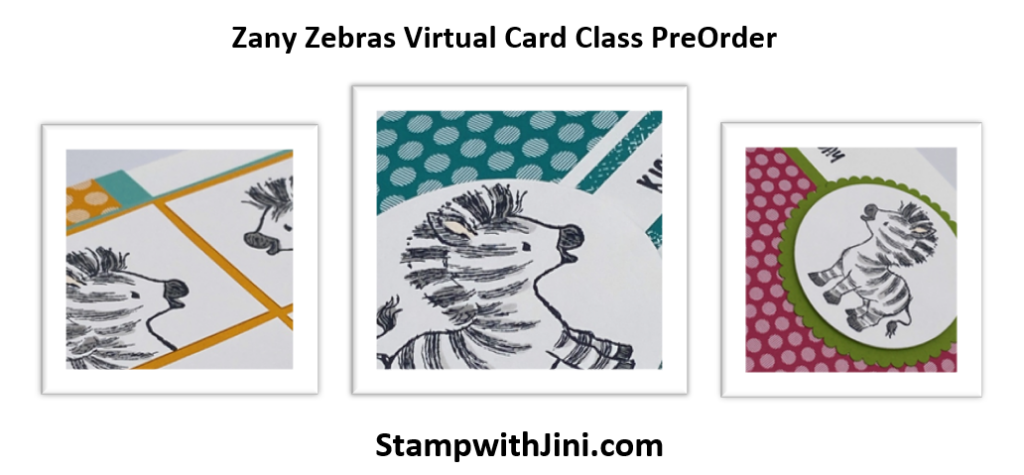
If you enjoy my video tutorials and PDFs, did you know you can choose one of my Online Card Classes or Specialty Zoom Classes this summer? Yep, you can find the stamp sets that I’ll be focusing on in my Calendar of Events along with details too. Zany Zebras is my first class that is available, but you’ll want to hurry since RSVP ends on June 19th. Click HERE to see more details that I shared earlier this week.
And if you’d like to get my Monthly Newsletter and Class emails you can Sign up HERE for it or get my Blog Posts delivered right to your inbox HERE
Shop at my Online Store and use Host Code FFQ3W3ZV
Click Here to learn more about using the Hostess Code If you order Online make sure your profile information is up to date and you’ve allowed me to send you your free gift.
If your Online order is $150 or more make sure not to use the host code so that you can take advantage of the Host Benefits yourself – No worries, I’ll still send you your free gift. It’s my way of saying thank you for choosing me as your demonstrator!
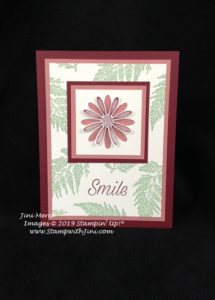
I love sending out birthday cards to my family and friends and so today I thought I’d share with you the one I did for the gals for August.
Created with our rich Merry Merlot and Rococo Rose it’s a quick and simple card to make but still packs a wow with it’s easy to make daisy focal point.
Check out my video to see just how easy this card was to make
Daisy Lane Card August#imbringingbirthdaysback Video Tutorial
And of course here is the coordinating PDF printable version
#imbringingbirthdaysback August Daisy Lane Card Tutorial PDF
Enjoy!
And then stop back by tomorrow when I’ll be sharing some of the fun we had at our team retreat from last weekend with you.
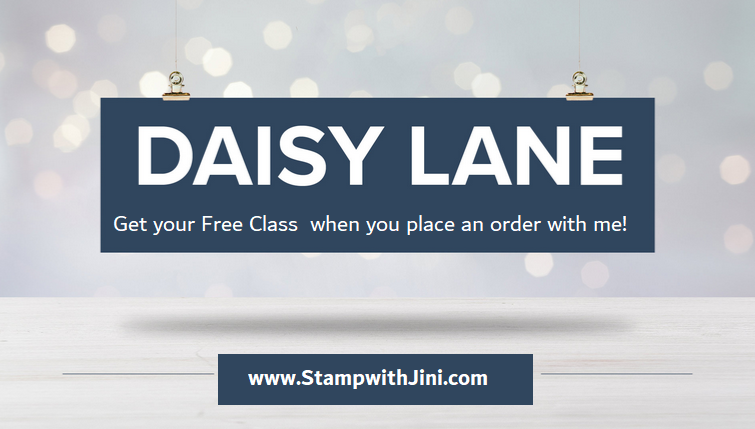
Shop at my Online Store and use Host Code Q2UWTQRW Place a qualifying order of $35 or more with me between now and August 18th and use this host code get a FREE Daisy Lane Note Card & Box Class!
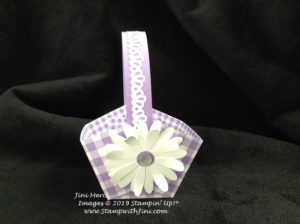
Today’s project is my take on a quick and easy basket. AND it’s perfect for spring, especially since it uses our lovely Gingham Gala Designer Series Paper!
I made this basket with a moving handle so it is more like a picnic basket than an Easter basket. Don’t you love the little bit of lace on the handle? I made this with our Decorative Ribbon Border Punch and it was so easy to do with just a small strip of Whisper White card stock.
Want to whip some of these up too? They are a nice size so add a little shredded paper and treat and you’re set to go. You can make a ton of these with just one stack of Gingham Gala Designer Series Paper and it comes in a variety of spring like colors so they are perfect for giving to others!
I hope you’ll enjoy making these cute little baskets too.
On a personal note I thought that I’d finally share the home improvement project that I was working on with you. I mentioned it a couple of weeks ago and then realized last night that I’d taken the pictures but didn’t share them. Sigh. Some days… lol Can you relate?
Any how here is what was keeping me busy – I still have a couple of finishing touch of things I need to do, but it’s all good.
I had a great time watching my son work on and build the cabinets and then watching the kitchen come together after dreaming about it for so long. I’m bias, but I think my son has done a great job. It turned out beautifully and I really like the look of the hickory. Johnathan did a beautiful job of choosing the grains so they look nice. I love doing projects like this together – great family time and memories being created in addition to a functional end result. You’ll get to see it yourself the next time to come to class, since this space is for our use and will make things easier than the old temporary kitchen set up.
Shop
at my Online Store and use Host Code 44SNJGKN
Click Here to learn more about using the Hostess Code If you order Online make sure your profile
information is up to date and you’ve allowed me to contact you (If you chose no
contact in the past you’ll need to call 1-800-Stamp Up to have them change your
profile for you.)
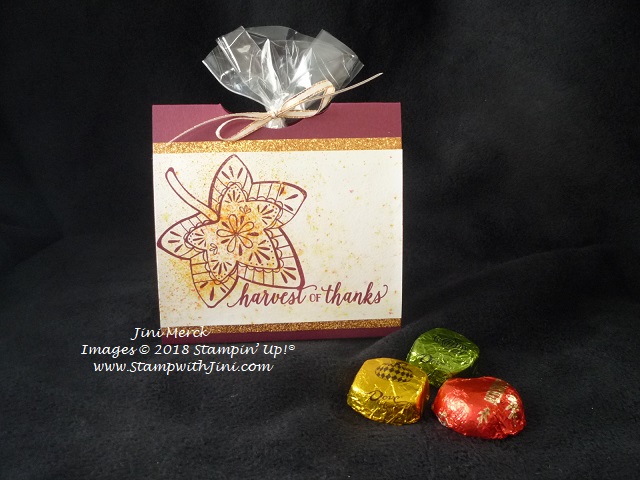
Do you love making treats for family and friends? If so you are going to LOVE this adorable little box made with the Takeout Treat Thinlits Dies. It makes treats sooooo quick and easy.
Check out these little Harvest Takeout Treats I made recently for my Stamp A Stack class last week. Wouldn’t they be cute adorning your Thanksgiving table?
They are small but they hold just the right amount of chocolate – I filed mine with these Lindor Truffles. Yum and the wrappers matched my color choice which was a nice coincidence too. LOL!
Tomorrow is the final day of OnStage here in Orlando and it’s been a blast so far. I hope I’ll be able to share some pictures when I post next week so you can see what I’ve been up too.
Shop at my Online Store and use Host Code SGA3ZW9U
Click Here to learn more about using the Hostess Code If you order Online make sure your profile information is up to date and you’ve allowed me to contact you
Last Chance to Sign Up for Your November Paper Pumpkin Kit
Shop at my Online Store and use Host Code W2NX46E9
Click Here to learn more about using the Hostess Code If you order Online make sure your profile information is up to date and you’ve allowed me to contact you
Today’s project that is a lot of fun to make since it includes a fast and easy technique that uses our Brusho Crystal Colors.
Shake and spritz and you’ve got a beautiful fall backdrop for your project! Got to love that and of course I can never resist using my Stampin’ Spritzers they are so much fun!
Want to see how their made so you can make some yourself? I’ve whipped up a quick video tutorial for you.
And how about a complete supply list with step by step directions too?
Shop at my Online Store and use Host Code W2NX46E9
Click Here to learn more about using the Hostess Code If you order Online make sure your profile information is up to date and you’ve allowed me to contact you