Tricky Treat Fun

I love punches and the NEW Tricky Treats stamp set in our 2012-2013 Catalog have coordinating punches for all of its images so it makes projects quick and easy. The images in this Tricky Treats set are so cute they just bring a smile to anyone’s face!

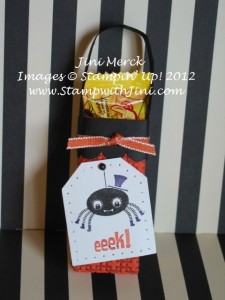
Here is a great swap that I received recently that uses the Tricky Treats stamp set. I love all the detail in this little gift item. Isn’t it cute? It holds a piece of laffy taffy – quick hide it from my son!

Did you notice the cute little black pearl on the top of the tag – You can make our Pearls and Rhinestones Basic Jewels and color you wish with a Sharpie ® marker or our Crystal Effects and Reinkers. Its sooo easy to customize them with your favorite color – you’ll never want to stop!

Supplies:

Stamp Set: Tricky Treats

Inks: Basic Black, Pumpkin Pie, Elegant Eggplant

Paper: Basic Black, Pumpkin Pie and Whisper White

Accessories: Essentials  Paper Piercing Pack and Stamping Pierce Mat, Extra Large Tag Punch, Pearls Basic Jewels, Sharpie®, Big Shot and Square Lattice Embossing Folder, 1/8″ Pumpkin Pie Taffeta Ribbon

Click here to order your Stampin’ Up! Products online 24/7! (US only)

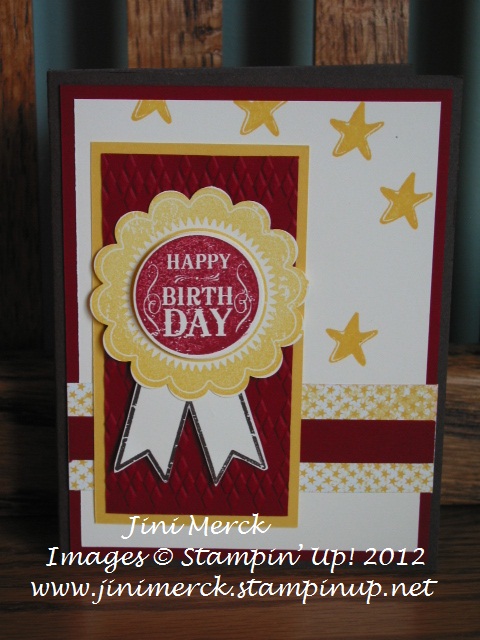
Blue Ribbon

I think everyone should have a stamp set that is fun for kids and easy to use. I think Blue Ribbon could be that set. Not only is it very versatile, but it’s easy enough for your child to use with you. Anything with a coordinating punch is a lot of fun. And not only does the Blue Ribbon set coordinate with punches, and our Designer Series Paper, World Spectacular, but it also coordinates with our Bitty Banners Framelits – now who doesn’t love our new Framelits, they are sooo easy to use!

I don’t know about you but my guys are always willing to punch things out. So that makes the Blue Ribbon stamp set almost fool proof, since you don’t have to worry about making sure things are straight.

Here is a card I received from Amy at convention using the Blue Ribbon Stamp set – isn’t it great?

Blue Ribbon

Supplies:

Stamp Set: Blue Ribbon

Inks: Cherry Cobbler, Early Espresso, and Daffodil Delight

Paper: World Spectacular DSP, Cherry Cobbler, Early Espresso, and Daffodil Delight and Very Vanilla

Accessories: 1 3/8″ Circle Punch, 2 3/8″ Scallop Circle Punch, Paper Snips, Big Shot and the Argyle Embossing Folder


Click here to order your Stampin’ Up! Products online 24/7! (US only)

Click HERE to sign up for my Monthly Newsletter now and receive a free tutorial (that’s a value of $9.95 for FREE!)

Love to learn new things? Check out my Virtual Club by clicking HERE

Clock Works

What a great masculine cards you can make with the Clock Works Stamp Set! Masculine cards are something that I struggle more to create. How about you?

Here is a simple and masculine card that I received from Carolyn Dobie in a convention swap that uses both the Clockworks stamp set and Kindness Matters, another great set. I really like the way she designed this card in all different tones of brown. How about you?

Supplies:

Stamp Set: Clockworks, Kindness Matters

Inks: Crumb Cake, Early Espresso, Soft Suede and Very Vanilla

Paper: Crumb Cake, Early Espresso, and Soft Suede

Accessories: Early Espresso1/4″ Stitched Grosgrain Ribbon and Paper Snips

Click here to order your Stampin’ Up! Products online 24/7! (US only)

Click HERE to sign up for my Monthly Newsletter now and receive a free tutorial (that’s a value of $9.95 for FREE!)

Love to learn new things? Check out my Virtual Club by clicking HERE

Harvest Blessings

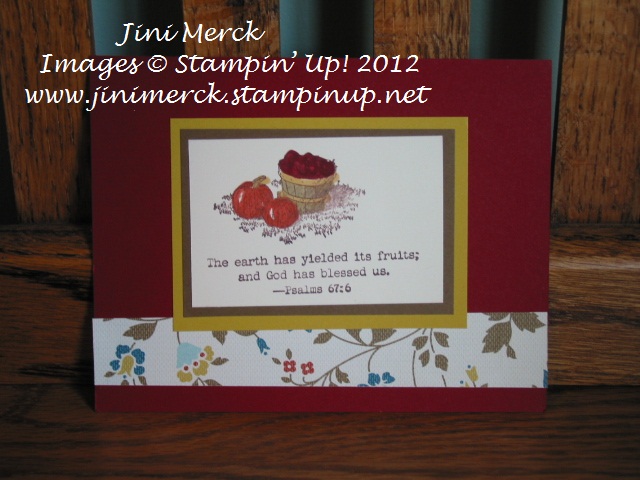
Harvest Blessings is such a great stamp set. I love the tractor in particular because of my guys. I think there are a lot of different ways you can use this set and it has a great antique feel to it too.

Here is a swap I received at convention from Robin Faris using the “harvest” image from the Harvest Blessings stamp set. What a great image for thanksgiving, don’t you think?

Harvest Blessings

Supplies:

Stamp Set: Harvest Blessings

Inks: Soft Suede

Paper: Comfort Café Designer Series Paper, Cherry Cobbler, Soft Suede, Summer Starfruit and Very Vanilla

Accessories: Stampin’ Write Markers

Click here to order your Stampin’ Up! Products online 24/7! (US only)

Click HERE to sign up for my Monthly Newsletter now and receive a free tutorial (that’s a value of $9.95 for FREE!)

Love to learn new things? Check out my Virtual Club by clicking HERE

A Cherry on Top

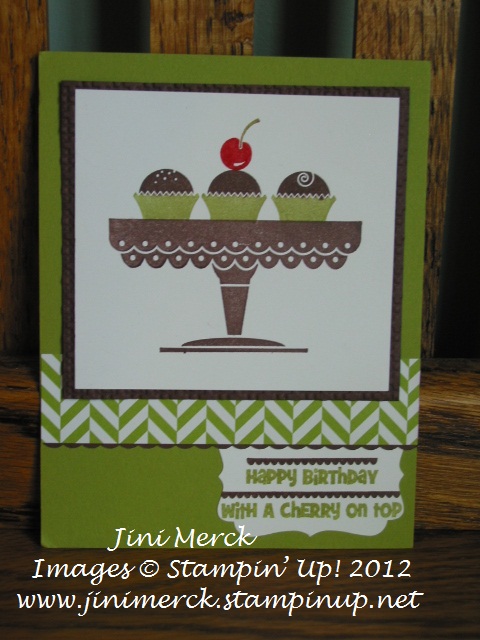
Being a Hostess is a lot of fun and part of the “perks” is being able to choose from our Hostess only exclusive sets. Whether you host a private party with friends or place a $150 order yourself, Hostess items are just… well, fun.

Here is a great card that I received during the swaps at Convention from Samatha Malchow using the A Cherry on Top Stamp Set.  Isn’t it a great card? After all who doesn’t love a cherry on top!

A Cherry on Top

Supplies:

Stamp Set: A Cherry on Top

Inks: Chocolate Chip, Real Red, and Lucky Limeade

Paper: Summer Smooches Designer Series Paper, Chocolate Chip, Whisper White, and Lucky Limeade

Accessories: Ribbon Border Punch, Decorative Label Punch, Big Shot and the Square Lattice Embossing Folder


Click here to order your Stampin’ Up! Products online 24/7! (US only)

Click HERE to sign up for my Monthly Newsletter now and receive a free tutorial (that’s a value of $9.95 for FREE!)

Love to learn new things? Check out my Virtual Club by clicking HERE

Established Elegance Convention Swap

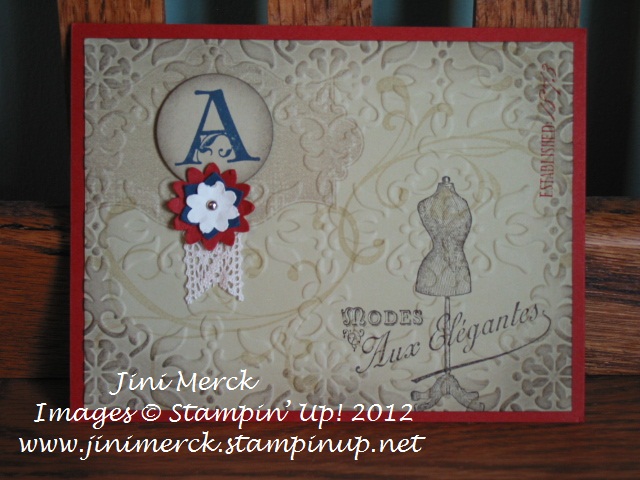
As promised yesterday here is my first swap from last month’s Stampin’ Up! Convention using the Established Elegance stamp set. This card was given to me by fellow Demonstrator, Lynnette Alvarez. I love the vintage look and feel of this card. Leave me a comment and tell me what you think.

Being part of Stampin’ Up! is so much fun and Stampin’ Up! gives us several opportunities to get together with other Demonstrators across the US several times a year. If you’d like to find out more about becoming part of my TEAM you can click HERE or contact me anytime.

Established Elegance

Supplies:

Stamp Set: Established Elegance, Everything Eleanor and Lovely Letters

Inks: Cajun Craze, River Rock, Early Espresso, Night of Navy and Crumb Cake

Paper: Cajun Craze, River Rock, Night of Navy, and Very Vanilla

Accessories: 1/16″ Circle handheld Punch, Boho Blossom and ¼” Circle Punches, Big Shot, Vintage Wallpaper Embossing Folder, Mini Brads, and Victoria Crochet Trim

Click here to order your Stampin’ Up! Products online 24/7! (US only)

Click HERE to sign up for my Monthly Newsletter now and receive a free tutorial (that’s a value of $9.95 for FREE!)

Love to learn new things? Check out my Virtual Club by clicking HERE

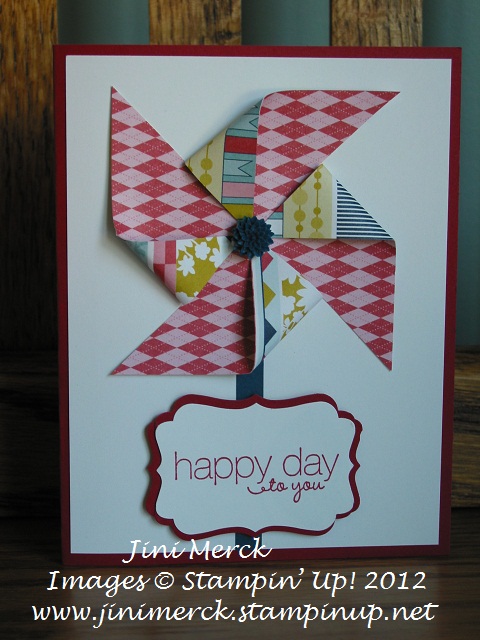
Patio Party Pinwheel

Wow, the last couple of weeks have been crazy around here with band camp. I’m the secretary of the boosters club so there is a lot of startup stuff that happens. But I’m back now and school doesn’t start for a few days.

Pinwheel Today I wanted to share with you this little Pinwheel card I made recently. Isn’t it cute? Pinwheels are all the rage right now it seems. I made this card for my last TEAM meeting. Everyone loved the NEW In Color Dahlias that we used for the centers of our pinwheels. The girls had so much fun making them that I thought I would offer the FREE Pinwheel tutorial to you – just for signing up for my email list! (That’s a $9.95 value for FREE) Interested? Click on my link below to sign up today.

Click HERE to sign up for my email list

and receive your FREE Pinwheel tutorial

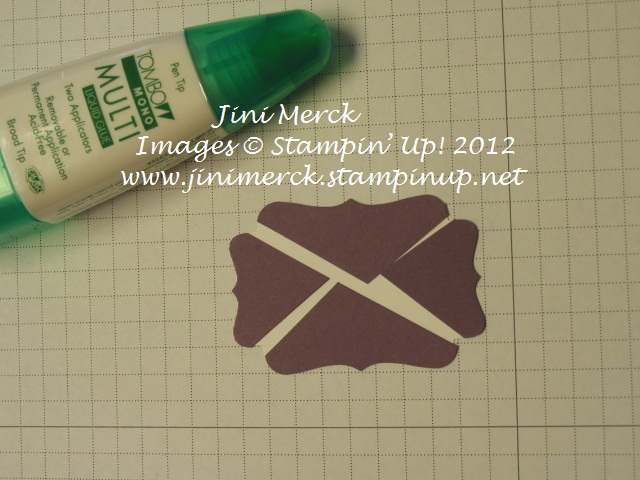
Wonder how I made the sentiment with the Decorative Label Punch? Here is quick shot of the punched piece after I cut it. 

And then adhere it to the back of the already stamped and punched sentiment piece. I like to use our Multipurpose Adhesive to do this since I can move it around after I turn it over and get the pieces right where I want them. 

How quick and easy is that! Do you like to learn new tips and techniques? Why not join my Virtual Club. You can click HERE for more information.

Come back tomorrow, I’ll be posting some of the cards that I received during swaps at convention.

Supplies:

Stamp Set: Friendly Phrases

Inks: Raspberry Ripple

Paper: Patio Party Designer Series Paper, Raspberry Ripple, Midnight Muse and Whisper White

Accessories: In Color Dahlias, Decorative Label Punch

Click here to order your Stampin’ Up! Products online 24/7! (US only)

2012 Holiday Catalog is HERE!

Just in time for the holidays – our Stampin’ Up! Holiday Catalog is now live! If you haven’t had the chance to check it out yet – why not do so now. You’re going to love all the new goodies.

Holiday Catalog                       

Click HERE for Holiday Catalog (flash)

Click HERE for Holiday Catalog PDF

Click HERE for Holiday Catalog Supply List

Some of the best things in this catalog are:

Bundles – I love that Stampin’ Up! has introduced bundles of matching stamp sets and Framelits at a 15% discount! Keep an eye out for the bundles throughout the catalog.

Kits There are some for all your favorite holidays! Keep an eye out for Halloween, Christmas and even Valentine’s Day bundles!

Suites Four new suites – one to fit everyone’s holiday desires

Samples- There are lots of them! You can check out the supply list HERE to see all the details so that you can create your own!

Want your own Holiday Catalog and haven’t received one yet? Just email your name, address and phone number to [email protected] and I’ll be happy to mail one to you!

Click HERE to sign up for my Monthly Newsletter now and receive a free tutorial (that’s a value of $9.95 for FREE!)

Click here to order your Stampin’ Up! Products online 24/7! (US only)

Double Fold Gate Card

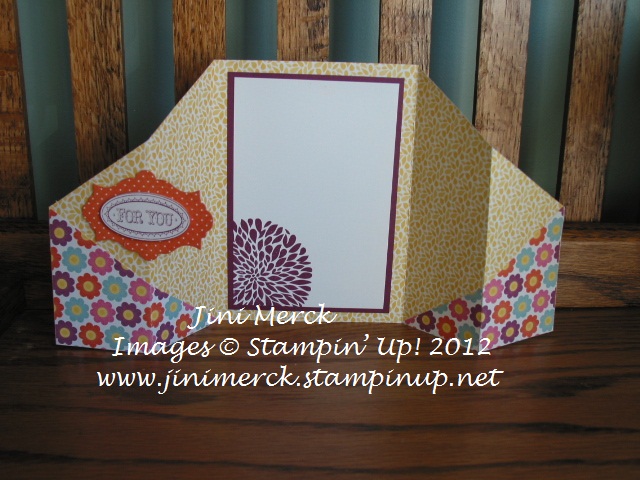
I love to try new things and so recently fell in love with making these cards using the Double Fold Gate technique and the Layered Labels stamp set. It’s a lot of fun to see all the different combinations that you can come up with.

This card in particular that I’m showing you today uses one of my favorite NEW stamps sets from the 2012-2013 Catalog, Layered Labels. First I love it because of the sentiments and secondly because of the fact it has a matching set of Framelits Dies that coordinate with it making it quick and easy to use. After all who doesn’t love their Big Shot? And with all the new goodies in the 2012-2013 Catalog the Big Shot options are endless!
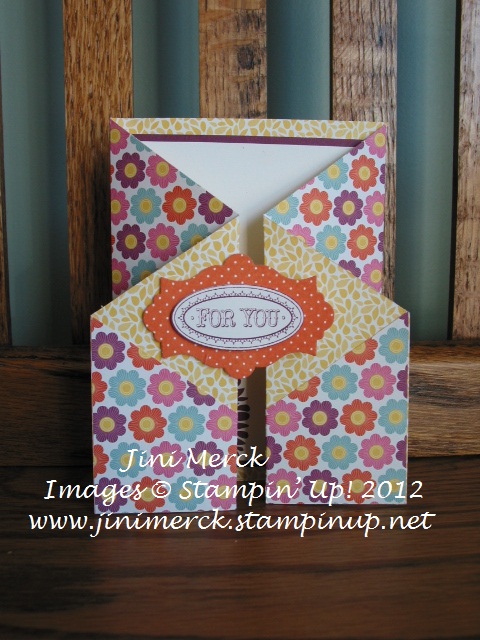
Double Fold Card Tutorial front

I’ve used the Floral District Designer Series Paper for this Double Fold Gate card. The Floral Districts DSP seems to be a DSP that I reach for most often right now– so much so I need to order my 3rd package of it already! I really like the bold, fun colors and patterns it contains.

I think these Double Fold Gate Cards are so much fun to make that I wanted to share with you the Double Fold Gate Card tutorial that I made for it. Grab your favorite pack of Designer Series Paper and see what combinations you can come up with – warning these can become addictive!

Double Fold Gate Card Tutorial

Supplies:

Simply Scored Scoring Tool

Stampin Trimmer

Bone Folder

Lay a 12″ x 5 ½” piece of Designer Series Paper on the Simply Scored Board with longest edge at the top. (I used our new Floral District Designer Series Paper.)
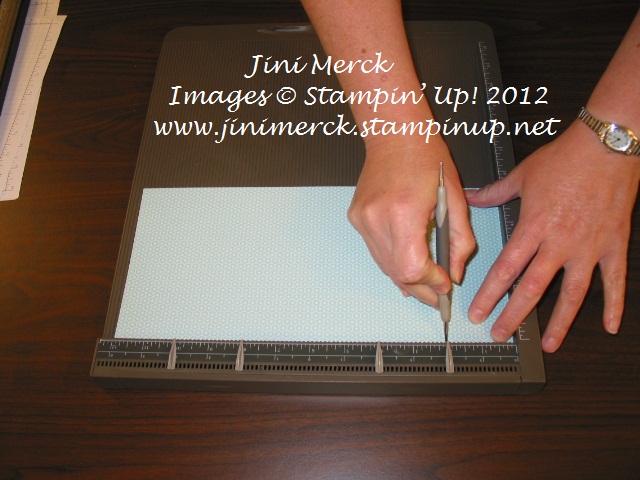
Double Fold Card Tutorial step 1

Score at 2″, 4″, 8″ and 10″ marks

Double Fold Card Tutorial step 2

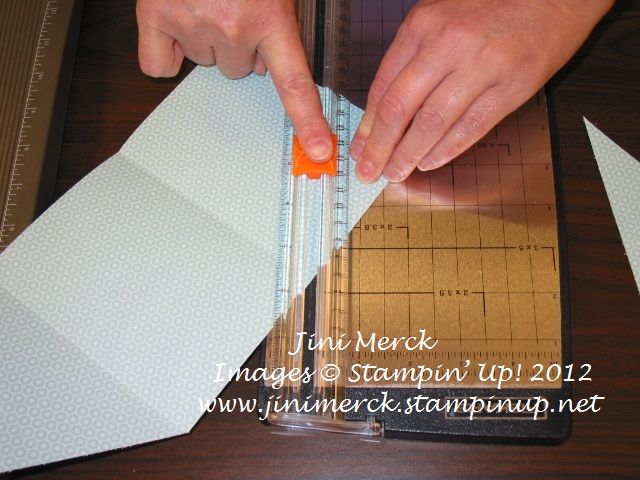
Turn Designer Series Paper and make a small mark each short end at the 2 ¾” mark
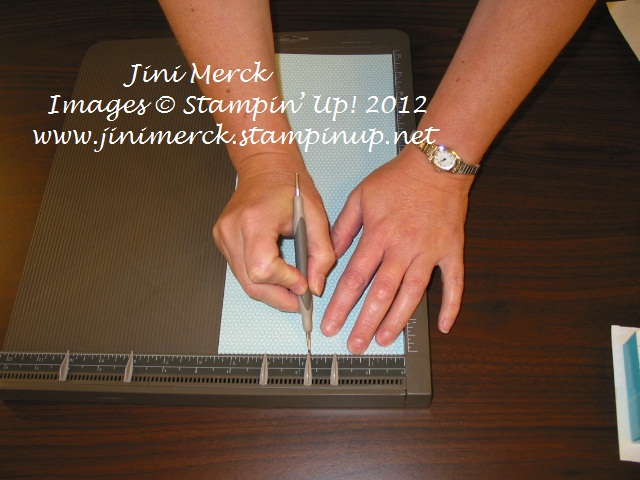
Double Fold Card Tutorial step 3Use the bone folder and fold in the two ends on the 4″ and 8″ score lines. (This allows you to see your score lines easier for when you line up your DSP to cut.)

Decide which side is the top of your card and then using the Stampin’ Trimmer to cut a diagonal line on each side. Line up the 2 ¾” mark on the grove where your blade travels. You can hold this in place with your index finger if you would like.
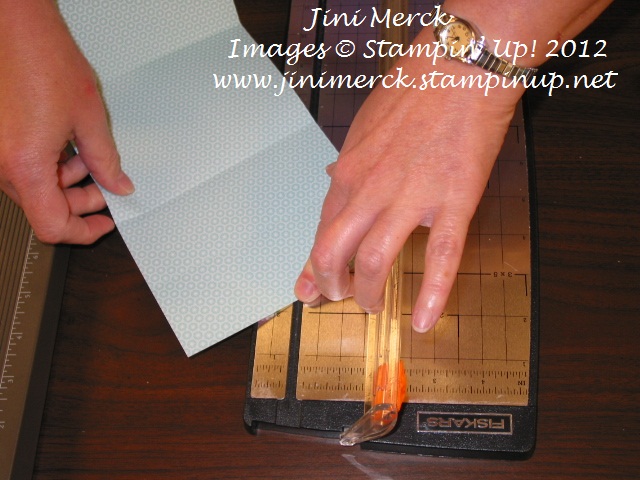
Double Fold Card Tutorial step 4

Then “swing” the top edge of your 4″ score line on the DSP until it is lined up on the grove too.

Cut.
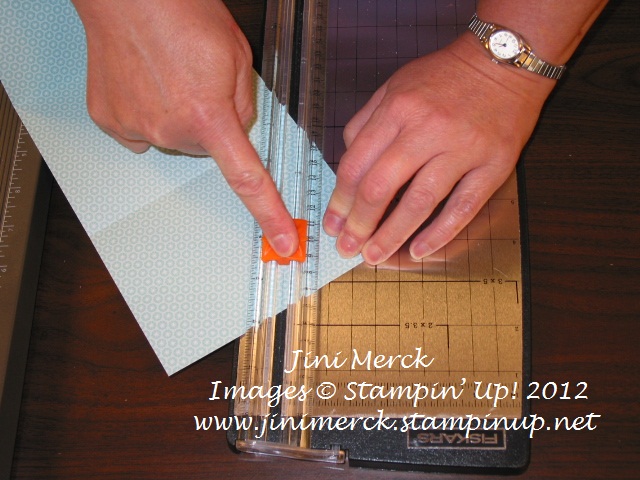
Double Fold Card Tutorial step 5

Repeat on the other side Lining up the 8″ score line and your

2 ¾” mark.
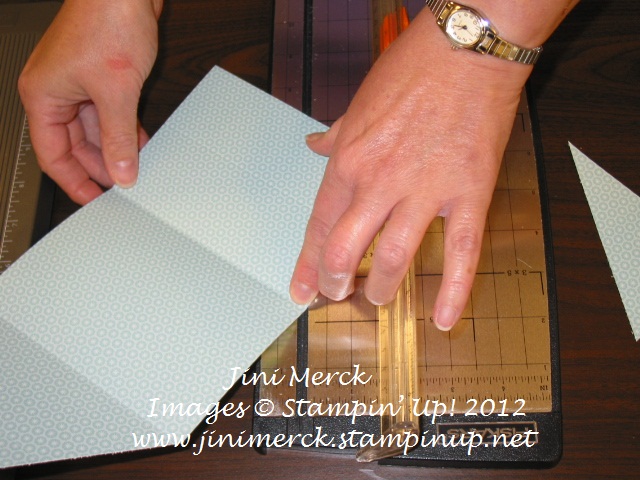
Double Fold Card Tutorial step 6

Double Fold Card Tutorial 7

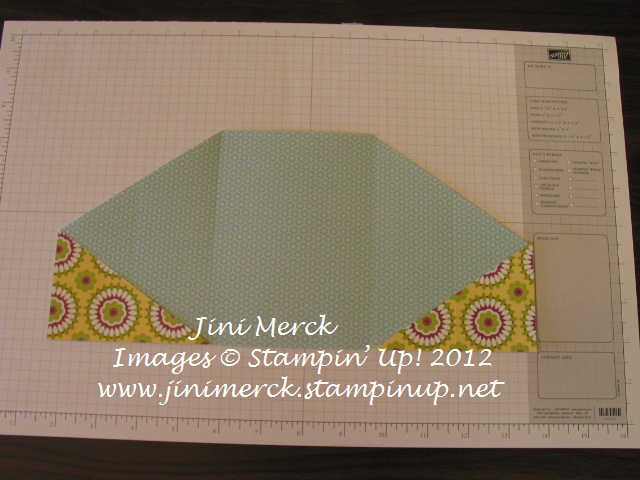
You should have three pieces that look like this.
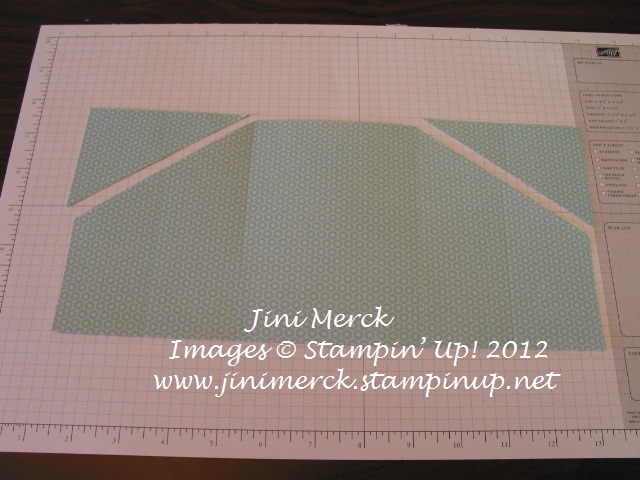
Double Fold Card Tutorial step 8

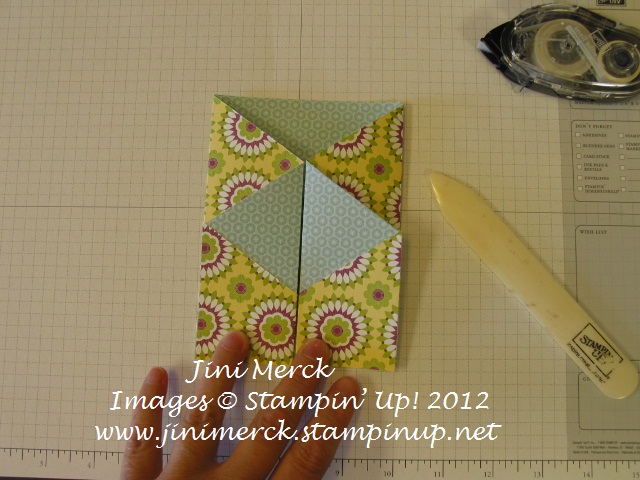
Flip over the piece and adhere to the bottom of card as shown. Repeat on the other side.
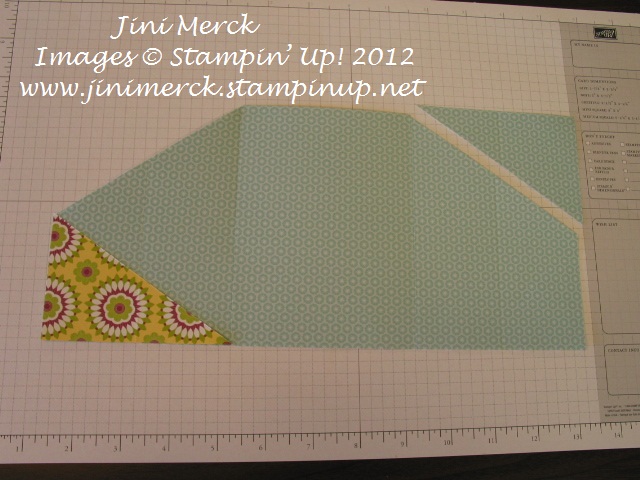
Double Fold Card Tutorial step 9

Double Fold Card Tutorial step 10

Using the bone folder you can fold the card on the 4″ and 8″ score lines (if you didn’t fold and score before cutting off the corners.)
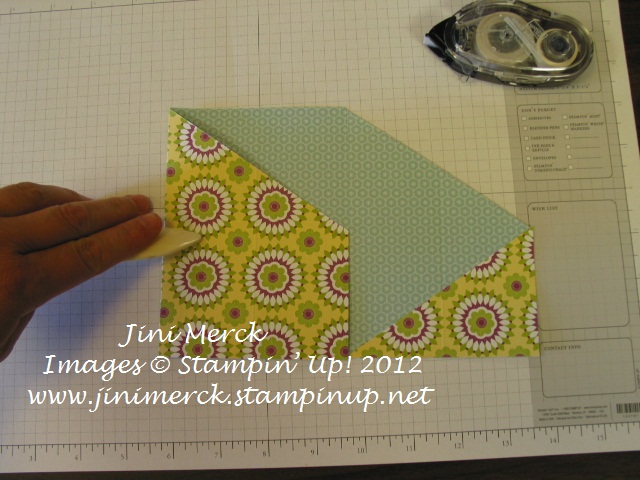
Double Fold card Tutorial step 11

Using Bone Folder, fold on the 2″ score line in the opposite direction to create Z fold.
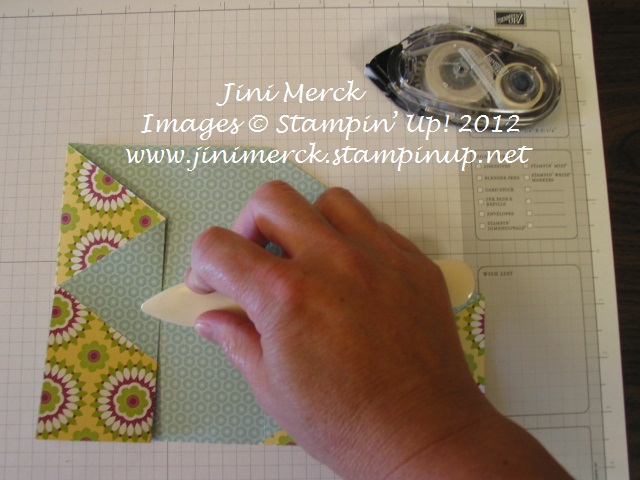
Double Fold Card Tutorial step 12

Repeat on the other side Using Bone Folder, fold on the 10″ score line folding in the opposite direction to create Z fold.
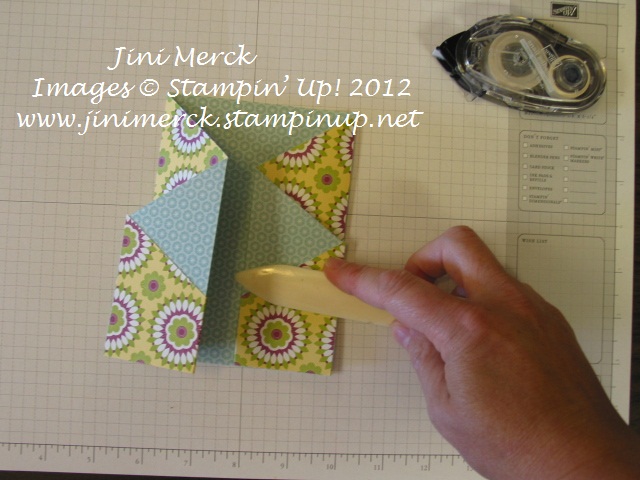
Double Fold Card Tutorial step 13

Your card should like this.

Double Fold Card Tutorial step 14

Adhere pieces of card stock to the inside and decorate front as desired. I used a piece of 3 ½” x 5″ Rich Razzleberry card stock with a layer of 3 ¼” x 4 ¾” Whisper White card stock. I used the Betsy’s Blossoms stamp set and stamped the flower image in Rich Razzleberry.
Double Fold Card Tutorial step 15

For the outside image I used our NEW Layered Labels stamp set and the coordinating Apothecary Accents Framelits Dies – Adhering the image only on the one side so that the card opens easily.

And here is the finished card.

Double Fold Card Tutorial front

Did you enjoy this tutorial? Do you like to learn new things?  Would you like to get exclusive tutorials for 2 projects that are just for you every month? Why not join my Virtual Stamp Club?

Watch for more information coming soon – meanwhile why not sign up and become part of my Mailing list NOW. Not only will you receive my Monthly Newsletter, which includes special promotions, tips and helpful hints (in addition to information about my events and my Virtual Club that starts in September), but you’ll also receive a FREE tutorial just for you!

Sign up for my monthly newsletter Click HERE

Click here to order your Stampin’ Up! Products online 24/7! (US only)


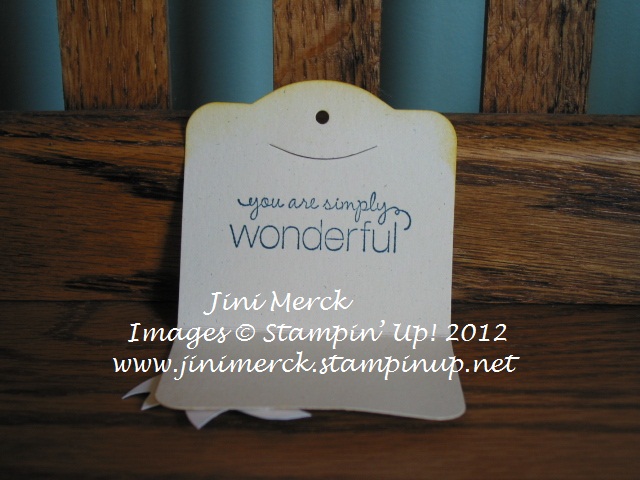
Two Tag Die

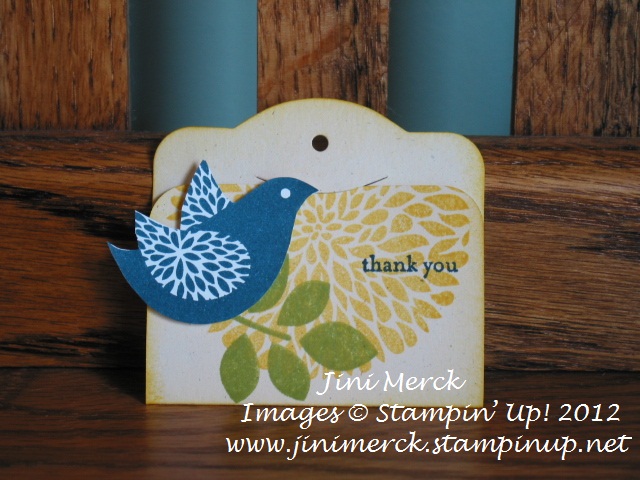
I love meeting new stamping friends and the other day during my Free Card Friday event one of my guests asked me about an easy way to create a tag for a gift she wanted to give someone soon. Here is what I came up with quickly.

First thing that came to mind was the Big Shot and the Two Tags Die. What is easier than using the Two Tags Die? Pick you card stock and just run it through – it’s that simple.

We chose to decorate the Two Tags Die using our stamp set Betty’s Blossoms, just introduced in our NEW 2012-2013 Catalog. (Don’t have a 2012-2013 Catalog yet? Contact me today and I’ll be happy to get one to you.)

Isn’t it cute – and of course we needed a little sentiment for the inside

If you haven’t had a chance to try our NEW Firm Foam ink pads why not stop by for one of my FREE events. Click HERE to see my Calendar of Events and find a date that works for you.

Supplies:

Stamp Set: Betsy’s Blossoms, Teeny Tiny Wishes and Friendly Phrases

Inks: Midnight Muse, Daffodil Delight and Lucky Limeade

Paper: Naturals Ivory

Accessories: Big Shot, Two Tag Die, and Stampin’ Sponge

Click here to order your Stampin’ Up! Products online 24/7! (US only)