#OnStage2019, Light & Peace and more

Today I thought I would share some of the Holiday Catalog swaps that I received during OnStage in Atlanta last weekend along with some more pictures.

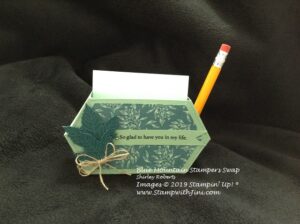
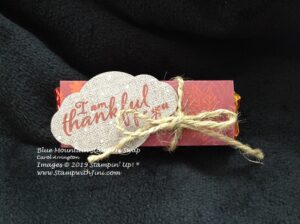
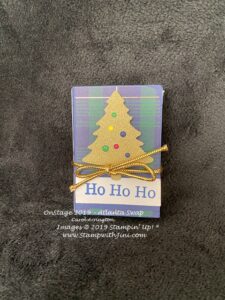
I am going to begin with a 3d items I received – a cute tic tac holder using the Perfectly Plaid Suite of Products (153326). Absolutely adorable and perfect to give a little something!

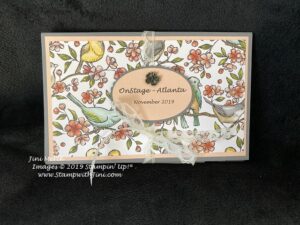
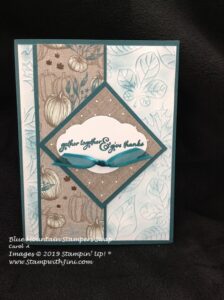
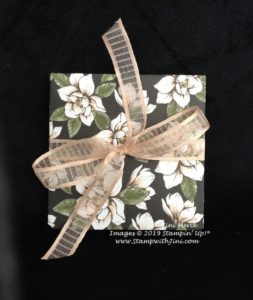
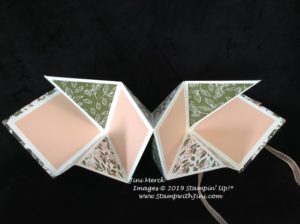
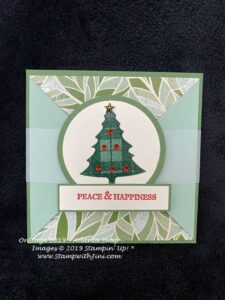
And here are a couple of lovely cards. This first one uses the Perfectly Pines stamp stamp set (149418) teamed up with our Mosaic Mood Specialty Designer Series Paper 9149478) from the Annual Catalog.

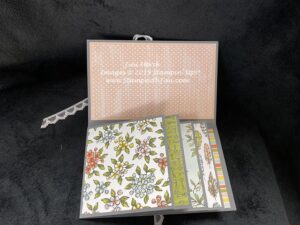
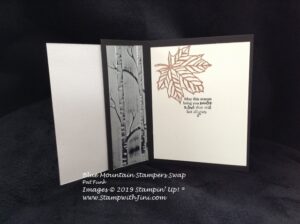
It is a square card that has a fun fold and opens a bit differently. Slip off the belly band and here is what you have.
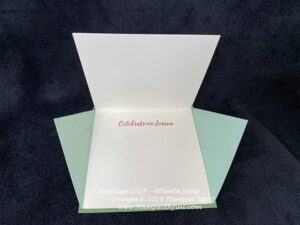
fun, right?

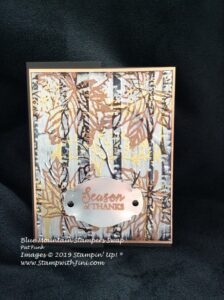
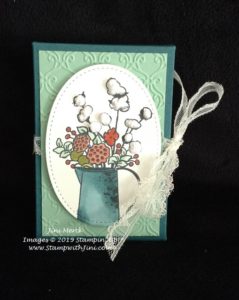
And how about this elegant card using the Light & Peace stamp set (150516)?

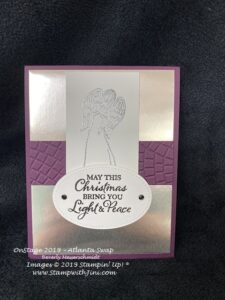
Done in Blackberry Bliss it uses our Champagne Foil Sheets (144748), Mosaic 3D Embossing Folder (149575) along with our Silver (109131) and Shimmer Black Embossing Powders (149512).

These pictures just don’t do justice to these projects. (I’m still getting use to my camera and am really missing my old phone lol)
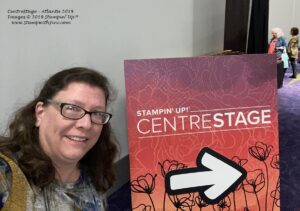
CentreStage

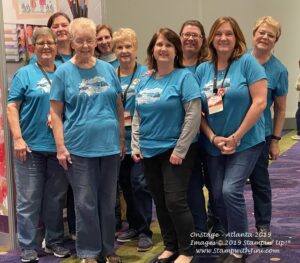
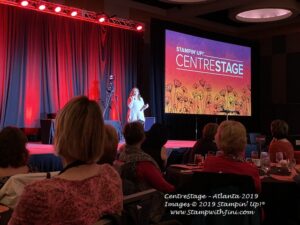
Friday night, Leaders gathered for what we call CenterStage, this is an event that includes a lovely evening of pampering before OnStage.

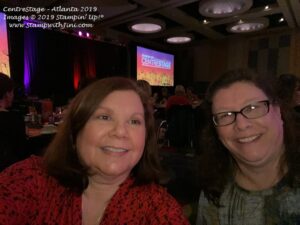
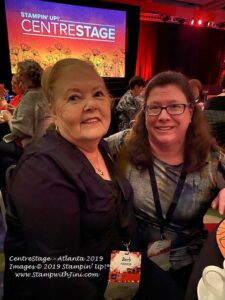
Susan and I stopped for a snap shot before going in. Who would have thought all those years ago she would inspire the dream of becoming a leader and earn an Incentive Trip. My husband Larry, joined me for the meetings after work regularly 10 years ago since we car pooled to his job after we moved. During one of the meetings, Susan spoke about the Alaskan Cruise which was the incentive trip that year. On the way home I can remember Larry asked me if I could do that to. I said yes, anyone could. He was so excited by the idea and has patiently supported me over the last 10 years as I worked toward this goal – and here I am! I am so appreciative and blessed to have earn the Maui trip and he’s soooo excited too!

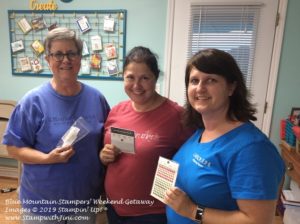
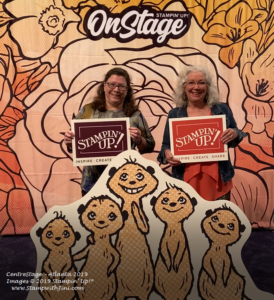
I truly enjoy CentreStage as it is smaller and a chance to connect with old friends and meet new friends. Here I am with Lori whom I met during our first Atlanta OnStage years ago

And Barbara whom I’ve been doing my organized swaps with for years.

Stampin’ Up! is always very generous and there is always a special gift for us at the table

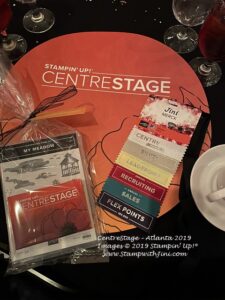
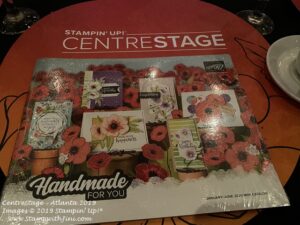
Our swag bags that include the NEW January – June Mini Catalog and Sale-a-bration Brochure, Squeal!!!

And we have a chance to hear news about what is going to happen and speak with the folks from the home office.

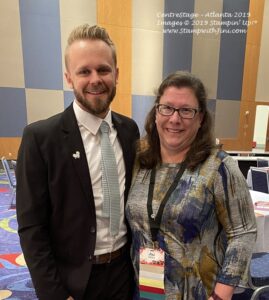
Here I am with Tanner, who is over the Southeast Area. I think it is always fun to see the people we work with online. Don’t you?

Just a little taste of what last Friday was like. Stop back by – I’ll be share more swap swaps and more!

Click here to order your Stampin’ Up! Products online 24/7! (US only)

Shop at my Online Store and use Host Code KTYQJ3TY

Click Here to learn more about using the Hostess Code If you order Online make sure your profile information is up to date and you’ve allowed me to contact you (If you chose no contact in the past you’ll need to call 1-800-Stamp Up to have them change your profile for you.)

Sign up HERE for my FREE Newsletter or Get my Blog Posts delivered right to your inbox HERE

#OnStage2019 Bird Ballard Flip Album

Whew, it’s been a busy weekend and I’m just catching up. I had a fantastic time over the weekend at our OnStage Local in Atlanta. It’s always great to meet new friends! Friday I shared one of the table 3d treats I made for folks and today I wanted to share the fun flip album I made as part of my team gifts for the event.

I just love the Bird Ballard Designer Series Paper with all it’s lovely water colored images so it was a perfect choice for this project as we were getting our first look at the 2020 January-June Mini Catalog & Sale-a-bration Brochure. (You are going to LOVE it!)

This album was fairly easy to whip up and is perfect for all kinds of events, trips, or even a brag book for Grandma! It will hold up to 10 photos including a 4×6, but is compact so it’s easy to store or take along with you.

I’ve made a video tutorial for you so you can see how I created this Flip Album

Bird Ballard Flip Album Video Tutorial

And if you’d like the complete supply list, measurements, and a step by step tutorial that contains some additional photos to go along with it here is my PDF version too.

Bird Ballard Flip Album PDF Tutorial

So what do you think? Like it and want to make one too? Why not leave me a comment and let me know?

#OnStage2019 – Atlanta

I loved having our largest group yet from our team attend and I think everyone had a blast learning, sharing, and meeting others from across the country. Since we had a large enough group we even sported our first team t-shirt! Spending time with these special ladies was a great way to end my 10th Anniversary year being a Stampin’ Up! Demonstrator.

I’ll be sharing more of our #OnStage2019 experience through out the week as I unpack things. So stop on by to check out some sneak peaks too!

On a personal note my technology has been uncooperative so I apologize for things being a bit scattered lately. I had to spend the day at the Apple store yesterday, so hopefully I’ve got things sorted out now. Next to find a computer person.

Supplies:

Paper: Bird Ballard Designer Series Paper (149592), Basic Gray (121044), and Petal Pink Card stock (122925)

Accessories: Very Vanilla Scalloped Lace Trim (149593), Bird Ballard Trinkets (149594), Layering Ovals Dies (141706), Simply Scored Scoring Tool (122334)

*Bird Ballard Suite of Products

Click here to order your Stampin’ Up! Products online 24/7! (US only)

Shop at my Online Store and use Host Code KTYQJ3TY

Click Here to learn more about using the Hostess Code If you order Online make sure your profile information is up to date and you’ve allowed me to contact you (If you chose no contact in the past you’ll need to call 1-800-Stamp Up to have them change your profile for you.)

Birds of a Feather Table Treats

Today I’m going to share a fun project I made for this weekend’s #OnStage Event in Atlanta. I’ll be giving these out to some friends as table treats – just a little something, something for our sweet tooth.

I really love this set with it’s fun images and couldn’t resist using it for this Thanksgiving project when I found these pumpkin pie Rice Krispies treats with their gold wrappers (rather than their blue ones), I thought to my self it’s perfect! I’m always thinking color coordination when I’m looking at the packaging on the store shelf. Have you ever shopped that way?

Actually they actually are pretty good too. So if you run across them you might want to give them a try too. If not the regular ones will work just as well.

Since I’m taking these to share I thought you might like to make some to share too, so I’ve created a video for you.

Not only do I share how to make the holder, but I’ve also shared how I colored this little turkey with our Stampin’ Blends – I just love their bright bold colors for projects like these!

Birds of a Feather Rice Krispies Holder Video Tutorial

Birds of a Feather Rice Krispies Holder Tutorial PDF

I’m going to run since I’ve got to get out the door, but stop back by again next week when I’ll be sharing the team gift I made for #OnStage with you. I ran out of time, so I don’t have the tutorial done yet.

Enjoy!

Supplies:

Stamp Set: Birds of a Feather (150571)

Inks: Memento Tuxedo Black Ink (132708/133456), Soft Suede (147273), Pretty Peacock (149560), Pumpkin Pie (144599), Mango Melody (147945, Mint Macaron (147283), and Cajun Craze Stampin’ Blends Combo Pack (147931), Poppy Parade Light (146878) and Gray Granite Dark Stampin’ Blends (149536)

Paper: Come to Gather Designer Series Paper (150454), Pretty Peacock (150880), Cajun Craze (119684), and Whisper White Card stock (100730)

Accessories: Delight Tag Topper Punch (149518), Come to Gather Ribbon Combo Pack (150456), and Layering Ovals Dies (141706)

Click here to order your Stampin’ Up! Products online 24/7! (US only)

Shop at my Online Store and use Host Code KTYQJ3TY

Click Here to learn more about using the Hostess Code If you order Online make sure your profile information is up to date and you’ve allowed me to contact you (If you chose no contact in the past you’ll need to call 1-800-Stamp Up to have them change your profile for you.)

Team Time fun with the Come to Gather Suite

Last week I held my monthly Team Meeting, it is one of my favorite days of the month. We gather, share, stamp, and enjoy time with each other. I’m blessed with a wonderful team that is also a great group of stampers. Because we all have been stamping for different lengths of time and have different styles, I always look forward to seeing what they have been creating.

Want to see? The theme for our swap this month was fall and none of the projects disappoint!

Here is a great treat box with a drawer that slides out

filled with a banana Twinkie, yum.

And a cute little sticky note holder using our Stitched Nested Label Dies.

And here is a quick and easy wrap for some mini chocolate bars – the sentiment is from the Painted Harvest stamp set found in our Annual Catalog.

And a few more cards

Pat created this next project using our Copper Embossing Powder and the trifold card measurements I shared with you earlier

And this final card uses our Gift of Fall Add On Note Card, the coordinating Paper Pumpkin stamp set, along with the Seasonal Layers Dies and Rectangle Stitched Dies.

I love the way that our Paper Pumpkin Kits coordinating with our products, allowing us to have even more options.

And of course every team meeting includes celebrating accomplishments, stamping, and learning new things too.

We’ll be heading off to our Stampin’ Up! #OnStage event this weekend, a first for many on the team, so you’ll want to stop back by to see what that’s all about. Stampin’ Up! events are always a lot of fun, a chance to meet others who love to stamp, and learn new things, and of course prize patrol is always a hit with everyone! Stampin’ Up! is always generous with its demonstrators.

Does this sound like something you would enjoy? If you love to stamp and would like to get a discount on your supplies, why not consider joining my team, the Blue Mountain Stampers?

What are the Blue Mountain Stampers?

That’s the name of our stamping community. We enjoy welcoming new members to our group. We’re from all over. If you’re considering joining Stampin’ Up!, you may have questions about how I would support you as part of my team. I do offer a variety of ways to learn, grow and to have FUN as a Blue Mountain Stamper!

  • Exclusive Team Resource Page – videos, PDFs and more
  • Exclusive Face book Group – A great way to share and connect with other team members and share
  • Monthly Creative Challenges
  • Swapping Opportunities
  • Team Retreats
  • Meetings – both local and online/virtual
  • Monthly Crafting Day
  • Monthly Lunch & Learn
  • Recognition & Incentives
  • Training available for private parties, clubs, classes, and more!
  • Additional support and business coaching available

We have a very active group that share and answer each other’s questions on our Exclusive face book group.  If you’re looking for fun, a place to grow and share with others…You’ll fit right in!

Hobbyists are welcome!

  • Did you know?  90% of my Blue Mountain Stampers’ are Happy Shoppers – purchasing for themselves, (along with their family and friends.)  That’s right…you can just get a discount on products you love!
  • We welcome the hobbyist who’s looking to be a “happy shopper” (and save money), as well as those of you that want to build a business (and make money).
  • Everyone is welcome after all there’s room for both and everyone in between.

And there is NO Obligation when you purchase your starter kit – Join the Blue Mountain Stampers and see what it’s all about!

If you still have questions please feel free to contact me. I’m always happy to answer any questions you have. You can either contact me by email StampwithJini@gmail.com or call 706 754-7124 and I’ll get back to you as soon as I can

Click here to order your Stampin’ Up! Products online 24/7! (US only)

Shop at my Online Store and use Host Code KTYQJ3TY

Click Here to learn more about using the Hostess Code If you order Online make sure your profile information is up to date and you’ve allowed me to contact you (If you chose no contact in the past you’ll need to call 1-800-Stamp Up to have them change your profile for you.)

Boo to You Treats

Do you enjoy making treats for family and friends? Halloween treats are not just for kids, but the young at heart too. Right? So I made up a batch of these candy wraps for family and friends and of couldn’t I resist using the Boo to You stamp set since it is filled with fun whimsical images of monsters we all know and love.

Created with our Monster Bash Designer Series Paper, you’ve got lots of choices for the color combinations and designs to choose from. And you are going to love the Basic Black 3/8″ Scalloped Edge Ribbon – it feels and ties wonderfully.

Here is a quick video tutorial showing you how I made them.

And a PDF for you too with a complete supply list

Boo to You Candy Bar Wrap Tutorial PDF

I’ve included a Stampin’ Blends list for the colors I used along with a close up of all 3 monsters in the PDF for your coloring needs.

Enjoy!

Just a Reminder it’s the Last Day to Subscribe to Paper Pumpkin and get your kit for October

You won’t want to miss out on this Christmas coordination CLICK HERE to subscribe today!

Supplies:

Stamp Set: Boo to You (150550)

Inks: Memento Tuxedo Black Ink Pad (132708/133456), Crumb Cake (144601) and Highland Heather Stampin’ Blends Combo Pack (147276), and Basic Black Light Stampin’ Blends (147940)

Paper: Monster Bash Designer Series Paper (150447), Basic Black (121045), and Whisper White Card stock (100730)

Accessories: Layering Circles Dies (141705), 1″ Circle Punch (119868), Assorted Googly Eyes (150453), and Basic Black 3/8″ Scallop Edge Ribbon (150449)

Click here to order your Stampin’ Up! Products online 24/7! (US only)

Shop at my Online Store and use Host Code H62N9P3Z

Click Here to learn more about using the Hostess Code If you order Online make sure your profile information is up to date and you’ve allowed me to contact you (If you chose no contact in the past you’ll need to call 1-800-Stamp Up to have them change your profile for you.)

Sign up HERE for my FREE Newsletter with class and event information or Get my Blog Posts delivered right to your inbox HERE

?Peak Princess Fun & the Amazing Magnolia Lane Folding Album

Last weekend was my Peak Princess event. What’s that? Well it is a special afternoon of pampering for those Team members who have earned it. We enjoy the time together, food, played a game, and of course create a project.

This event was extra special since it was our largest group yet due to everyone’s hard work – and I added a bit of a luau theme to the snack table to celebrate.

The hit of the snack table was the Artichoke & Mushroom Toast – not really Hawaiian fair, but since the Hawaiian pizza rolls I was planning on were a flop when I tried them, this worked out well since everyone seem to enjoy them.

Here is the recipe if you want to try them yourself. I found them really easy to do and prepped everything the day before and then assembled before the event.

Artichoke & Mushroom Toast

Taste of Home

  • 36 slices French bread baguette (1/2 inch thick)
  • 3 T. Olive Oil, divided
  • ½ lb. sliced fresh mushrooms
  • ½ lb. sliced baby portobello mushrooms
  • ½ tsp. Italian seasoning
  • 2 T. butter
  • 6 garlic cloves, minced
  • 1 jar (7.5 oz) marinated quartered artichoke hearts, drained
  • 1/3 c. mayonnaise
  • 1 T. Parmesan cheese, shredded
  • 2 c. Swiss cheese, shredded

Place bread on baking sheets; brush with 2 tablespoons oil. Broil 4-6 inches from heat for 1-2 minutes or until lightly toasted.

In a large skillet, sauté mushrooms with Italian seasoning in butter and remaining oil until tender. Add garlic; cook 1 minute longer. Remove from heat and set aside.

Place artichokes in a food processor; cover and process until finely chopped. Add mayonnaise and Parmesan cheese; cover and process until blended. Spread over toast slices; top with mushrooms and sprinkle with Swiss cheese.

Bake at 350 degrees for 4-6 minutes or until cheese is melted.

Yield 3 dozen

Print a copy here

And here is the classroom waiting for everyone to arrive.

I shared the little Country Home Kit Kat Holders which were everyone’s “pillow gifts” on the table with you yesterday – I thought the thankful greeting was perfect to express my thanks to my team.

We enjoyed a game after everyone settled in –

Have you ever played the Right, Left Game? It’s so simple…. everyone starts with a package and then we passed our packages to the right or left depending on the Ink Pad story I read.

Lot’s of fun and laughter to go around!

After we did a Make n Take and created these lovely Folding Albums. My friend, Marni gave me one of these little albums last spring in a swap and I loved it so much. I saved it since I knew it was the perfect project for the day. I simply put my own spin on it.

It wasn’t hard to choose the paper I wanted to use. The Magnolia Lane Designer Series Paper is so striking and you’ve got a ton of pattern choices in the package. Here is what the album looks like opened.

I’m looking forward to filling it with some photos!

Here is the gang working on theirs

Want to see how I made this album? The Team enjoyed making them so much I thought you would too!

Amazing Magnolia Lane Folding Album Video Tutorial

Oh, I almost forgot the tag or chip board is simply the extra piece in our Specialty Designer Series Paper packs – How great is that? You can up cycle it!

So what do you think? Want to make one for yourself? I think they make great gifts and of course you could stamp on the inside diamonds if you prefer rather than use it as an photo album. I think there are endless ways to use this amazing album!

Here is a printable version with the complete supply list I used.

Amazing Magnolia Lane Folding Album Tutorial PDF

I am so humbled to have such a fantastic Team, they truly inspire me to want to be the best leader I can be.

Stop back by next week when I’ll be sharing some of the projects they made

Supplies:

Paper: Magnolia Lane Designer Series Paper (149484), Petal Pink 5/8″ Organdy Striped Ribbon (149985), and Whisper White Card stock (100730)

Accessories: Petal Pink 5/8″ Organdy Striped Ribbon (149441)

Adhesives: Snail (104332/104331), Tear & Tape (138995), and Multipurpose Liquid Adhesive (110755)

Click here to order your Stampin’ Up! Products online 24/7! (US only)

Shop at my Online Store and use Host Code H62N9P3Z

Click Here to learn more about using the Hostess Code If you order Online make sure your profile information is up to date and you’ve allowed me to contact you (If you chose no contact in the past you’ll need to call 1-800-Stamp Up to have them change your profile for you.)

Country Home Kit Kat Holder

This past weekend was my team Peak Princess event and so I wanted to make something special for my team members that earned this special event during the first quarter. Naturally the Country Home stamp set came to mind with it’s lovely sentiments and images. The fact that I could use the fun new Snowfall Accents Puff Paint on the cotton pods from the Holiday Catalog was an added bonus and a ton of fun!

Check out these elegantly wrapped treats

And since this holder fits a full size Kit Kat Bar there is plenty to share if you want too!

They are simple to make, use a sheet of card stock and I really like how the back opens to show your sentiment.

See how I made it and the magic of the Snowfall Accents Puff Paint here in my video tutorial.

COUNTRY HOME KIT KAT HOLDER VIDEO TUTORIAL

And here’s the a complete supply list and printable tutorial for you too. Speaking of which do you find these PDFs helpful? Do you like the PDFs? Why not leave me a comment and let me know.

Country Home Kit Kat Holder Tutorial PDF

Enjoy!

Supplies:

Stamp Set: Country Home (147678)

Inks: Memento Tuxedo Black Ink Pad (132708/133456), Pretty Peacock (149560), Cajun Craze (147931), Old Olive (144597), and Mint Macaron Stampin’ Blends Combo Pack (147283), and the Color Lifter (144608)

Paper: Pretty Peacock (150880), Mint Macaron (138337), and Whisper White Card stock (100730)

Accessories: 3/8″ Scalloped Lace Trim (149593), Stitched Shapes Dies (145372), Snowfall Accents Puff Paint (150691), Stylish Scroll Embossing Folder (150665) and Heat Tool (129053)

Click here to order your Stampin’ Up! Products online 24/7! (US only)

Shop at my Online Store and use Host Code H62N9P3Z

Click Here to learn more about using the Hostess Code If you order Online make sure your profile information is up to date and you’ve allowed me to contact you (If you chose no contact in the past you’ll need to call 1-800-Stamp Up to have them change your profile for you.)

Gather Together Mini Shipping Treat Box

Today’s treat box was created special for my Holiday Catalog Kick Off last Saturday and it will filled with some chocolate goodies. I had a lot of fun making them for my guests.

Any how here is the treat – a made with one of our Mini Shipping Boxes, so it will hold quite a bit.

Clearly I had a thing for caramel when I was shopping since when I started filling the boxes I realized I’d picked up 4 different kinds. Or maybe it was because I was looking at the color coordinating packaging! LOL! Do you ever do that?

I really love how these treat boxes turned out and I can’t wait to share the fun technique for creating these wonderful little leaves and stamping on the wood element pieces that I used to decorate the box. No inky fingers! Ahh….. the magic of stamping.

Why not check out my video tutorial? Not only will you see just how easy these treats were to make but I’ll share a couple of tips and tricks with you too.

Gather Together Mini Shipping Box Video Tutorial

So what do you think? If you’d like to make some fall treats like this I’ve got a PDF with step by step instructions that goes with my video and it contains the complete supply list for you too.

Gather Together Mini Shipping Box Tutorial PDF

Enjoy! And then stop back by tomorrow when I’ll be sharing one of the cards we made, along with tutorials too!

Supplies:

Stamp Set: Gather Together (*150589)

Inks: Soft Suede (147115/115663) and Pretty Peacock Classic Ink (150083/150090)

Paper: Mini Shipping Boxes (149492), Come to Gather Designer Series Paper (150454), Cajun Craze (119684), and Crumb Cake Card stock (120953)

Accessories: Gathered leaves Dies (*150662), Come to Gather Ribbon Combo Pack (150456), and Tags & Feathers Elements (150455)

*Gather Together Bundle (153036)

**Suite of Products Bundle (153484)

Click here to order your Stampin’ Up! Products online 24/7! (US only)

Shop at my Online Store and use Host Code EFXCZ934

Click Here to learn more about using the Hostess Code If you order Online make sure your profile information is up to date and you’ve allowed me to contact you (If you chose no contact in the past you’ll need to call 1-800-Stamp Up to have them change your profile for you.)

Wonderfully Wicked

It’s Friday the 13th and so I couldn’t resist sharing some more Halloween cards with you today using the Wonderfully Wicked Bundle from the Holiday Catalog. This bundle includes some simple images that will assure you can create some great projects so that you can have a wonderfully wicked time this year with your family and friends. LOL!

Here are some projects using this set for you today – This first card uses a simple technique of turning down the corner of the card front allowing you a peek of what is inside.

And how about a little sparkle? This die was cut out using our Red Glimmer Paper (150427).

And of course here are some treat items, since what’s Halloween without some treats?

Our Coffin Treat boxes (150451) and Mini Pizza Boxes (144645) and Kraft Pillow Boxes (147018) make this little treats a snap!

And did you know that you can add color to our boxes with a Sponge Brayers (141714) or Stampin’ Spritzers (126185)? It’s quick and easy to do!

So what do you think? Ready for that full moon tonight?

Stop back by tomorrow when I’ll be sharing a Tutorial with you for my September Thank You card.

Supplies:

Stamp Set: Wonderfully Wicked (*150547)

Paper: Monster Bash Designer Series Paper (150447)

Accessories: Wicked Dies (150725) and Black Stampin’ Dimensionals Combo Pack (150893)

*Wonderfully Wicked Bundle (153041)

Click here to order your Stampin’ Up! Products online 24/7! (US only)

Shop at my Online Store and use Host Code EFXCZ934

Shoe Box Fun at the Team Weekend Getaway

I mentioned last Friday that I was getting ready for my team retreat – we gather 3 times a year for weekends of stamping, laughter, food and fun. I really look forward to these gatherings of uninterrupted crating time with my peeps. They are the best and while it is like a big slumber party we also get to get to use our Holiday PreOrder goodies to create. What could be better?

A shoe box swap of course! While it was a small gathering this time due to schedules we still had a wonderful time at our shoe box swap. It is always good fun and I love seeing what everyone is creating. Here are some of the projects.

This first card is for Halloween and uses the Apple Builder Punch (150663) and the coordinating Harvest Hello stamp set (150581).

This set is great for quick and easy card since it has a coordinating punch – and a super set for teachers and back to school projects since its got some wonderful sentiments too.

And here is a card that uses a bundle (153006) that is sure to be popular.

The Christmas Gleaming Suite is filled with wonderful products, and the Brightly Gleaming Designer Series paper (150429) includes Copper Foiling that is quite striking. We used the new Copper Delicata Metallic Ink for this project (150707/150708) and can you see the subtle shimmer of the Shimmy Crystal Effects (150892) that we used for the berries? So excited to have these new option for our crafting!

We also made this fun easel sticky note holder using the Pressed Petals Designer Series Paper (149500).

And finally here is my card that I created using the Toile Christmas Bundle (152367) from the Toile Tidings Suite of products.

I just fell in love with this Distinktive stamp set as soon as I saw it – the cardinal is always a favorite of mine. I’ll be working up a tutorial for you and hope to share it in the next week or two as we get closer to the Holiday Catalog launch on September 4th.

And of course, what is a team event with out some door prizes?

Goodies from the Holiday Catalog catalog – winners got to choose their favorite accessories.

Would you like a 2019 Holiday Catalog? You can pick one up during my August Classes or contact me and I’ll be happy to mail you one.

And of course how about a special event where you can pick up your copy of the catalog AND use some of these fun items too! Why not join me and play with some of the new products?

Saturday, September 14th at 1 pm – 3:30

Class Fee $10; or free with a minimum order

Click HERE to see my Calendar of Events and RSVP

If your Online order is $150 or more make sure not to use the host code so that you can take advantage of the Host Benefits yourself – No worries, I’ll still send you your free gift.

Click Here to learn more about using the Hostess Code If you order Online make sure your profile information is up to date and you’ve allowed me to contact you (If you chose no contact in the past you’ll need to call 1-800-Stamp Up to have them change your profile for you.)

The Holiday Catalog is right around the corner and I won’t be able to mail you one if you have chosen no contact.

Sign up for my FREE Newsletter My Newsletters include stamping tips, tutorials, ideas and Classes!