Forever Lovely Valentine Treat

I made today’s project as a little goodie for my team members and put one at everyone’s tables for the Winter Retreat this past weekend. I couldn’t resist these yummy little Creme Filled Wafer Rolls when I saw them and was hoping they were individual wrapped. However, that turned out not to be the case so our 2×8″ Cello Bags to the rescue!
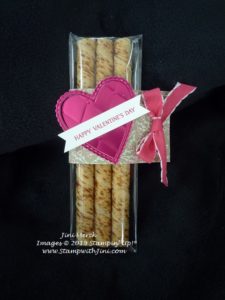
I simply slipped 3 of the little sticks inside and sealed then decorated. I really like how they came together and think they turned out quite elegant with the Lovely Lipstick Foil Sheets. The little heart looks just like a chocolate box since I used the Tufted Embossing Folder. What do you think?

I’ve put a video together for you in case you’d like to make some of these treats too

Forever Lovely Valentine Treat Video Tutorial

And of course, I’ve got a complete supply list below for you along with a PDF tutorial too.

Forever Lovely Valentine Treat PDF

Enjoy!

Supplies:

Stamp Set: Forever Lovely (*148624)

Inks: Lovely Lipstick Classic Ink (147140)

Paper: Grapefruit Grove and Lovely Lipstick Foil Sheets (Sale-a-bration 149712), All My Love Designer Series Paper (148576), and Whisper White Card stock (100730)

Accessories: 2×8″ Cello Bags (141703), Be Mime Stitched Framelits Dies (148527), All My Love Ribbon Combo Pack (148584), Triple Banner Punch (138292) and Tufted Dynamic Embossing Folder (146335)

*Forever Lovely Bundle (150580)

Click here to order your Stampin’ Up! Products online 24/7! (US only)

Shop at my Online Store and use Host Code FFCVWYHC

Click Here to learn more about using the Hostess Code If you order Online make sure your profile information is up to date and you’ve allowed me to contact you (If you chose no contact in the past you’ll need to call 1-800-Stamp Up to have them change your profile for you.)

Sign up HERE for my FREE Newsletter or Get my Blog Posts delivered right to your inbox HERE
How Do You Get a 2019 Occasions Catalog?

Don’t have a Demonstrator? Email me at [email protected] include your name, address, and phone number and I’ll be happy to mail you one.

Sign up HERE for my FREE Newsletter or Get my Blog Posts delivered right to your inbox HERE

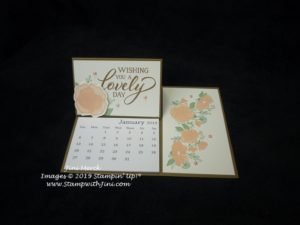
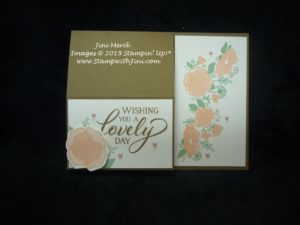
Forever Lovely Calendar Card

I created today’s projects for my January Thank You Cards. They are a bit different from what I usually do since they contain a little calendar but I really like the way they turned out and hope everyone who receives them will enjoy them.


They are so easy to make and even better they fold flat for mailing.

Want to learn how I made them? I’ve filmed a Tutorial for you today and also typed up a PDF to go along with it so you can make some too if you would like.

FOREVER LOVELY CALENDAR CARD VIDEO TUTORIAL

January Thank You Forever Lovely Calendar Card Tutorial PDF

Enjoy!

Supplies:

Stamp Set: Forever Lovely (*141624)

Inks: Petal Pink (147108), Mint Macaron (147106), and Soft Suede Classic Ink (147115)

Paper: Soft Suede (115318) and Whisper White Card stock (100730)

Accessories: Lovely Flower Edgelits Dies (148526), Share What You Love Artisan Pearls (146927), Stampin’ Trimmer (126889), and Stamparatus (146276)

*Forever Lovely Bundle (150580)

Click here to order your Stampin’ Up! Products online 24/7! (US only)

Shop at my Online Store and use Host Code FFCVWYHC

Click Here to learn more about using the Hostess Code If you order Online make sure your profile information is up to date and you’ve allowed me to contact you (If you chose no contact in the past you’ll need to call 1-800-Stamp Up to have them change your profile for you.)

Sign up for my FREE Newsletter My Newsletters include stamping tips, tutorials, ideas and Classes!

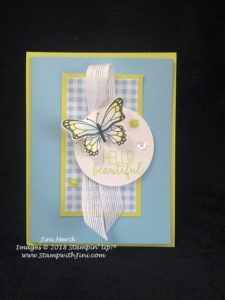
Butterfly Gala Card Tutorial

The Occasions Catalog goes Live on January 3rd! So there are just a few more days before you can get the wonderful new products. Hopefully, you’ve received your catalogs in the mail from me already so you already have it in hand. This week I’ll be sharing some tutorials for projects I’ve made, including OnStage projects. I think you’ll enjoy them – so come back by and check them out.

Today’s card is one that I shared with you from my Team OnStage Event (you can see it here). So as promised I’m going to share how I made this card.

This set is a beautiful set that contains not only beautiful butterfly images but lovely sentiments using a pretty font. I couldn’t resist when I saw it in the 2019 Occasions Catalog and since it’s part of a Suite of products there are tons of choices for coordinating products. I think you’re going to LOVE it as much as I do!

So what do you think want to make one too? I’ve got a PDF Tutorial and Video for you too. Why not check them out?

Butterfly Gala Card Video Tutorial:

And here is the printable tutorial for you too!

Butterfly Gala Card Tutorial printable PDF

I’ve included the complete supply list for you below. You’ll be able to order these products starting January 3rd. (And of course if you prefer you can email me your order now and I’ll be happy to place it for you when the catalog goes live.)

Want to see all the wonderful 2019 Occasions Catalog & Sale-a-bration products? Why not come to my Occasions Catalog Kick Off event? There is still time to RSVP and hold your spot! But hurry since I need your RSVP by the end of the day January 2nd to hold your spot and have things cut and ready for you.

Click HERE to see my Calendar of Events and RSVP today

Save your spot – RSVP by Wednesday, January 2nd

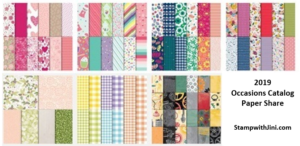
Get Your Designer Series Paper Share – Preorder ends January 2nd!

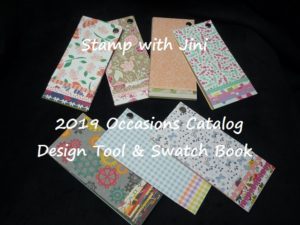
Design Tool & DSP Swatch Book now Available – Preorder ends January 2nd!

Click HERE for more information and learn how to get yours!

LAST 48 HOURS FOR THE HOLIDAY CATALOG – YIKES!

And of course a new Catalog means that the 2018 Holiday Catalog will be ending on January 2nd – so if you have a shopping list your have checked off you’ll want to get your favorites before 11:50 (MT) Wednesday, January 2nd before they’re gone!

Supplies:

Stamp Set: Butterfly Gala (*148580)

Inks: Memento Tuxedo Black Ink Pad (132708), Lemon Lime Twist (147145) and Balmy Blue Classic Ink (147105)

Paper: Gingham Gala Designer Series Paper (148554), Lemon Lime Twist (144245), Balmy Blue (146982), Vellum (101856), and Whisper White Card stock (100730)

Accessories: Butterfly Duet Punch (*148523), Gingham Gala Adhesive Baked Sequins (148561), 5/8″ Whisper White Flax Ribbon (148764), 2 1/4″ Circle Punch (143720), Pearls (144219), and Sponge Daubers (133773)

*Butterfly Gala Bundle (150599)

Shop at my Online Store and use Host Code QZTFAJ7Q

Click Here to learn more about using the Hostess Code If you order Online make sure your profile information is up to date and you’ve allowed me to contact you (If you chose no contact in the past you’ll need to call 1-800-Stamp Up to have them change your profile for you.)

Sign up for my FREE Newsletter My Newsletters include stamping tips, tutorials, ideas and Classes!

Get your Paper Pumpkin Kit for January! Subscribe today!

Healing Hugs Triple Stamping Tutorial

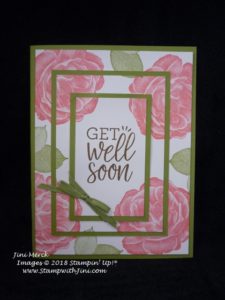
Today’s card uses the Healing Hugs stamp set that I shared with you in yesterday’s post. I really love this set with its realistic images – it stamps beautifully and makes get well cards sooo simple to create.

Today’s card is another card I designed for Sherrie’s Shoe box Swap at OnStage Live in Orlando. It uses a simple technique that packs a wow effect. And everyone will wonder how you did it!

Check out this quick video showing you how I made this card.

HEALING HUGS TRIPLE STAMPING VIDEO TUTORIAL

And of course what tutorial would be complete with out a PDF for you too?

HEALING HUGS TRIPLE STAMPING CARD TUTORIAL (printable) PDF

Wheew! It’s a crazy week and I’m learning so much – I can’t wait to share it with you!

Enjoy!

Supplies: 

Stamp Set: Healing Hugs (146527/146530)

Inks: Flirty Flamingo (147052), Old Olive (147090), and Soft Suede Classic Ink (147115)

Paper: Old Olive (146970) and Whisper White Card stock (100730)

Accessories: Old Olive 1/8″ Sheer Ribbon (144171)

Click here to order your Stampin’ Up! Products online 24/7! (US only)

Shop at my Online Store and use Host Code SGA3ZW9U


Click Here to learn more about using the Hostess Code If you order Online make sure your profile information is up to date and you’ve allowed me to contact you

Healing Hugs Get Well Card

Count down to OnStage Live I’m so excited – I’m getting ready to celebrate 30 years of Stampin’ Up! with my fellow demonstrators. I’ll have all kinds of wonderful project and goodies to share with you when I return!!! Meanwhile I’ve got some great posts lined up already sharing some of the projects I’ve made for this event that I hope you’ll enjoy.

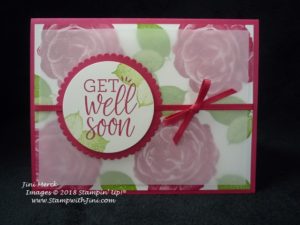
Later today I’ll participating in Sherrie’s Shoe box Swap, an event that is all kinds of fun. I’m looking forward to seeing and stamping with some old friends while I’m there too. Any so today I thought I’d show you the card that I’ve designed as my project.

I really love the way this card turned out and think it will brighten the day of the recipient. I’m hoping everyone at the shoe box will feel the same way. How about you, what do you think?

I’ve got a quick video tutorial for you and a PDF also, so why not check them both out?

Healing Hugs Get Well Card Video Tutorial

Here is the PDF with all the measurements so you can make some too!

Healing Hugs Get Well Card (printable) PDF

Enjoy!

Stop back by tomorrow when I’ll be sharing another card that I made with this set .

Supplies: 

Stamp Set: Healing Hugs (146527/146530)

Inks: Lovely Lipstick (147140) and Granny Apple Green Classic Ink (147095)

Paper: Vellum  (101856), Lovely Lipstick (146970), and Whisper White Card stock (100730)

Accessories: Lovely Lipstick 1/8″ Grosgrain Ribbon (146952), Layering Circles Framelits Dies (141705)

Click here to order your Stampin’ Up! Products online 24/7! (US only)

Shop at my Online Store and use Host Code SGA3ZW9U


Click Here to learn more about using the Hostess Code If you order Online make sure your profile information is up to date and you’ve allowed me to contact you

Falling for Leaves Thank You Card Tutorial

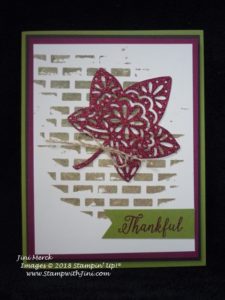
It’s Monday and I’ve got a week filled with tutorials for you! Today’s card is a Thank You card that I make to send out to those of you who place an order – and today’s card is the one I designed for November’s orders using a  technique with our Embossing Paste.

I just fell in love with the Joyous Noel Glimmer Paper when I saw it so I thought I’d use the beautiful Merry Merlot Glimmer Paper for this month’s project. I teamed it up with some of our Shimmer Paste and our brick mask.

But since I wanted to add a bit more color I tinted the Shimmer Paste Crumb Cake. Check out this quick Video Tutorial showing you just how simple that is to do! And that means we have unlimited colors to choose from. Who doesn’t like that?

How to Create Tinted Shimmer Paste Video Tutorial

Want to see how I made this card? I’ve whipped up a quick video for you

Falling for Leaves Thank You Card Video Tutorial

And of course, for those of us who like documents here is a PDF too.

Falling For Leaves November Thank You Card (printable) PDF

Enjoy!

Here is an update about the Holiday Catalog:

Stampin’ Up! made an announcement on Saturday, November 3rd stating the following.

Since these products cannot be sent from the manufacturer in time for the holidays, these item numbers will not be reactivated.

147816: Joyous Noel Specialty Designer Series Paper
147890: Festive Farmhouse Elements
147811: Santa’s Workshop Enamel Elements

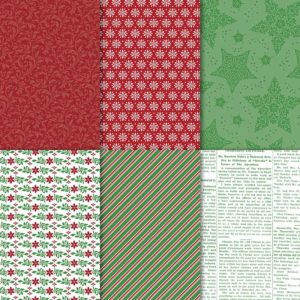
We apologize for any inconvenience this may cause you. In order to provide you with another holiday-themed option, we’ve decided to make our promotional Dashing Along Designer Series Paper (item 149903) available for sale at ($11.00). This beautiful, 12″ x 12″ traditional Christmas paper has a festive, eclectic feel and is perfect for layering. Coordinating colors are Cherry Cobbler, Garden Green, and Whisper White.

Though we don’t yet have a fulfillment date, all backorders for Joyous Noel Specialty Designer Series Paper, Festive Farmhouse Elements, and Santa’s Workshop Enamel Elements will be filled as soon as possible.


And here is a quick reminder – There are just a few days left to get your November Pamper Pumpkin Kit! If this month’s kit is as popular as last years kit you’ll definitely want one!

Supplies: 

Stamp Set: Falling for Leaves (*147680)

Inks: Merry Merlot Classic Ink (147112) and Crumb Cake Classic Ink Refill (121209)

Paper: Joyous Noel Glimmer Paper (147817), Old Olive (100531), Early Espresso (119686), Merry Merlot (146979) and Very Vanilla Card stock (101650)

Accessories: Detailed Leaves Thinlits Dies (*147921), Triple Banner Punch (138292), Pattern Party Decorative Masks (144103), Palette Knives (142808), Shimmery White Embossing Paste (145645), and  Silicone Craft Sheet (127853)

*Falling for leaves Bundle (147921)


Click here to order your Stampin’ Up! Products online 24/7! (US only)

Shop at my Online Store and use Host Code SGA3ZW9U


Click Here to learn more about using the Hostess Code If you order Online make sure your profile information is up to date and you’ve allowed me to contact you

#imbringingbirthdaysback with the Rooted in Nature Stamp Set

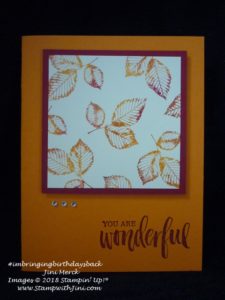
Today’s card is the one I designed for my November Birthday cards that I’ll be sending out today. This birthday card uses a fun technique that is one of my favorites to create fall colored leaves. It is called the Baby Wipe Technique.

This card layout is also one of my favorites since it is clean and simple but still packs a wow. And with the Baby Wipe Technique everyone will wonder how you created leaves with fall color too.

I’ve whipped up a quick tutorial so you can recreate the Baby Wipe Technique for your projects!

Baby Wipe Technique Video Tutorial

And if you want to make some of these cards here is my video showing you how the card is put together too.

Rooted in Nature Card Video Tutorial

Prefer a document? Here is a PDF containing all the measurements and step by step directions for putting your card together.

Rooted in Nature Birthday Card Tutorial (printable) PDF

I’ve got lots of tutorials coming up for you next week so make sure to stop on by and check them out.

Enjoy!

#imbringingbirthdaysback in 2019

And if you would like a birthday card too – I’m compiling my list now for 2019! So why not email me your name, address, and date of birth? No need for the year since we’re all 29!!!

Supplies: 

Stamp Set: Rooted in Nature (*146479/146482)

Inks: Cherry Cobbler Classic Ink & Reinker (147083/119788), Cajun Craze (119790) and Pumpkin Pie Classic Reinkers (105229)

Paper: Pumpkin Pie (105117), Cherry Cobbler (119685)  and Very Vanilla Card stock (101650)

Accessories: Clear Rhinestone Basic Jewels (144220)

Click here to order your Stampin’ Up! Products online 24/7! (US only)

Shop at my Online Store and use Host Code SGA3ZW9U


Click Here to learn more about using the Hostess Code If you order Online make sure your profile information is up to date and you’ve allowed me to contact you

Lemon Zest Treat Holders

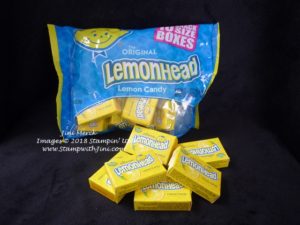
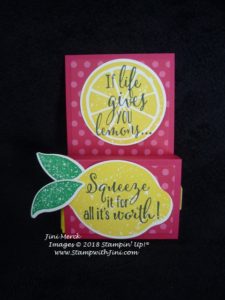
I love lemon and so needless to say I find using the Lemon Zest Stamp Set a lot of fun to use. As I was wondering around my local Dollar Tree a couple of weeks ago I found this package of individual Lemonhead Candies, one of my favorites so I couldn’t resist picking up a couple of bags to use as treats.

This treat holder is quick and easy to make and folds flat when you don’t have the box inside so it’s great for travel too.

So not only did I create these for my October Card Class as a little treat, but they’ll be headed to Orlando with me next week as a swap during our OnStage Live event too.

Want to make some too? Here is a quick video tutorial for you.

Lemon Zest Treat Holder Tutorial

And of course I did a PDF for you too!

Lemon Zest Treat Holder (printable) PDF

Enjoy!


Supplies: 

Stamp Set: Lemon Zest (143805/143808)

Inks: Pineapple Punch (147141), Call Me Clover Classic Ink (147139), and Memento Tuxedo Black Ink (132708)

Paper: 2018 In Color Designer Series Paper Stack (146963), Lovely Lipstick (146970), and Whisper White Card stock (100730)

Accessories: Lemon Builder Punch (143712), 1 3/4″ Circle Punch (119850), Simply Scored Scoring Tool (122334) and Bone Folder (102300)


Click here to order your Stampin’ Up! Products online 24/7! (US only)

Shop at my Online Store and use Host Code SGA3ZW9U


Click Here to learn more about using the Hostess Code If you order Online make sure your profile information is up to date and you’ve allowed me to contact you


Trick or Tweet Treat Tents

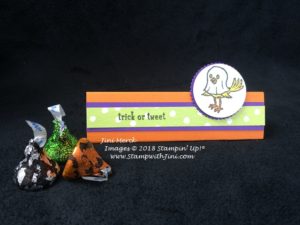
Today’s treat holder is a quick and easy one that you can make last minute for your holiday treat giving and it holds what else, chocolate! So it will be a hit with your chocolate lovers.

This treat was made using the fun little animal image from the Trick or Tweet stamp set – my favorite for making all those fun Halloween treats! And perfect for these Halloween wrapped chocolate Kisses I found this fall.

Check out this video tutorial so you can make some too.

Trick or Tweet Treat Tent Video Tutorial

And of course I’ve whipped up a PDF with a complete supply list for you too!

Trick or Tweet Treat Tent Tutorial PDF


Enjoy! And then stop back by tomorrow when I’ll be sharing some birthday inspired cards with you.

Supplies: 

Stamp Set: Trick or Tweets (147725/147722)

Inks: Memento Tuxedo Black Ink Pad (132708)

Paper: Toil & Trouble Designer Series Paper (147531), Pumpkin Pie (105117),https://www.stampinup.com/ecweb/product/105117/pumpkin-pie-8-1-2-x-11-cardstock?dbwsdemoid=2048121 Gorgeous Grape (146987), and Whisper White Card stock (100730)

Accessories:   Layering Circles Framelits Dies (141705), Simply Scored Scoring Tool (122334), and Assorted Stampin’ Blends

Click here to order your Stampin’ Up! Products online 24/7! (US only)

Shop at my Online Store and use Host Code W2NX46E9


Click Here to learn more about using the Hostess Code If you order Online make sure your profile information is up to date and you’ve allowed me to contact you

Falling for Leaves Treat Tent Video Tutorial

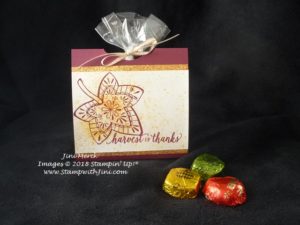
Today’s project that is a lot of fun to make since it includes a fast and easy technique that uses our Brusho Crystal Colors.

Shake and spritz and you’ve got a beautiful fall backdrop for your project! Got to love that and of course I can never resist using my Stampin’ Spritzers they are so much fun!

Want to see how their made so you can make some yourself? I’ve whipped up a quick video tutorial for you.

And how about a complete supply list with step by step directions too?

Falling for Leaves Treat Tent Video Tutorial PDF

Enjoy!


Supplies: 

Stamp Set: Falling for Leaves (*147680)

Inks: Merry Merlot Classic Ink (147112)

Paper: Joyous Noel 6×6 Glimmer Paper (147817), Merry Merlot (146979), and Shimmery White Card stock (101910)

Accessories: Brusho Crystal Colours (144101), Stampin’ Spritzers (126185), and Pretty Label Punch (143715)

*Falling for Leaves Bundle (147921)


Click here to order your Stampin’ Up! Products online 24/7! (US only)

Shop at my Online Store and use Host Code W2NX46E9


Click Here to learn more about using the Hostess Code If you order Online make sure your profile information is up to date and you’ve allowed me to contact you